Idleon has Constellations which in turn unlock points for dozens of Star Signs which give various buffs to your characters.
Each Star Sign can only be unlocked through hidden challenges, which is why it can be fairly tedious to find and unlock them all one by one.
Don’t fret, as collecting all the possible Constellations and unlocking Star Signs is going to be a breeze with this guide at your disposal.
We created beautiful maps and screenshots so you can find everything as easily as possible.
Infinite Star Signs
World 4 Rifts brought along new Infinite Star Sign bonuses, which are explained at the very end of the article.
World 6 and the 3rd Star Chart
The World 6 update brought along a completely new Star Chart and a bunch of new constellations to complete. Check it out here!


Unlocking and using Star Signs
Star Signs are unlocked in World 1, but you need to know where to look in order to use them in the first place.
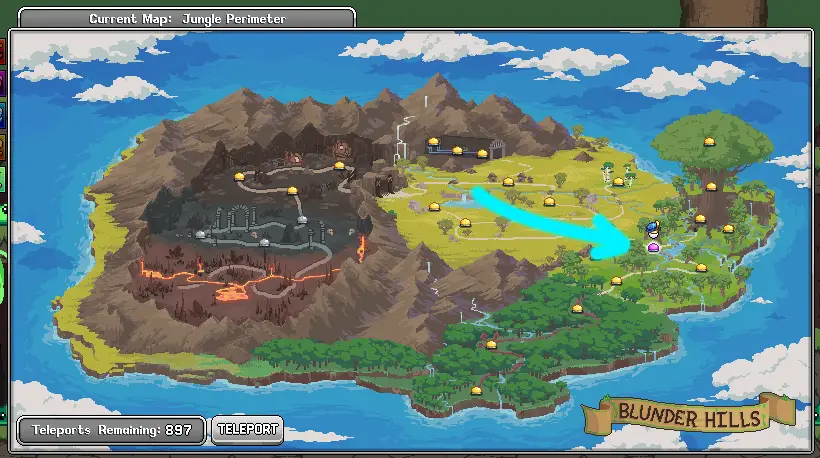
In order to activate Star Signs, you need to locate the Telescope, which can be found at the top of the tree in World 1. You can enter the tree by clicking on the dark door on the tree in the Jungle Perimeter map.
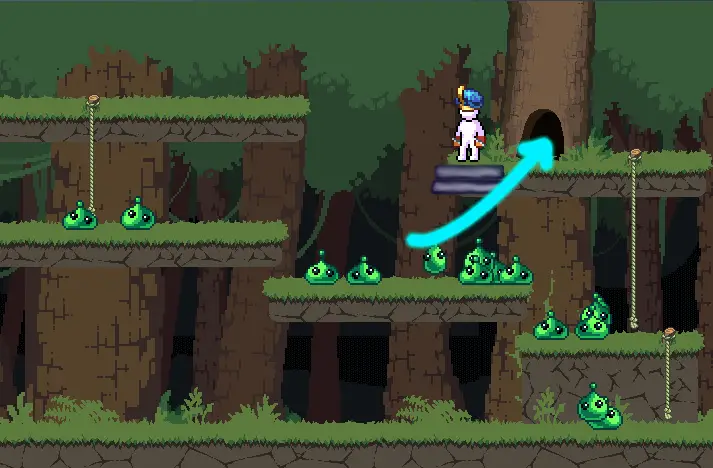
Once you reach the top of the tree by going through the Sticks and Nuttos, you will find a map with Wood Mushrooms and a Telescope.
Click on the Telescope to initiate a quest where you must click on the little Constellation at the bottom right corner of the map.

After that, you can start unlocking the rest of the constellations spread around the world of Idleon.
Remember!
In order to fully activate a completed constellation, you must click on the sign once more, after completing the requirements. It will then turn brighter than usual to tell you it is done.
Also remember that if a constellation requires AFK time, it has to be a single continuous time period, so you can’t use multiple Time Candies or AFK half of the time today and rest tomorrow.
A single 1 Hour Time Candy works even if the limit says 1+ Hours of AFK time.
All Constellations in World 1
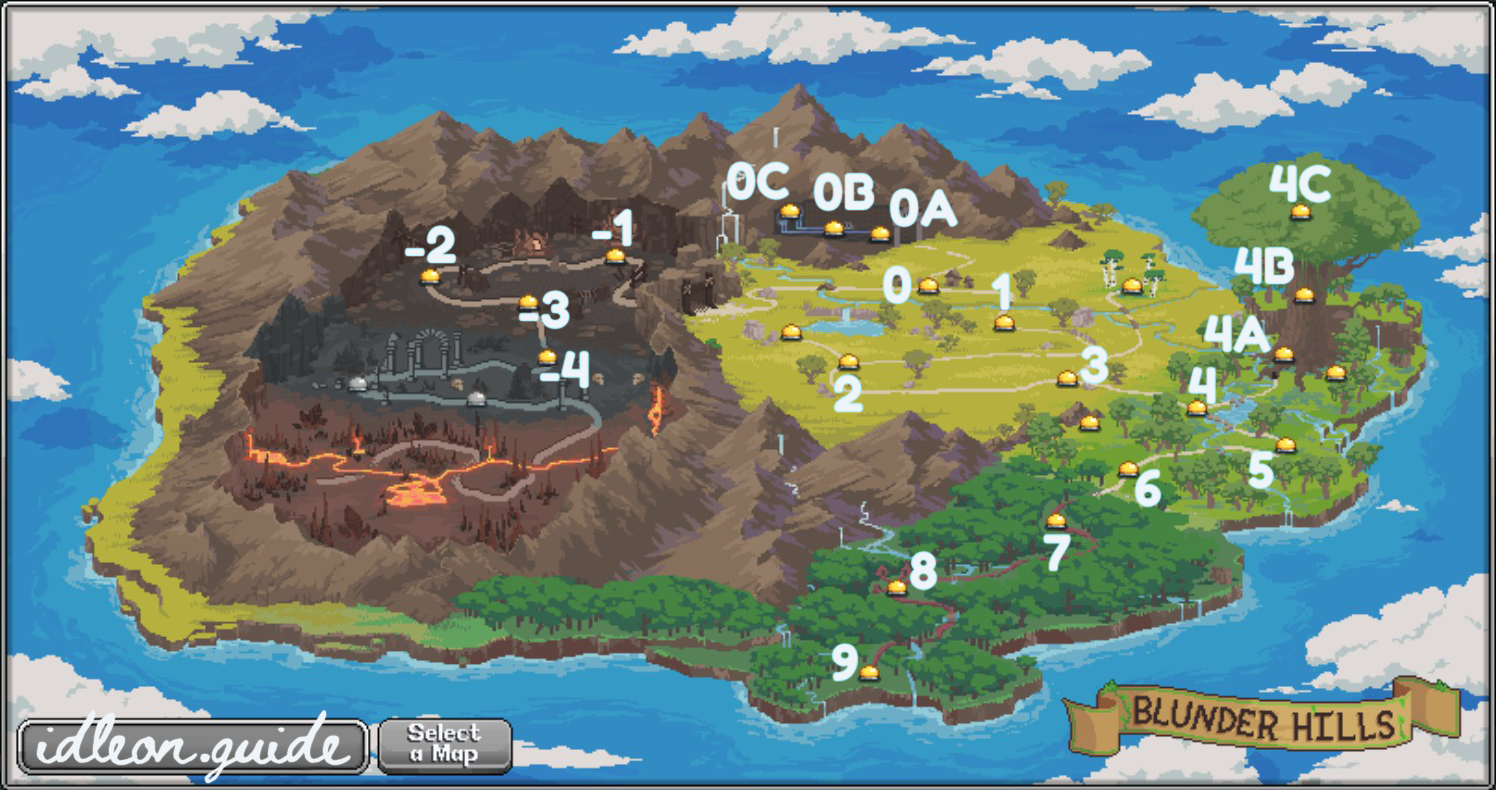
Starting off with the easy ones in World 1 aka Blunder Hills, there are 10 different Constellations of varying difficulty.
All of them are on different maps, yet not every map has one so we made a handy map with convenient map numbers which you can use to find the corresponding Constellation in the table below.
The table entries are ordered depending on the Map positions.
| Map | Map Name | Requirements | Location |
|---|---|---|---|
| 0 | Blunder Hills | Reach level 30 on 4 players | 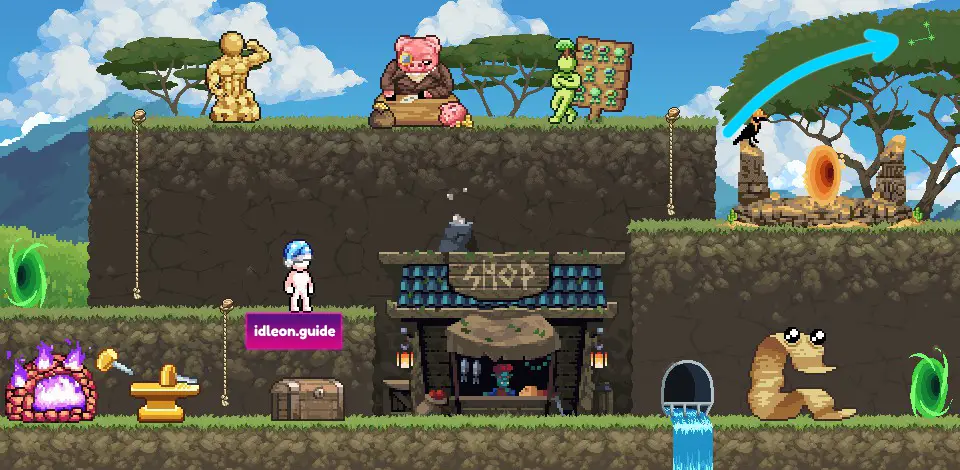 |
| 2 | Froggy Fields | Clear Dewdrop Colosseum on 3 players | 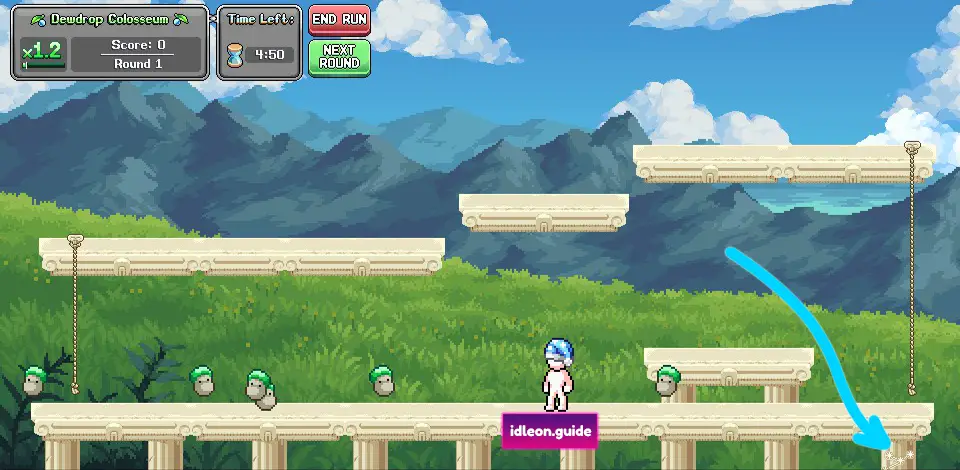 |
| 3 | Valley of the Beans | Reach this star on 4 players |  |
| 4C | Where the Branches End | AFK here for 1+ hours |  |
| 5 | Winding Willows | AFK here for 2+ hours on 2 players |  |
| 8 | Encroaching Forest Villas | Defeat Amarok in under 20 seconds on 3 players | 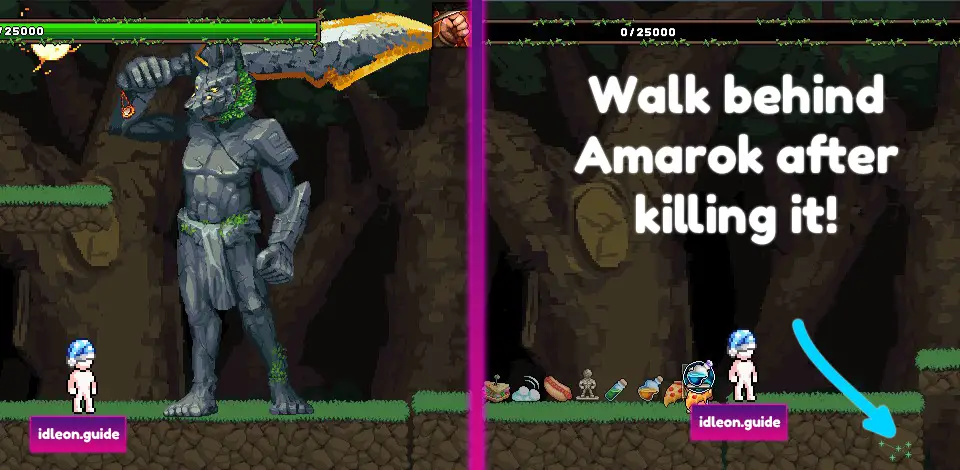 |
| 9 | Tucked Away | Reach this star on 3 players | 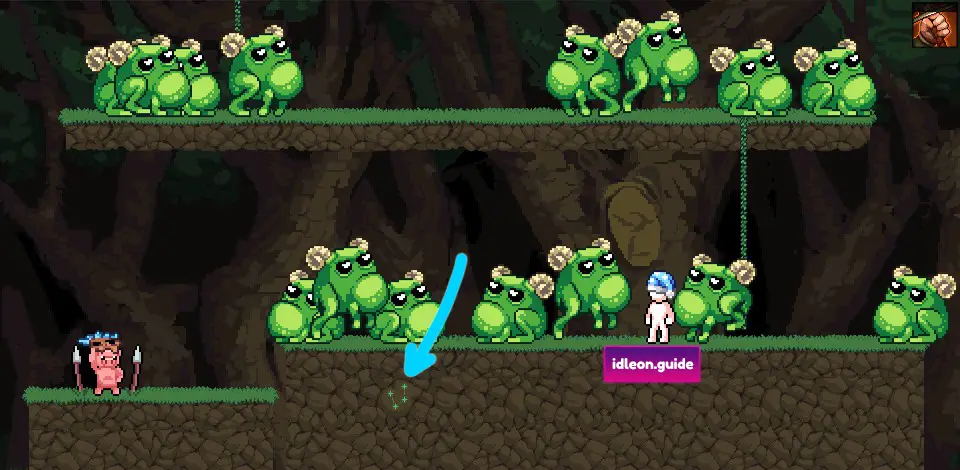 |
| 0C | The Office | Defeat Dr. Defecaus on 3 players | 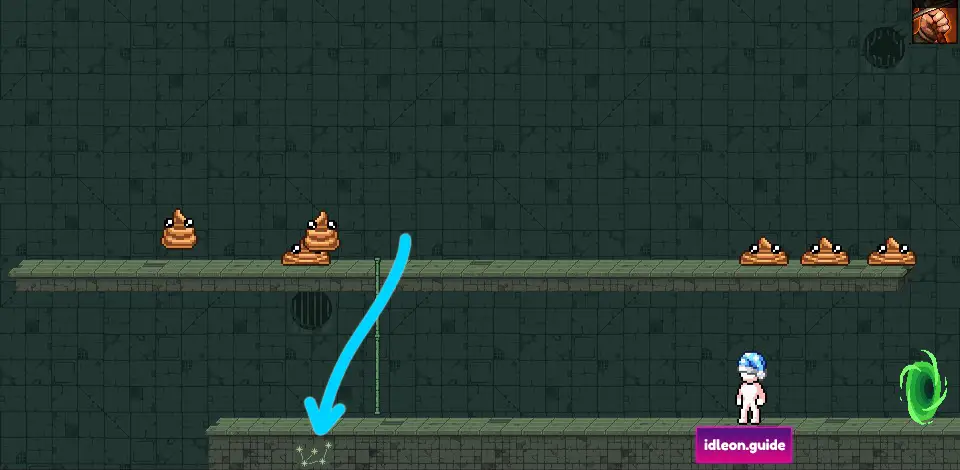 |
| -2 | Freefall Caverns | Reach this star with an Archer |  |
| -4 | Echoing Egress | Reach this star with a Mage (Requires Mining Level 40 on that Mage!) |  |
Most of the Blunder Hills constellations are simple and self explanatory, but some require further explanation.
The Colosseum constellation is technically not on the Froggy Fields map, but inside the Colosseum that you must enter from the top right corner of Froggy Fields.
The same goes for map 8, as you must enter the Amarok boss-fight from the Encroaching Forest Villas map in order to find the Star Sign behind the boss.
Finally, as mentioned in the beginning, maps 4C and 5 require AFK time, which means for Winding Willows you must sit there with a character for 24 straight hours for it to count (or use a single 24-hour Time Candy).
If you collect/redeem your AFK Gains from a character after 20 hours for example, you would need to start all over from 0 to get any progress to the constellation.
You can use any Time Candy for the 1 hour AFK Gain requirement.
Every Constellation in World 2
Moving on to World 2, Yum-Yum Desert, the constellations are still very easy but a few of them require multiple days of AFK-time on some characters, which will take time.
Again you can use the map below to match with the table, so you know where to go and what to do.

| Map | Map Name | Requirements | Location |
|---|---|---|---|
| 0 | YumYum Grotto | Reach level 65 on 4 players |  |
| 2 | The Mimic Hole | Reach this star on 3 players | 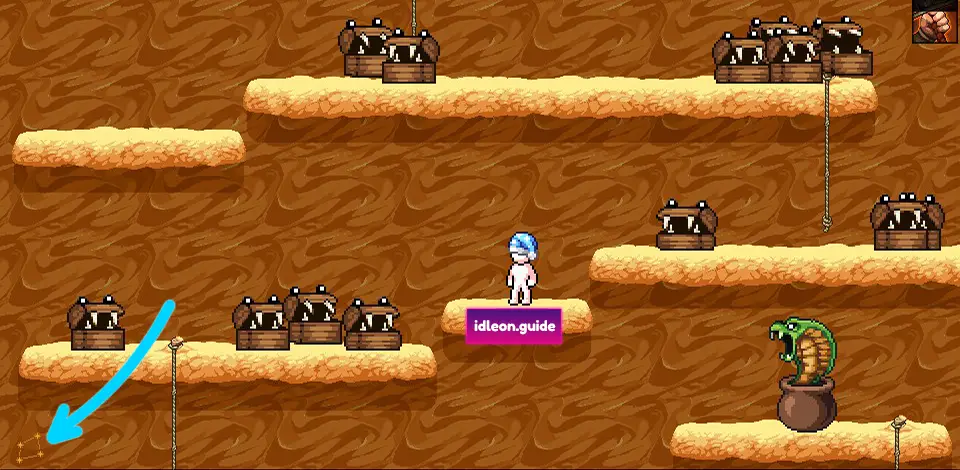 |
| 2 | The Mimic Hole (Sandstone Colosseum) | Clear the Sandstone Colosseum on 4 players |  |
| 4 | The Grandioso Canyon | AFK here for 4+ hours on 3 players |  |
| 7 | Slamabam Straightaway | Reach this star on 4 players | 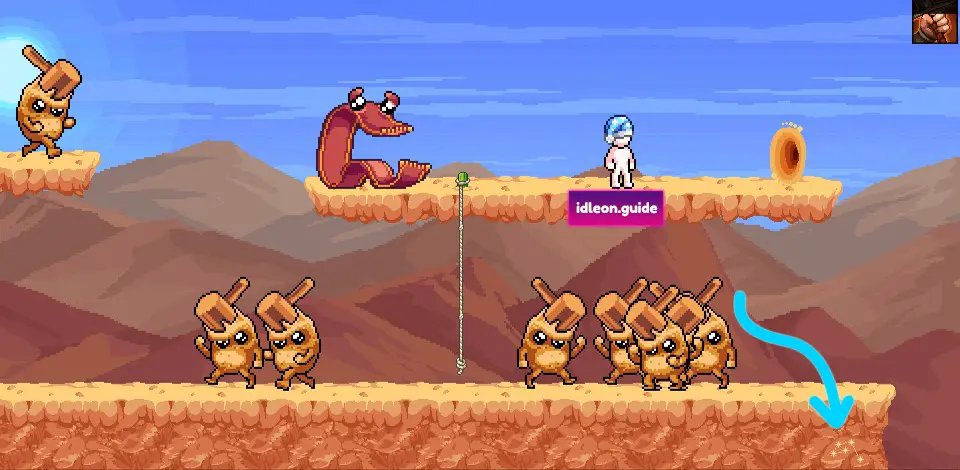 |
| 9 | Up Up Down Down | AFK here for 8+ hours on 3 players |  |
| 11 | Djonnuttown | Defeat Efaunt as any Beginner Class (Journeyman or Maestro works!) | 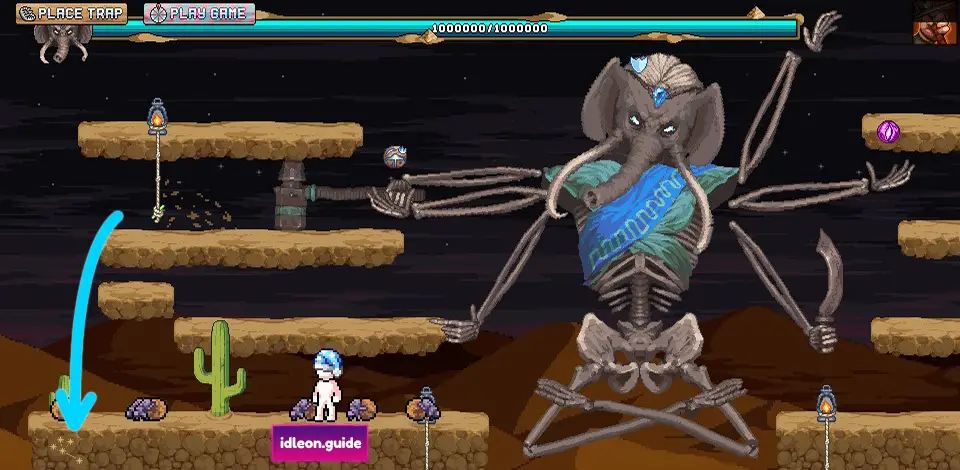 |
| -2 | Faraway Piers | Reach this star as any Mage Class (Requires Fishing Level 15 on that Mage!) | 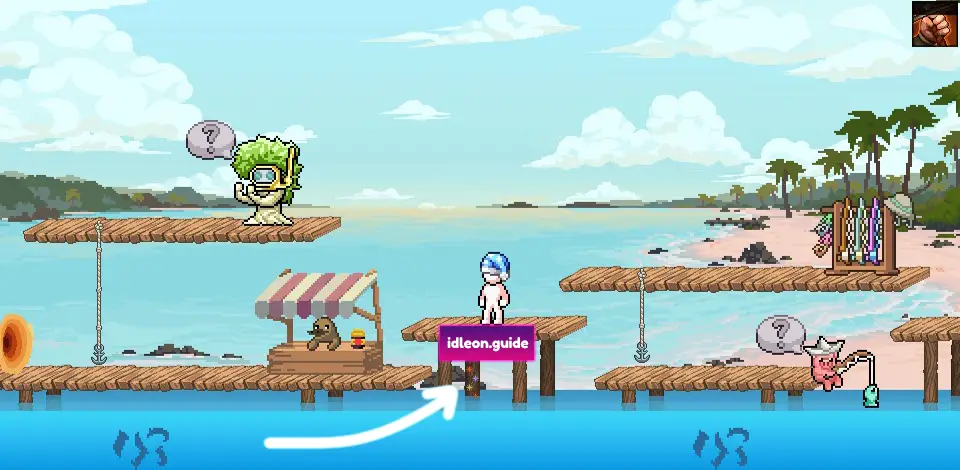 |
Nothing really confusing here either, except the Efaunt challenge, which obviously means you must enter the boss-fight from the Djonnuttown map, then beating the boss with a Beginner, Journeyman or Maestro character.
All Constellations in World 3
While there’s nothing special in the World 3 challenges either, but they do get more tedious as you must complete a lot of them with more characters than in previous worlds.
Remember that you can always come back later when reaching the kill requirements get easier when you are stronger, as there is no big benefit of grinding all the way to the Bloodbone map with 4 characters, other than completing the Star Sign.
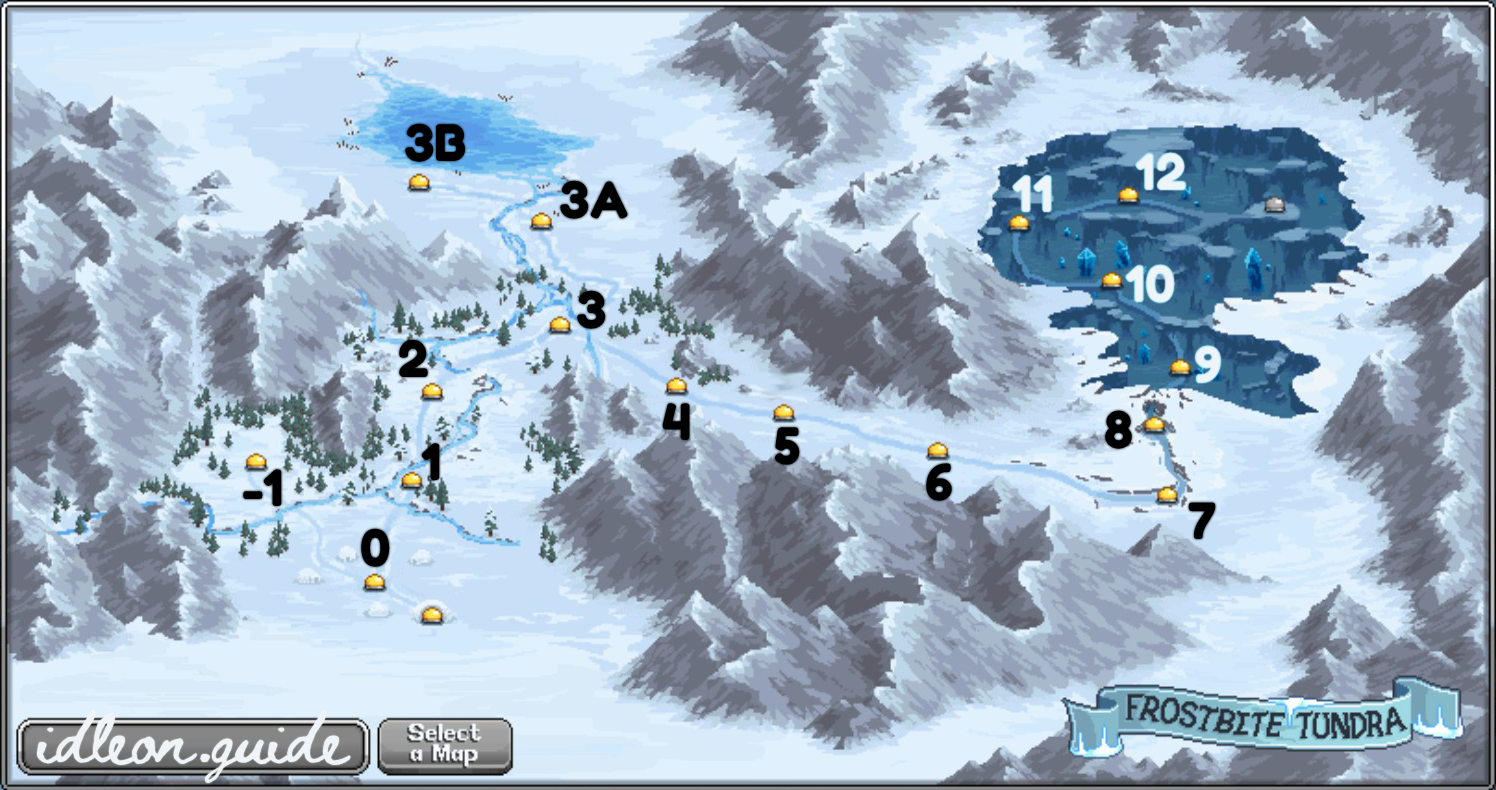
| Map | Map Name | Requirements | Location |
|---|---|---|---|
| -1 | Trappers Folley | Reach Trapping Level 15 with 5 players |  |
| 0 | Frostbite Towndra | Reach Lv 90 on 6 players | 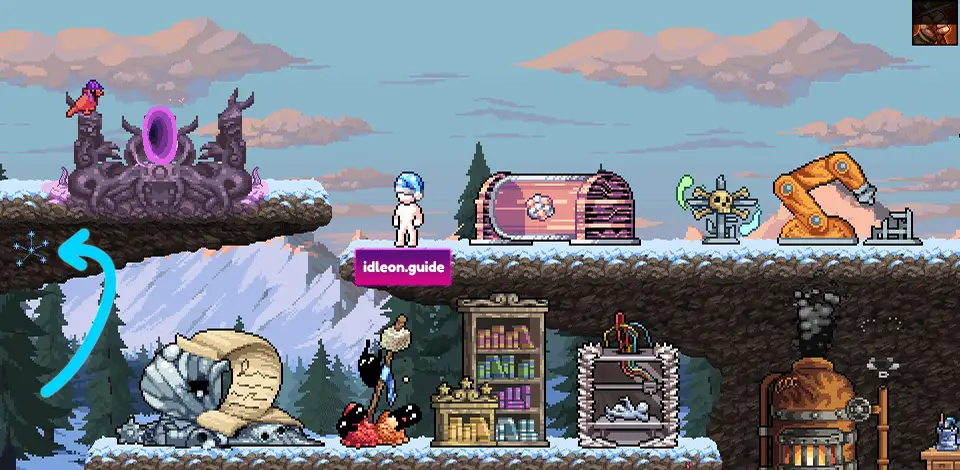 |
| 1 | Steep Sheep Ledge | Kill a Sheepie barehanded on 4 players | 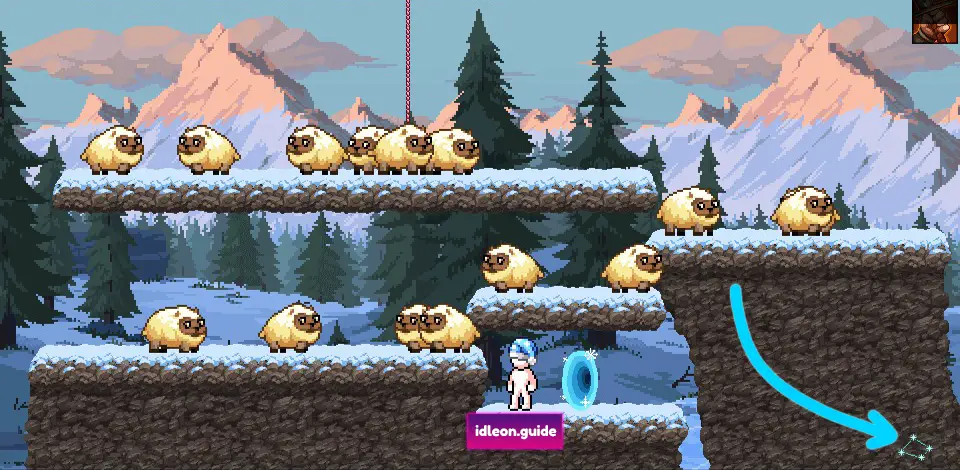 |
| 3B | Hell Hath Frozen Over | Kill a Bloodbone on 4 players | 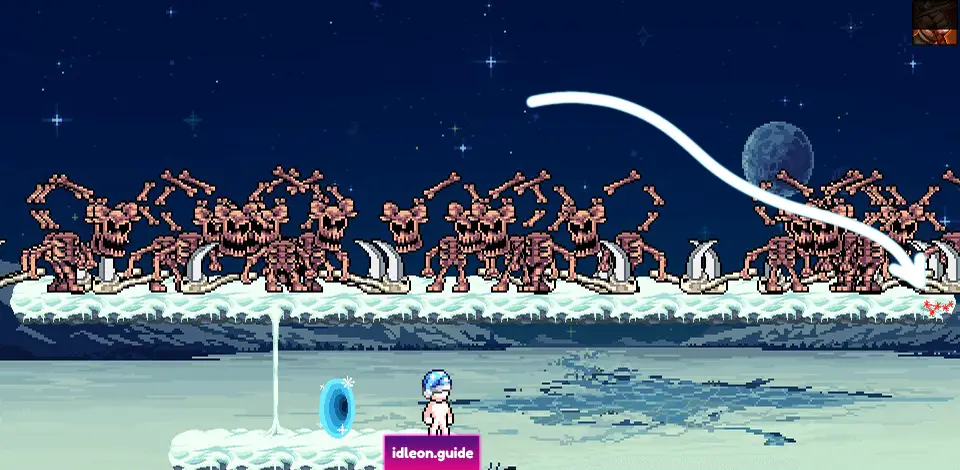 |
| 4 | Refrigeration Station | AFK for 16+ Hours on 3 players | 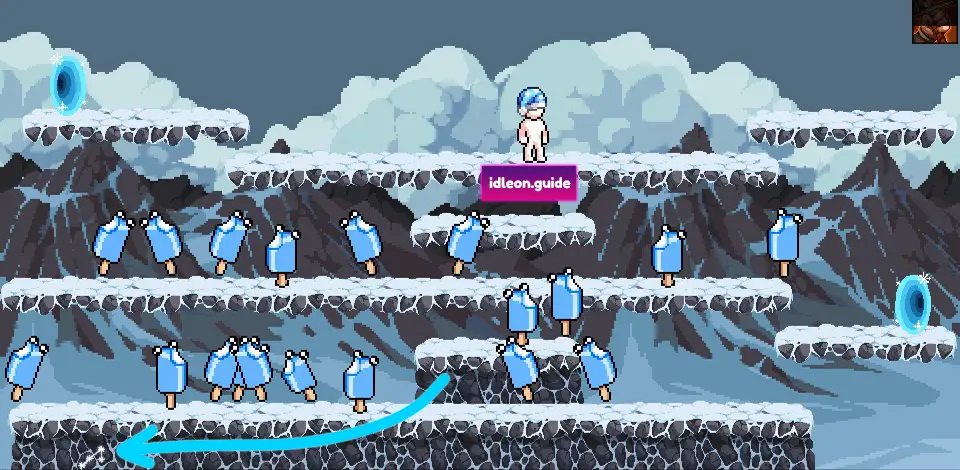 |
| 6 | Rollin' Tundra | Reach Wave 11 on 4 players | 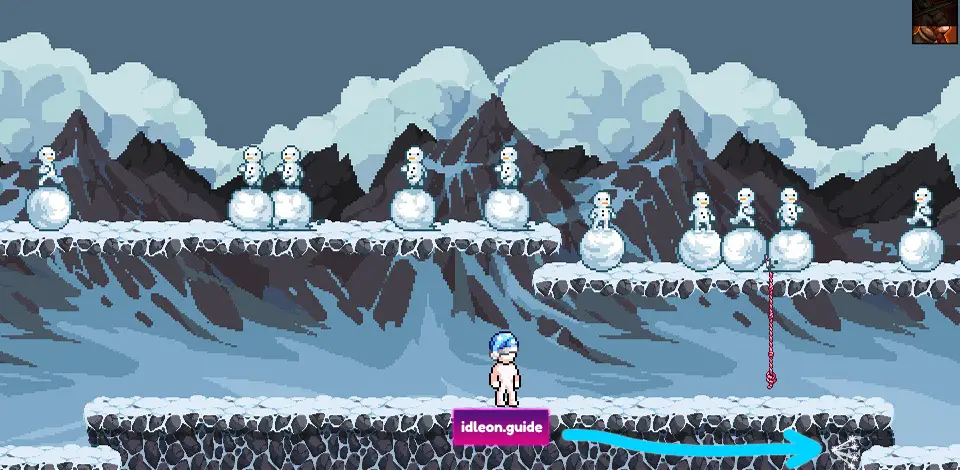 |
| 8 | Thermonuclear Climb | AFK for 10+ Hours on 9 players | 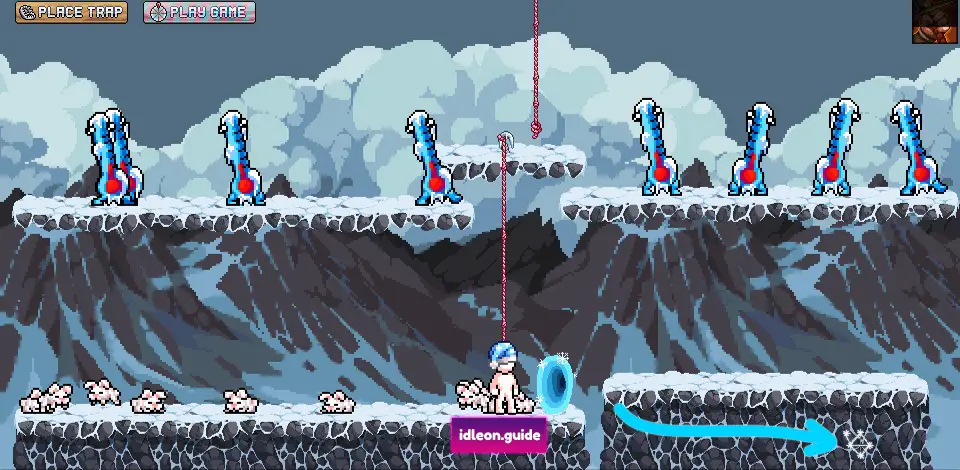 |
| 12 | Crystal Basecamp | Reach this star on 6 players |  |
The noteworthy unique map in Frostbite Tundra is the Rollin’ Tundra map constellation which requires you to reach Wave 11 in the Frosty Firefight Tower Defence battle. You can activate it by clicking on the totem and choosing ‘Summon‘.
If you’re struggling with it, maybe skip it for now until you level up your towers in Construction and reach World 4 with some big buffs from Cooking meals.
Every Constellation in World 4
Surprisingly World 4 Star Signs are easier than many other Worlds, but they just tend to be forgotten due to players focusing on speeding through Cooking and the Lab.
The only notable exception is the last constellation at Shelled Shores, which requires Mega Critting, which is not easy to do early on.

| Map | Map Name | Requirements | Location |
|---|---|---|---|
| 0 | Outer World Town | Reach Lv 120 on 8 players |  |
| 1 | Spaceway Raceway | Defeat all mushrooms before any respawn on 3 players |  |
| 3 | Donut Drive-In | Reach Cooking Level 15 on 4 players | 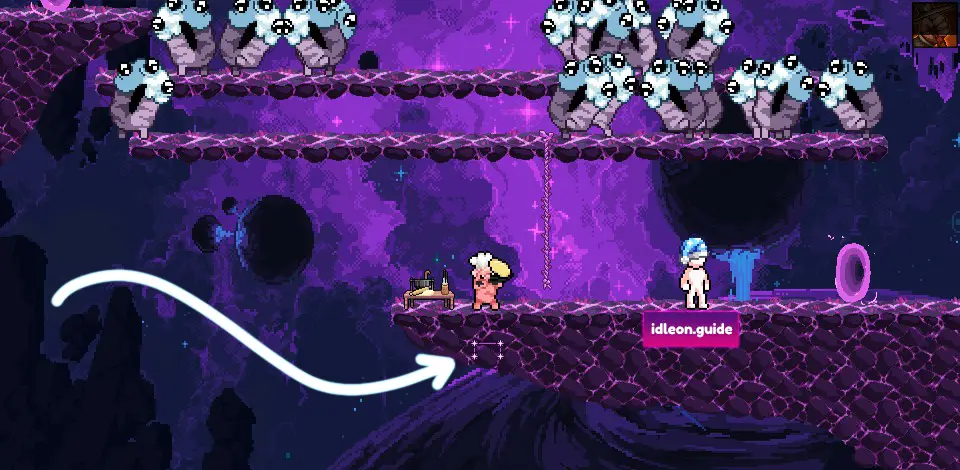 |
| 6 | Wurm Highway | Reach this star on 3 players |  |
| 8 | Cocoa Tunnel | Defeat all choccies before any respawn on 4 players | 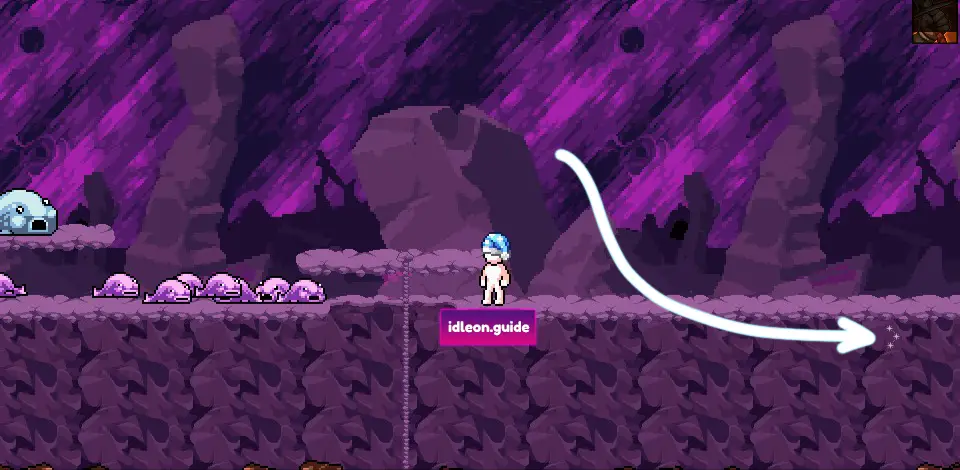 |
| 9 | Standstill Plains | Reach this star on 4 players | 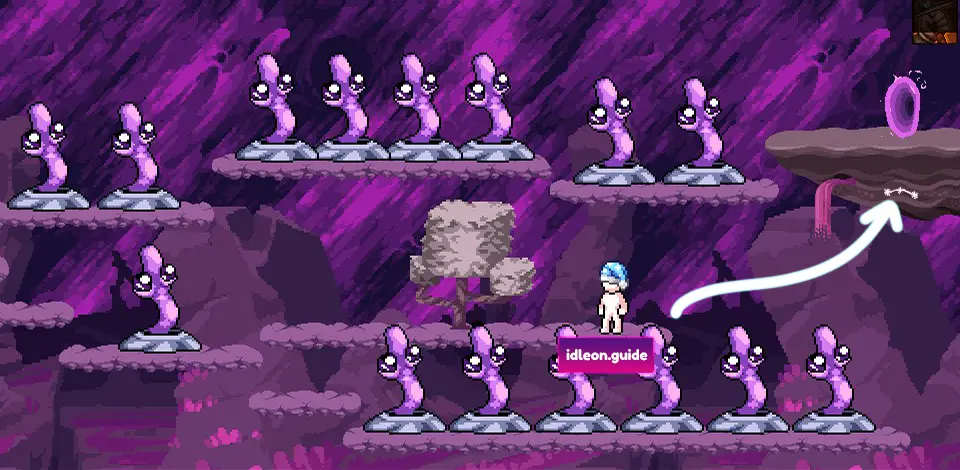 |
| 10 | Shelled Shores | Hit a megacrit on a Clammy on 4 players |  |
As mentioned, the last Star Sign is the only one that might need some explanation. Mega-Critting can only be done once you have the Mega Crit Star Talent from the Party Dungeon Flurbo Shop.


You can check your current Crit-chance from the character info panel when you open your bag. If it’s not at least 100%, you won’t be able to Mega Crit yet, so you should return to this constellation later on.
In the image above, the character has a 27.3% chance to do a Mega Crit on every hit.
All Constellations in World 5
Once you reach World 5, progress starts to slow down as it takes a lot longer to reach new maps, but the Star Sign challenges themselves aren’t any more complex than before.
The biggest challenge is just the amount of time it will take to reach the last Worm Nest map with 5 players.
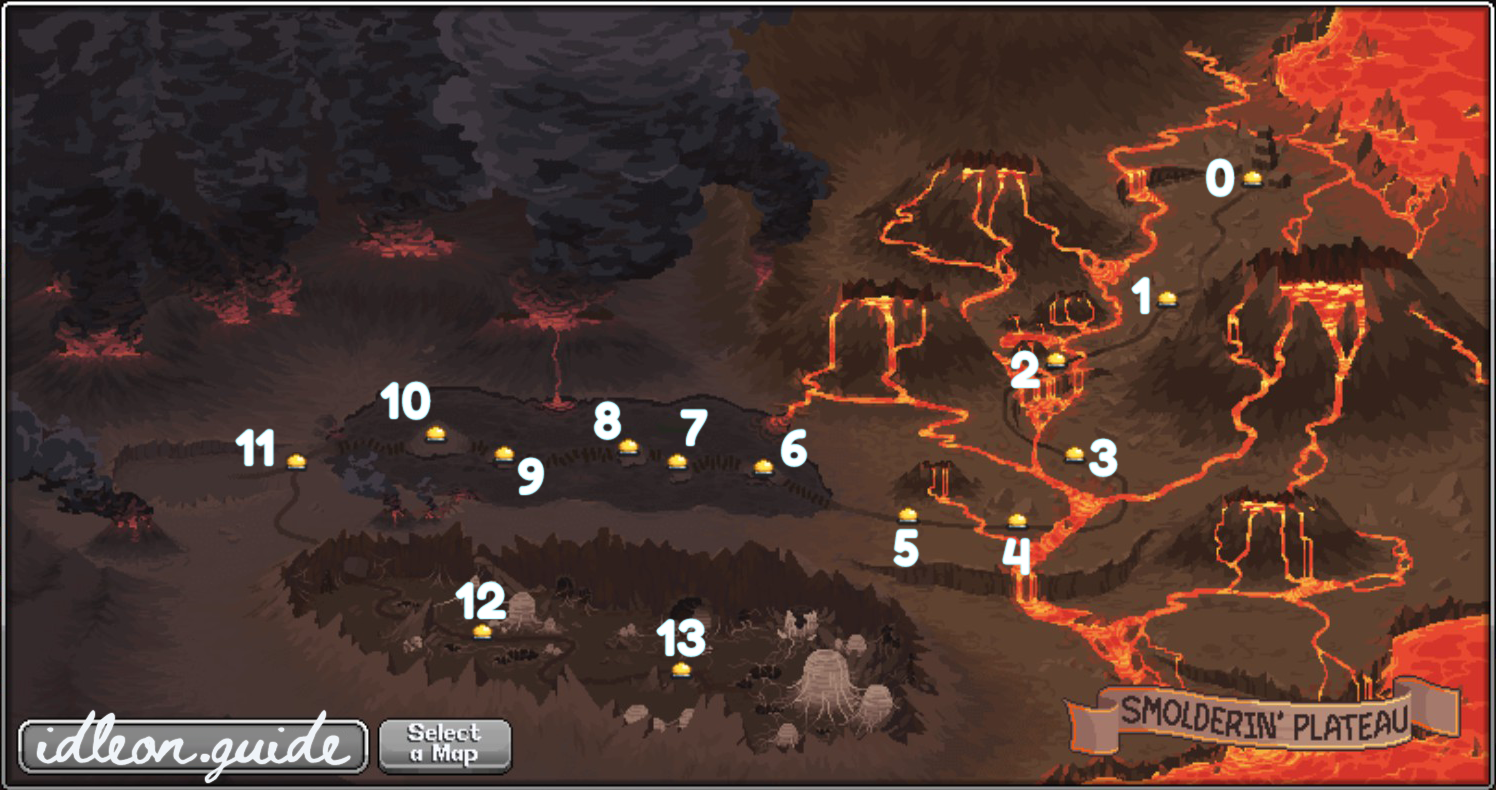
| Map | Map Name | Requirements | Location |
|---|---|---|---|
| 0 | Magma Rivertown | Reach Lv 200 on 10 players |  |
| 2 | Niagrilled Falls | Defeat all Maccies before any respawn on 6 players | 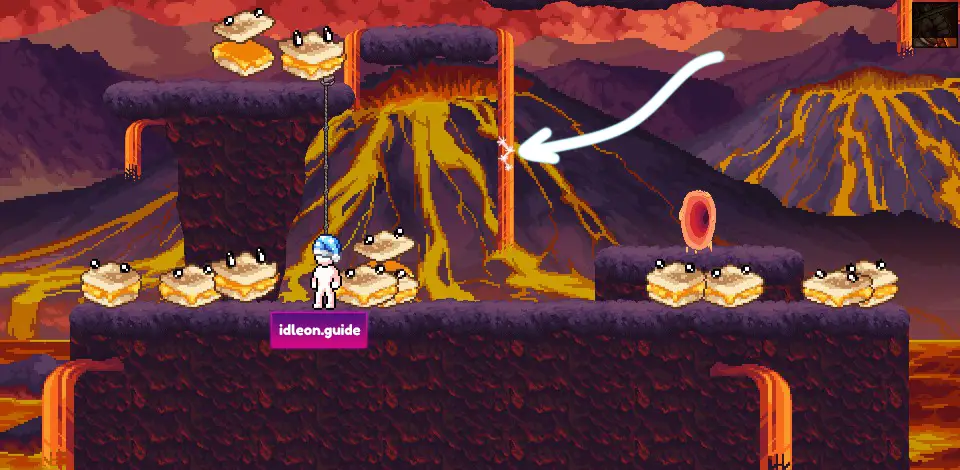 |
| 4 | Cracker Jack Lake | Reach this star on 10 players |  |
| 6 | Erruption River | Successfully gather Dandielogs on 3 players |  |
| 8 | OJ Bay | Defeat all Citringes before any respawn on 7 players | 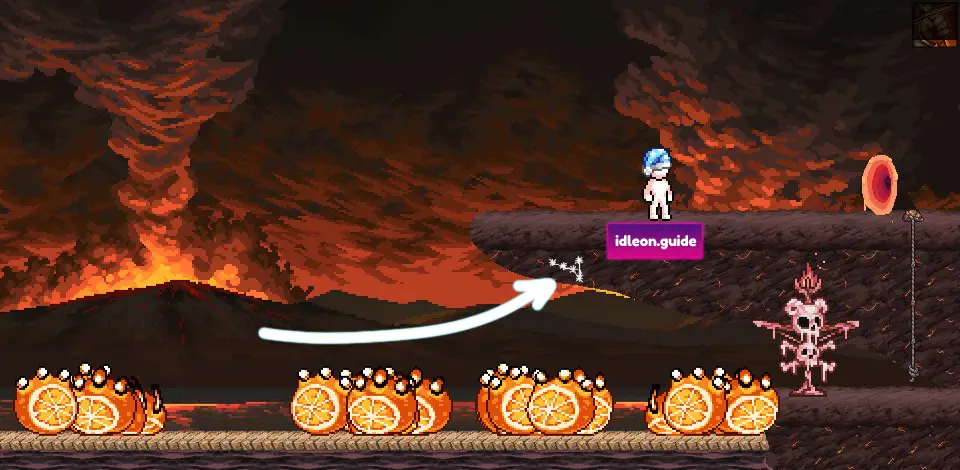 |
| 11 | Miner Mole Outskirts | Reach this star on 10 players | 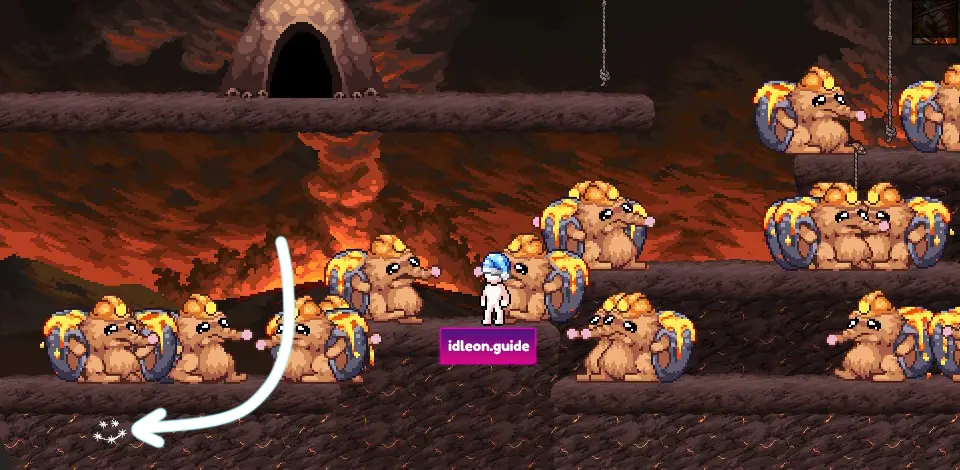 |
| 13 | The Worm Nest | Defeat 100 Wurms in under 100 sec from entering on 5 players | 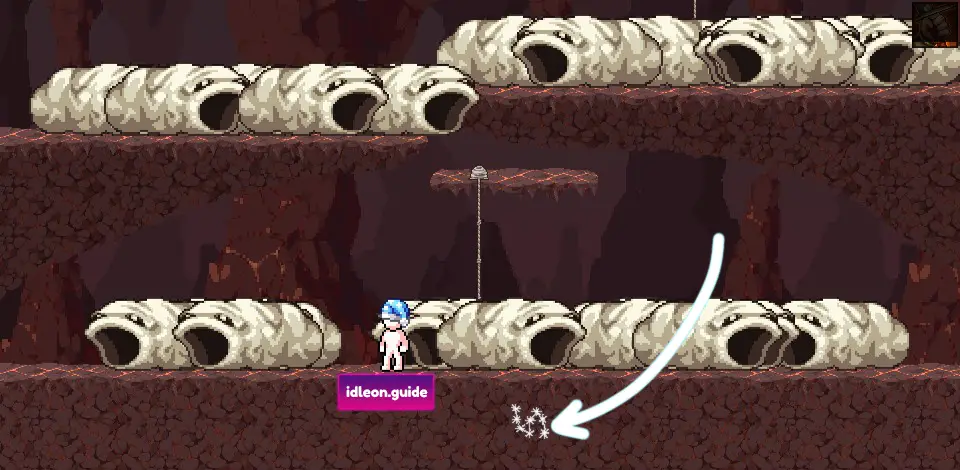 |
The Erruption River Star Sign requires you to gather Dandielogs on 3 players, which can be done by hitting the giant dandelion in the same map. It will require quite a bit of Chopping efficiency, so do it with your Mages and Journeyman class.
You can check your gathering chance from the AFK Information screen after you click on the Dandelion.
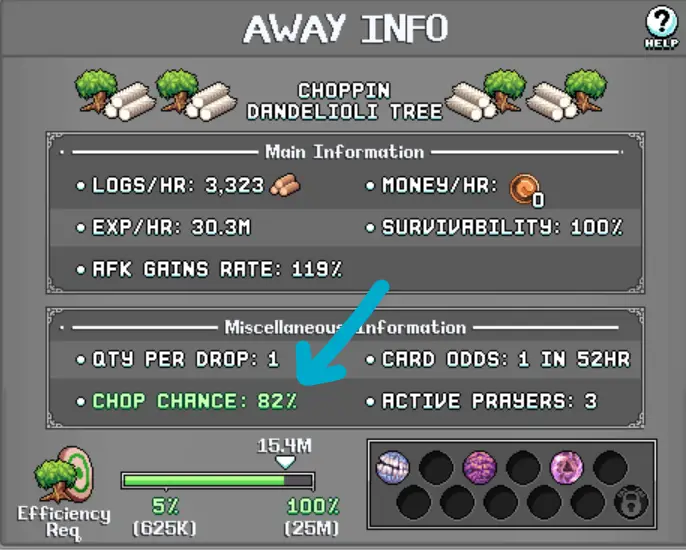
In the image above the character has an 82% chance to get a Dandielog per hit, and all you need is one log with each of the 3 characters, so even if your gathering chance is anything above 1%, all you need to do is wait long enough for one to drop.
Every Constellation in World 6
World 6 is the newest addition to the game with a lot easier constellations than most others. The only issue is that the last few maps will require a lot of kills to access.

| Map | Map Name | Requirements | Location |
|---|---|---|---|
| 0 | Spirit Village | Reach Lv 420 on 4 players |  |
| 1 | Spirit Village | Take no damage on 3 players |  |
| 3 | Irrigation Station | Reach this star on 10 players |  |
| 5 | Edge of the Valley | Enter the map without helmet or weapon, then defeat all Woodlins on 3 players. |  |
| 7 | Lightway Path | Run from left portal to right portal without touching a lantern spirit, on 4 players. All mobs must be alive when you start. | 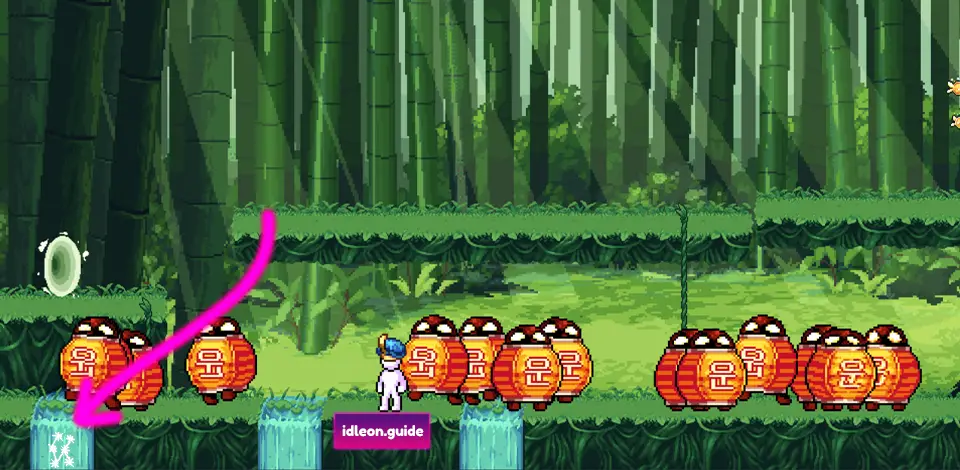 |
| 9 | Above the Clouds | Defeat a Giant Leek Spirit on 5 players |  |
| 11 | Dozey Dogpark | Chop Effervescent Logs on 5 players | 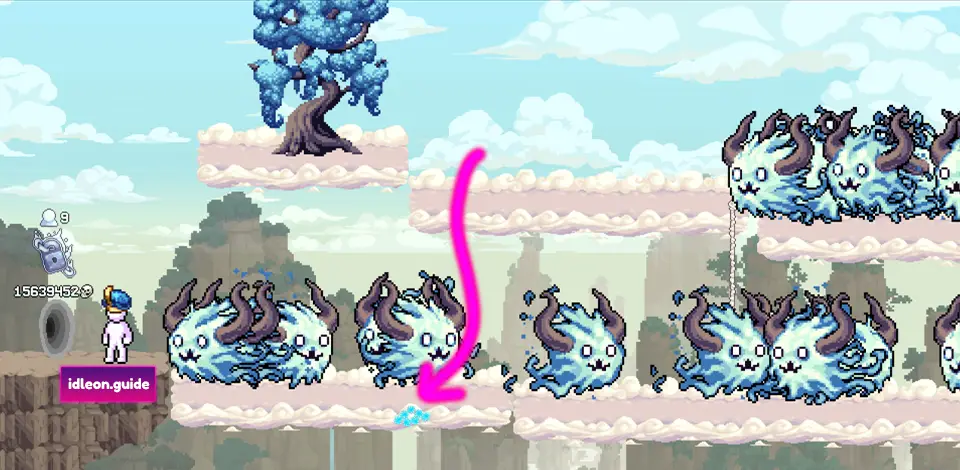 |
| 12 | Yolkrock Basin | Defeat all Royal Eggs before any respawn on 7 players | 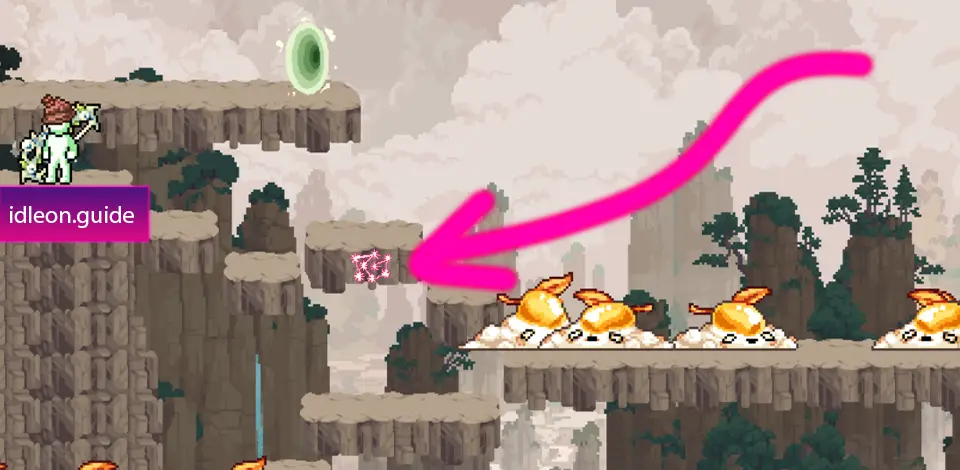 |
| 14 | Emperor's Castle Doorstep | Defeat 100 Samurai Guardians within 100 seconds of entering the map on 8 players |  |
A useful tip for Gooble Goop Creek’s defense requirement is to remember to turn off your Balance of Pain prayer as that can reduce your defense up to -60% which will make all the difference.

When it comes to Lightway Path’s portal run, it sounds intimidating but turns out you can start the run by clicking the constellation, then kill all the lanterns with ranged attacks, so not getting hit is not too difficult after all. Just use ranged characters like mages and archers for this.
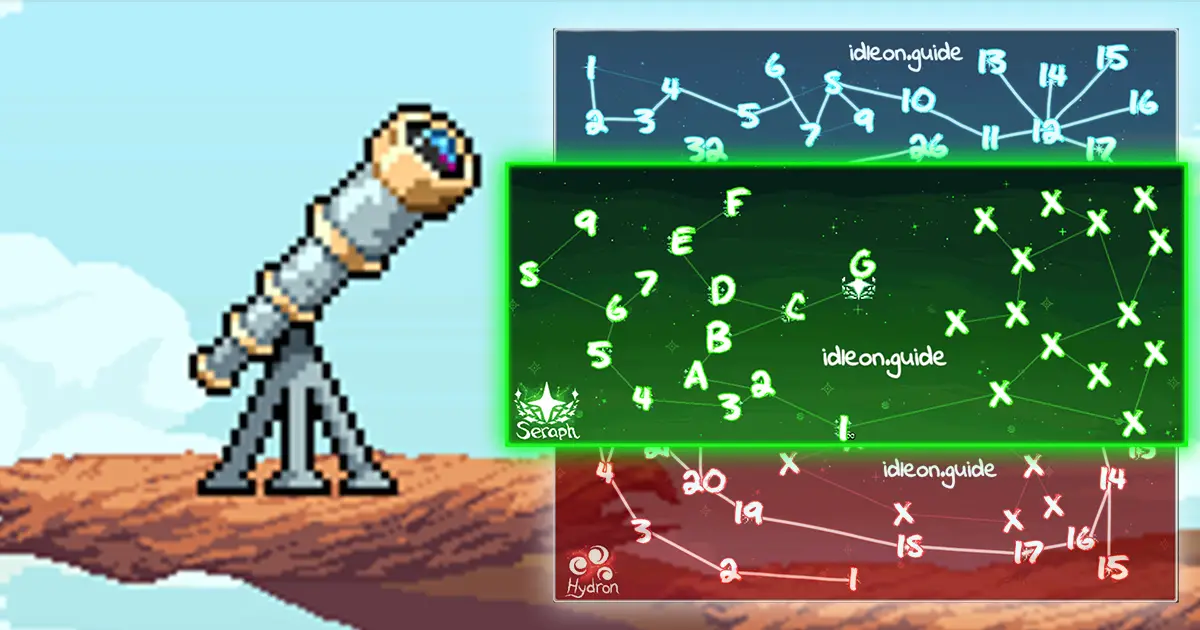
All Star Signs Listed and Explained
There are three Star Charts in Idleon from which you can choose up to three Star Signs to activate at once (once you progress far enough).
Star Signs are not as significant as most other bonuses in the game, like Alchemy for example, but they definitely add up and get boosted by other multipliers.
They will become significantly more powerful once you reach Infinite Starsigns from the rift in World 3, which are explained in the next chapter.
Starting off with the first tab, Chronus, your first priority should be to get to Star Sign #22 which allows you to activate two Star Signs at once. The rest are up to your current needs.
We added some arbitrary lines between the numbers to make it easier to get the general order of the Star Signs, they don’t represent any special unlocking order.
Note!
It is generally recommended to skip Star Signs 13-16 from the Chronus tab as they’re weak and those points are better used to unlock later signs.
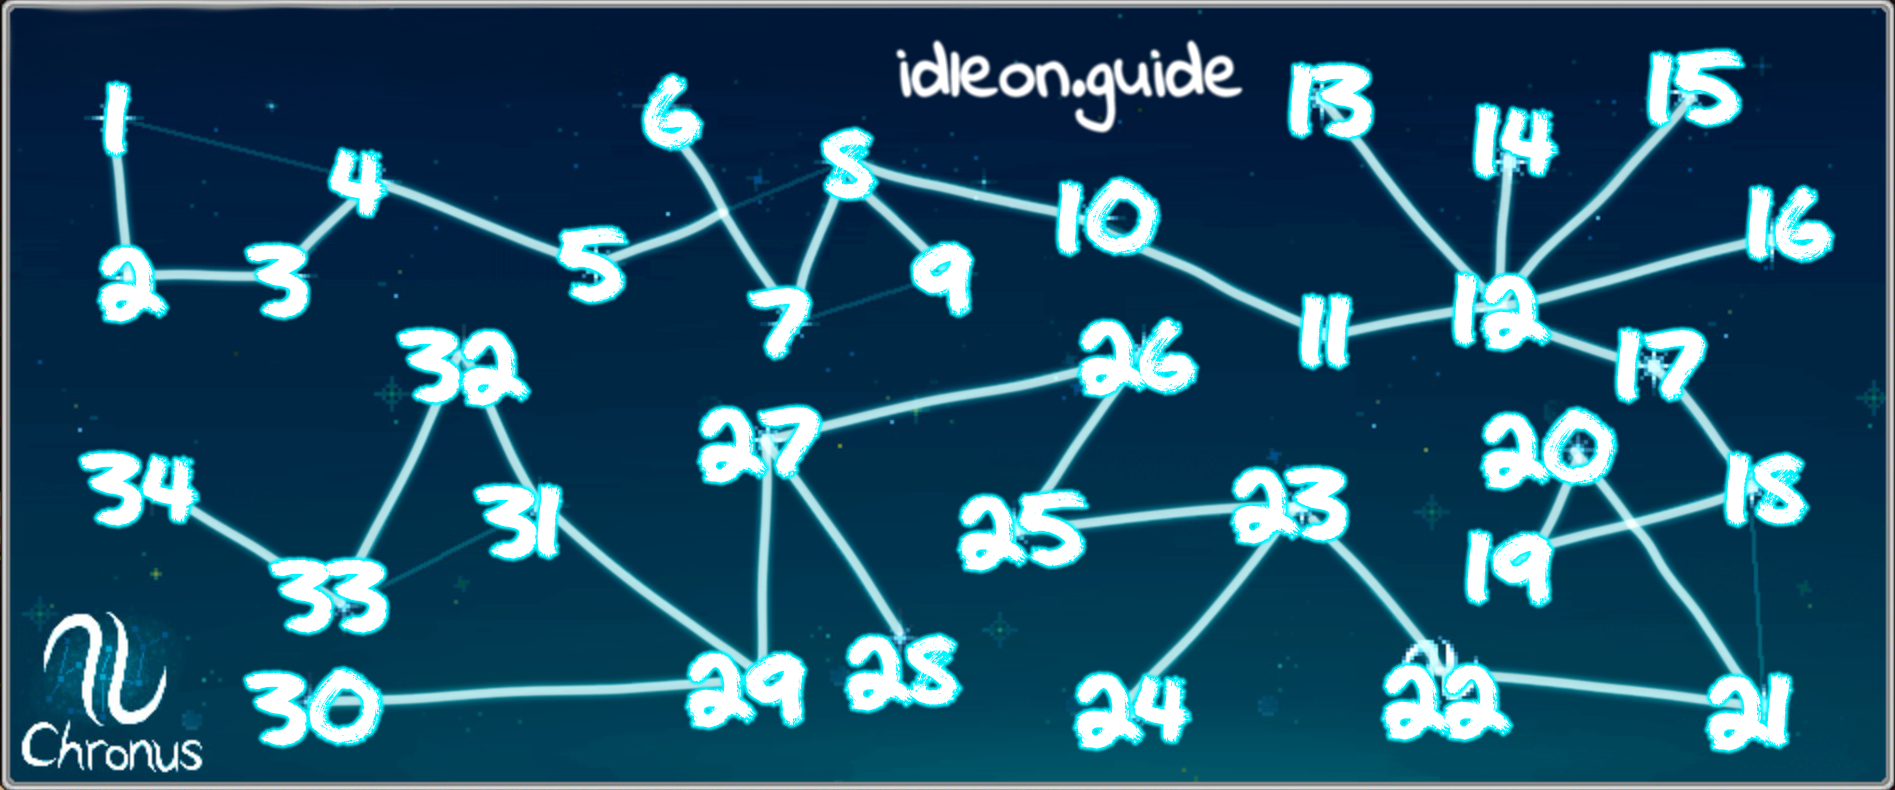
| Number | Name | Effect | Point Cost |
|---|---|---|---|
| 1 | The Buff Guy | +1% Total Damage +3 STR | 0 |
| 2 | The Book Worm | +1% Class EXP Gain +3 WIS | 0 |
| 3 | The Fuzzy Dice | +3 Talent Points +3 LUK | 0 |
| 4 | Flexo Bendo | +2% Movement Speed +3 AGI | 0 |
| 5 | Dwarfo Beardus | +5% Mining Efficiency +20% Multi-Ore Chance | 2 |
| 6 | Miniature Game | +30% Minigame Rewards | 2 |
| 7 | Pie Seas | +5% Fishing Efficiency +20% Multi-Fish Odds | 2 |
| 8 | Hipster Logger | +5% Chop Efficiency +20% Multi-Log Chance | 2 |
| 9 | Shoe Fly | +5% Catch Efficiency +20% Multi-Bug Chance | 2 |
| 10 | Pack Mule | +10% Carry Cap | 2 |
| 11 | Pirate Booty | +5% Drop Rate | 2 |
| 12 | All Rounder | +4 All Stats | 2 |
| 13 | Muscle Man | +8 STR | 1 |
| 14 | Fast Frog | +8 AGI | 1 |
| 15 | Smart Stooge | +8 WIS | 1 |
| 16 | Lucky Larry | +8 LUK | 1 |
| 17 | Fatty Doodoo | -3% Movement Speed +5% Defence +2% Total Damage | 2 |
| 18 | Robinhood | +4% Accuracy +2% Movement Speed | 2 |
| 19 | Blue Hedgehog | +4% Movement Speed 1 in 1M Chance to get Sanic Ring from Active Kills | 3 |
| 20 | The Fallen Titan | +3% Boss Damage +4% Crit Chance | 2 |
| 21 | Ned Kelly | +6% Defence +2 Weapon Power | 2 |
| 22 | Chronus Cosmos | All characters can now align with 2 Star Signs at once (Passive) | 3 |
| 23 | Activelius | +15% Class EXP when fighting actively | 2 |
| 24 | Gum Drop | +15% to get a Time Candy when claiming 8+ Hour AFK gains | 2 |
| 25 | Mount Eaterest | +10% chance to not consume food +15% All Food Effect | 2 |
| 26 | Bob Build Guy | +10% Speed in Town Skills | 3 |
| 27 | The Big Comatose | +2% Skill AFK Gain | 3 |
| 28 | Sir Savvy | +3% Skill EXP gain | 3 |
| 29 | Silly Snoozer | +2% Fight AFK Gain | 3 |
| 30 | The Big Brain | +3% Class EXP gain | 3 |
| 31 | Grim Reaper | +2% Mob Respawn rate | 4 |
| 32 | The Forsaken | -80% Total HP -50% Defence +6% Fight AFK Gain | 4 |
| 33 | The OG Skiller | +5% Carry Cap +1% Skill AFK gain +2% All Skill Prowess | 4 |
| 34 | Mr No Sleep | -6% AFK Gain +30% Carry Cap | 4 |
The only odd one out in the first tab is #19, which gives you a one in a million chance to get a unique ring as a drop from any active monster kill, called a Sanic Ring.
It is not by any means a great ring, mainly giving +1% Movement Speed and a few other stats, but it is a fun little Sonic The Hedgehog easter egg that you might want to acquire once you have nothing better to do.
The second Star Sign tab is called Hydron and from there you should aim to get to #10 as fast as possible, since it unlocks the ability to use 3 Star Signs simultaneously.
Note that this bonus doesn’t stack with the first tab, so you can only choose a total of 3 Star Signs from both tabs together, not 2 + 3!

| Number | Name | Effect | Point Cost |
|---|---|---|---|
| 1 | All Rounderi | +1% All Stat | 1 |
| 2 | Centaurii | +10% Accuracy | 1 |
| 3 | Murmollio | +10% Defence | 2 |
| 4 | Strandissi | +3% STR | 2 |
| 5 | Agitagi | +3% AGI | 2 |
| 6 | Wispommo | +3% WIS | 2 |
| 7 | Lukiris | +3% LUK | 2 |
| 8 | Pokaminni | +15% Card Drop (Not in Party Dungeons) | 2 |
| 9 | Gor Bowzor | +12% Boss Damage | 2 |
| 10 | Hydron Cosmos | All characters can now align with 3 Star Signs at once (Passive) | 2 |
| 11 | Trapezoidburg | +20% Critters per Trap +10% Trap Efficiency | 3 |
| 12 | Sawsaw Salala | +25% Construct Exp | 3 |
| 13 | Preys Bea | +15% Worship Efficiency +15% Worship EXP | 3 |
| 14 | Cullingo | +15% Total Multikill | 3 |
| 15 | Gum Drop Major | +40% to get a Time Candy when claiming 40+ Hour AFK gains | 3 |
| 16 | Grim Reaper Major | +4% Mob Respawn rate (If you are over level 60) | 3 |
| 17 | Sir Savvy Major | +6% Skill EXP gain (If you are over level 60) | 4 |
| 18 | The Bulwark | +20% Total Damage -12% Movement Speed | 4 |
| 19 | Big Brain Major | +6% Class EXP gain (If you are over level 80) | 4 |
| 20 | The Fiesty | +6% Total Damage | 5 |
| 21 | The Overachiever | +15% Total Damage -7% Fight AFK Gain | 5 |
| 22 | Comatose Major | +4% Skill AFK Gain (If you are over level 90) | 5 |
| 23 | S. Snoozer Major | +4% Fight AFK Gain (If you are over level 100) | 5 |
| 24 | Breedabilli | +35% Breedable speed +15% Shiny Pet leveling speed | 4 |
| 25 | Gordonius Major | +15% Cooking Speed (Multiplicative) | 4 |
| 26 | Power Bowower | +30% Pet Damage | 4 |
| 27 | Scienscion | +20% Lab EXP gain | 4 |
| 28 | Artifosho | +15% Artifact Find Chance (Multiplicative) | 4 |
| 29 | Divividov | +30% Divinity EXP gain | 4 |
| 30 | C. Shanti Minor | +20% Sailing Speed | 4 |
After World 6 was released, bonuses 24-30 were added to this star map, out of which #25 is the only one that will aid you after World 4, as it improves cooking speed which is extremely useful.
The new Seraph star map was added alongside World 6 and requires nearly all constellations in all worlds to be completed in order to unlock it.

| Number | Name | Effect | Point Cost |
|---|---|---|---|
| 1 | Muscle Magnus | +50 STR | 1 |
| 2 | Cropiovo Minor | +3% Crop Evolution chance per Farming level | 2 |
| 3 | Fabarmi | +20% Farming EXP gain | 2 |
| 4 | O.G. Signalais | +15% Over Growth chance in Farming | 2 |
| 5 | Lightspeed Frog | +50 AGI | 3 |
| 6 | Beanbie Major | +20% Gold Food Bonuses | 3 |
| 7 | Damarian Major | +25% Total Damage | 4 |
| 8 | Lotto Larrinald | +50 LUK | 5 |
| 9 | Intellostooge | +50 WIS | 4 |
| A | S. Tealio | +12% Ninja Stealth | 3 |
| B | Sneekee E. X. | +15% Sneaking EXP gain | 3 |
| C | Jadaciussi | +10% Jade Gain (Multiplicative) | 3 |
| D | Druipi Major | +12% Drop Rarity | 4 |
| E | Sumo Magno | +20% Summoning EXP gain | 4 |
| F | Killian Maximus | +3% Multikill Per Tier | 5 |
| G | Seraph Cosmos | All characters get 1.10x Star Sign bonuses per 20 Summoning Levels | 11 |
At the time of writing this section, only the right half of the new Seraph bonuses are available, out of which G aka Seraph Cosmos is definitely the most important one to unlock as soon as possible as it boosts all other star signs.
The other ones are really up to your needs. We will update this table once more bonuses are added to the game.
Infinite Star Signs Explained
Rifts have been recently added to The Untraveled Octopath map in World 4, which gives you various upgrades once you complete a certain amount of Rifts.
The secon Rift Bonus is unlocked from reaching Rift 11 is the Infinite Stars bonus, which turns Star Signs into passive unlocks and removes any negative effects from them.
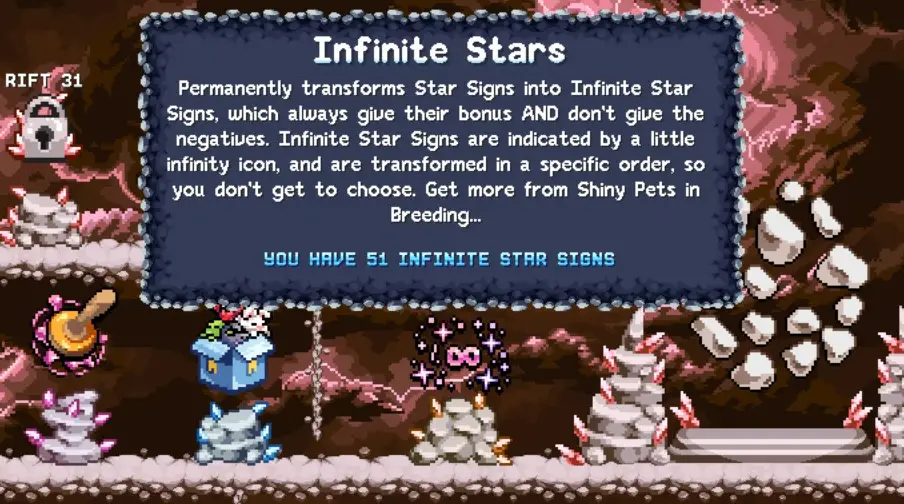
The problem is, they unlock Star Signs in order from the first to last, so you can’t just have all the best Star Signs as passives immediately.
You can see which Star Signs are currently passively active on all your characters by checking which Star Signs have a small infinity symbol next to them.
In the image below, all signs from the first Star Chart have been made passive, so all characters receive those bonuses at all times, without needing to Align with any of them!

Finally, the question remains, how can you get more Infinite Star Signs?
Thankfully it’s very easy as you get more Infinite Star Signs by breeding Shiny Pets.
Only a few pets will give you more Star Signs, but if you level them up by keeping them in the Fence Yard, they will give more and more Stars as they level up.
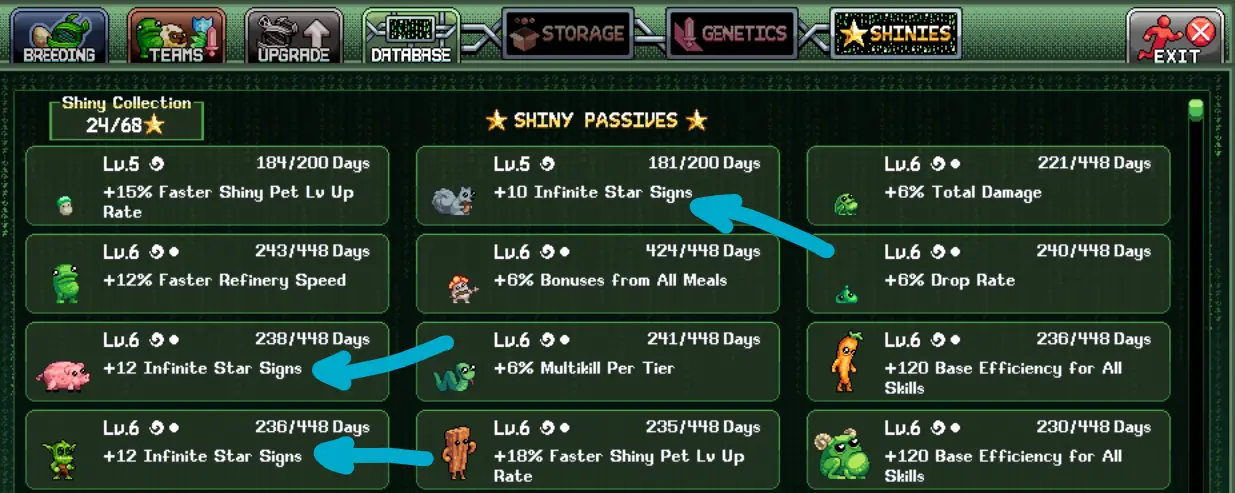
There are 5 different pets that will unlock more Infinite Starsigns as you level them up:
| Infinite Star Pet Name | Unlock Order |
|---|---|
Squirrel | World 1 Pet #2 |
Piggo | World 1 Pet #7 |
 Glublin | World 1 Pet #10 |
 Sir Stache | World 3 Pet #3 |
Penguin | World 3 Pet #9 |
At level one, each of these Shiny Pets will give +2 Infinite Star Signs, which increases by +2 for every level up.
At the time of writing there are currently 58 available star signs, so in order to make them all passive, you need to get all of these pets to at least level 5 and a few to level 6.
To speed up this process, you should consider leveling up the 4 Shiny Pets that increase Shiny Pet level up speed:
| Shiny Level Up Speed Pet Name | Unlock Order |
|---|---|
Green Mushroom | World 1 Pet #1 |
 Wode Board | World 1 Pet #11 |
 Crescent Spud | World 2 Pet #16 |
Quenchie | World 3 Pet #11 |
Each of these pets will give a +18% Speed Boost to Shiny Pet leveling once they reach level 6.
There’s not much points in going further than level 6 on most pets, as getting to level 7 takes exponentially longer.
One final question you might have, is there any point in aligning to any Star Signs once you’ve made them all into Infinite Star Signs?

Mostly no, except if you use the Silkrode Nanochip in the lab, which doubles the effect of all the Star Signs that you have Aligned to on that character.