
Journeyman and it’s sub-class Maestro is a secret class in Idleon and requires a lot of work to unlock. This class is also commonly referred to as Jman or Mman.
However, it is an extremely crucial class that will boost your skilling efficiency on every other character to new heights.
If you don’t know when is the right time to start working on unlocking Journeyman, check our class priority guide for in-depth information, but in general your 7th or 8th character would be a sweet spot. It really doesn’t matter as long as you end up having one (there’s no need for multiple Journeymen).
Voidwalker
We added a section on how to unlock the new Voidwalker class advancement to the end of this guide!

Why you need a Journeyman Class
The reason you need a Journeyman is to get its sub-class Maestro, which has a skill that boosts all your other characters Skilling Efficiency.
| Icon | Name | Description | Effect Scaling |
|---|---|---|---|
 | Right Hand of Action | Boosts skill efficiency of other characters if their skill level is lower than Maestro’s. | Level 100: +75% Skill Efficiency Level 200: +100% Skill Efficiency |
This means if your Maestro has a Mining level of 85 and your Warrior has a Mining level of 80, your Warrior will double his Mining Efficiency as long as his Mining level stays below 85. This is also a key factor that is explained in our Mining Build guide.
Maestro also has a Left Hand of Learning skill which has a similar boost for Skill EXP instead, but it should only be used when your Maestro has clearly higher levels on all skills as you want to keep your other characters skill levels lower than Maestro’s.
Also now that Voidwalker has been released, it has even more epic skills to boost all your other teammates, but he is covered later in the guide.
Important!
You should always aim to have your other characters skills lower level than your Maestro’s, otherwise they don’t receive the bonuses from either Hand of Action talents!
However, you should still level up all your characters skills up to the level requirement of the highest level tool for that profession and the total skill level bonuses provided by The Rift’s Skill Mastery bonus.
For example, the current highest Mining Pickaxe is the Destroyer of the Mollo Gomme which requires a Mining level of 100. So once you reach level 100 in mining for your Warriors, make sure to stop leveling and make sure Maestro’s mining stays above level 100.
(That is, until you start grinding for The Rift Skill Mastery, which gives you bonuses all the way up to 1000 combined skill levels for each skill across your whole account.)
This way you get the efficiency boost as well as the stats of the highest level pickaxe.
| Tool | Skill Level | Stats |
|---|---|---|
Copper Pickaxe | Mining Level 3 | Mining Power: +6 Mining Speed: +3 STR: +3 Upgrade Slots: 2 |
Destroyer of the Mollo Gomme | Mining Level 100 | Mining Power: +62 Mining Speed: +8 STR: +55 AGI: +25 Mining Efficiency: +35% Defence: +35 Upgrade Slots: 7 |
As you can see from the table above, the stat bonuses from a higher level tool are significant and they boost your efficiency a lot more.
We provided some tips on how to maintain this level balance later on in the guide.
Also don’t focus too much on reaching level 100 in any skill before you reach World 6, as resources in later worlds will always give A LOT more experience to skills.
Rift Update
Rift has been added to World 4 and it has a reward that gives you buffs from your total skill levels across all characters, which has made it worth while to level all characters skills even higher than the maximum tool requirements. However, you should focus on doing that only at very end game when you have nothing better to do.
Read more about The Rift rewards!
How to get the Journeyman Class
Getting Journeyman is fairly easy, but getting Maestro later on can be difficult (definitely tedious).
The Journeyman class can only be acquired by completing a certain questline and you must be a Beginner class while you do the quests. This means you CAN NOT choose any class like Warrior, Archer or Mage from Promotheus at Valley of Beans!
Notice
If you accidentally chose a normal class, you will not be able to become a Journeyman on that character and the only way is to wait until you unlock a new character and do the quests on that character!
Another thing to note early on is that you will need the following items from World 1 in order to complete all the Journeyman quests:
(If you already have the Peanut Recipe, you can skip the first 3 items!)
| Item | Amount Needed | Main Source |
|---|---|---|
 Nomwich | 30 |  Merchant Blunder Hills |
Frog Leg | 200 | Frog Froggy Fields |
Bean Slices | 100 |  Bored Bean Valley of the Beans |
 Hot Dogs | 3,302 |  Merchants Blunder Hills & Encroaching Forest Villas |
Bleach Logs | 1,651 |  Birch Tree Valley of the Beans |
Copper Ore | 1,651 | Copper Vein Tunnels Entrance |
 Gold Bar | 250 |  Smelt in Blunder Hills Gold Ore from Freefall Caverns |
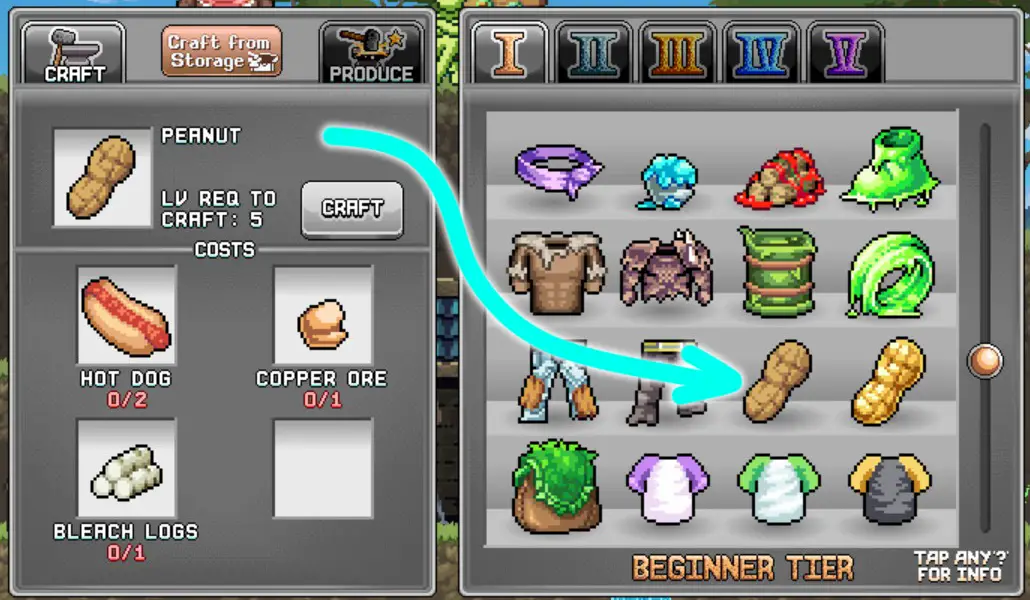
Once you’ve acquired all these items, you need to use some of these items in order to get a crafting recipe for Peanuts.
This can be acquired by completing the first 4 quests from Picnic Stowaway in Froggy Fields.


The first quest will require 30 Nomwiches that you should have ready to go.
The second quest will require you to kill a few Frogs until they drop 3 Ketchup Bottles and 3 Mustard Bottles. This should take only a minute or two and you can throw away any extra bottles you might find.
The third quest needs you to kill a few Green Mushrooms that will be spawned into the Froggy Fields map. The Mushrooms that you need to kill have a fist-icon on top of them.
Finally the fourth quest needs you to turn in 200 Frog Legs and 100 Bean Slices.
After completing these four quests, talk to Picnic Stowaway again and it will drop you a recipe to craft Peanuts!
Now go to your Anvil and craft 651 Peanuts.
Next, move the Peanuts into your Storage chest to split them into your Bag into two stacks, a stack of 1 and the rest in the other stack (we used to have to make 4 separate stacks previously, but the quest has been updated since).

Once you have your two nut-stacks looking good, go to the Vegetable Patch map and drop the single peanut onto the bush next to the tree. Make sure to only drop the stack with one peanut, as the bush will destroy the whole stack!

After a second or two the bush will eat your Peanut and start giving you quests.
Keep clicking on the bush until he has taken all your 650 peanuts and given you a single Stone Peanut in return.
Now you must go back to town and craft 500 more Peanuts, then go the bottom right corner of the Froggy Fields map, where you will find a rock with a small X on it.

Drop your Stone Peanut on the rock, after which it will ask you for your 500 Peanuts.
This in turn will reward you with the Golden Peanut recipe and you must go back to town and make 5 of those Golden Peanuts.
Sadly, in-order to craft them, you will need 500 Peanuts once again, as well as a total of 250 gold bars.
Once you crafted your shiny nuts, go give them to the same rock and you will be rewarded with the Journeyman class advancement!
It is good to note that this questline can be done this far with any class, but unless your character is a Beginner class, meaning you haven’t selected any class yet, you won’t be rewarded anything for turning in the Golden Peanuts.

How to unlock the Maestro Class
If you thought gathering Peanuts was a pain, you’re in for a disappointment, as the Maestro class advancement takes a lot more work.
To start off, you will obviously need to be a Journeyman in order to advance to the Maestro class.
Next head to the Shifty Sandbox map in World 2 and talk to Goldric.
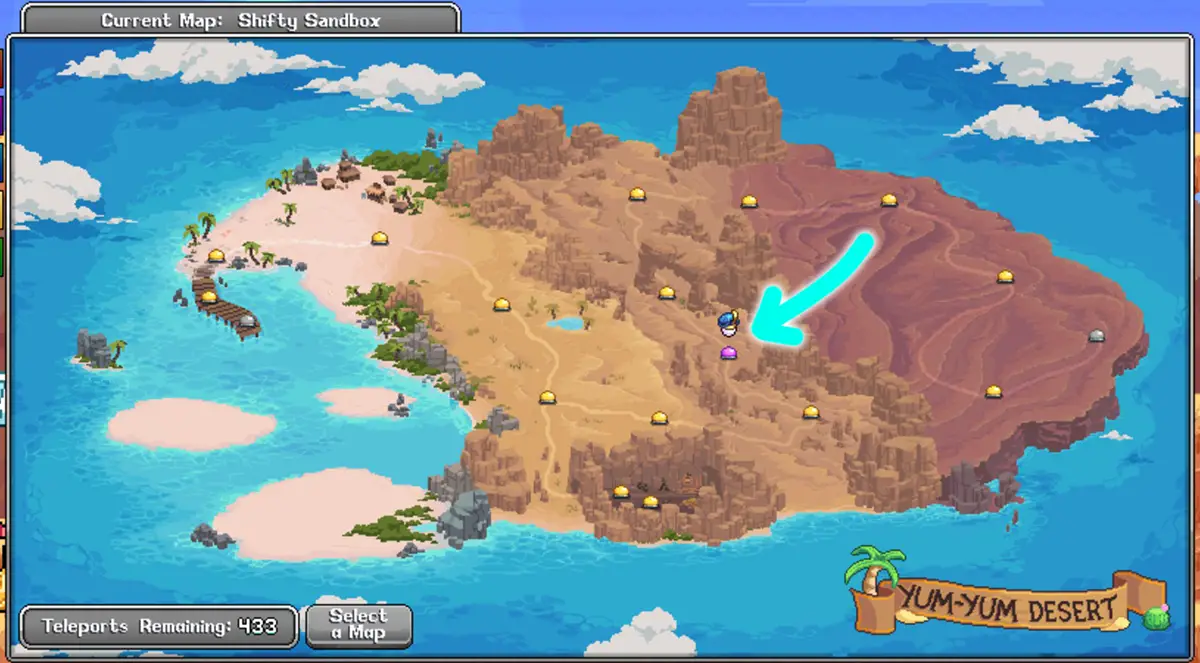

Now you need to do 5 quests from Goldric, which are thankfully not very complicated but can take a while.
The first one needs you to run over some copper coins that spawn on the ground on the same map. Easy enough.
The second quest needs you to get a score of 15 OR pass through a total of 90 rings in any Catching minigame (For example the one in the Jar Bridge map). Also simple enough.
The third quest requires you to find 600 paintings by killing monsters. Ugh, not so simple. You can check the table below where to find those paintings:
| Item | Amount Needed | Source |
|---|---|---|
 Casual Confidante | 200 |  Mimic The Mimic Hole |
 Triumphant Treason | 200 |  Mafioso The Grandioso Canyon |
 Claiming Cashe | 200 |  Sand Castle Shifty Sandbox |
Note that you need to have the quest active in order for these paintings to drop from the monsters above.
Once you found 200 of each painting, you can turn them in and move onto the fourth quest, which requires you to find one Golden Plop.
| Item | Amount Needed | Drop Chance | Source |
|---|---|---|---|
Golden Plop | 1 | 1 in 20,000 |  Poop World 1 Poopy Sewers |
As you may notice, it is a very rare drop so if your kills per hour are very low on Poops, it might take a while to find one. You can use time candy to speed these two quests up a lot!
Finally once you found the Golden Plop, you can move onto the final, fifth quest which requires you to dress up in golden gear. So go craft the items below and equip them on your character, then talk to Goldric.
| Item | Materials needed to craft |
|---|---|
Gold Helmet | Copper Helmet (x1) Fly (x2,000) Gold Bar (x250) |
Gold Platebody | Copper Platebody (x1) Pocket Sand (x1,500) Gold Bar (x350) |
Gold Platelegs | Copper Platelegs (x1) Goldfish (x500) Gold Bar (x475) |
Golden Tool Example: Gold Pickaxe | Iron Pickaxe (x1) Megalodon Tooth (x2,500) Gold Bar (x800) |
Golden tools require a skill level of 15, so you can make any one that you have high enough skill level on, for example a Gold Pickaxe if your Mining is 15.
This quest will finally give you a Bag o Nuts as a reward, which is needed to start the actual Maestro questline.
To start the Maestro quests, go to the last map in World 2, Djonnuttown, and drop the Bag o Nuts on top of the cactus in the bottom left corner (the dark character won’t appear if you’re not a Journeyman).


This will start the dreaded skill level quests where you need to reach high levels in most of your main skills.
The skill requirement quests are split into two quests with the following requirements:
| Skill | Level Requirement |
|---|---|
Mining | 32 |
Chopping | 33 |
Smithing | 35 |
| Skill | Level Requirement |
|---|---|
Fishing | 23 |
Alchemy | 25 |
Catching | 25 |
We added a chapter below this one with some tips on leveling up these skills fairly easily.
Once you’re done with the skilling quests, you are ready to start the final battle to become a Maestro.
For the final quest you will need to defeat the Biggie Hours boss while having the Elderly Peanut in your inventory (you should receive it after the skilling quests).

The catch is, having this peanut in your inventory will reduce your HP to 1 and reduce your damage by 50%. This might sound impossible but we will share a few solutions below.
However, first you need to summon Biggie Hours, which can be done by crafting Googly Eyes. If you don’t have any, you might want to put the peanut into your Storage while you gather the Recipe and resources needed to craft these eyes.
| Item | Drop Chance | Source |
|---|---|---|
Recipe for Googley Eyes | 1 in 40,000 |  Crabcake World 2 Dessert Dunes |
Once you have the recipe, you will need the following materials to craft a single pair of Googley Eyes (1 Googley Eyes = 1 Biggie Hours spawn).
| Item | Amount Needed | Source |
|---|---|---|
Woodular Circle | 2 |  Walking Stick World 1 The Base of the Bark |
Distilled Water | 5 |  Alchemy Shop World 2 Yum Yum Grotto |
Capitalist Case | 1 | Merchant World 1 Encroaching Forest Villas |
Once you have crafted the Googley Eyes, grab your Elderly Peanut and go to The Mimic Hole, then drop the eyes on the broken hourglass.


This will spawn Biggie Hours and you must defeat it in order to turn the Elderly Peanut young again and finish your Maestro quest!
The obvious question then remains, how can you beat Biggie Hours with 1 HP?
Well the easiest option is to have high enough defense to take 0 damage from it. This would require you to have 594 DEF, which you can check by opening your bag and checking the Defense stat from the Player Info on the left.
The best way to boost your defense is to equip better armor and equip any cards that boost defense and upgrade the orange FMJ bubble in alchemy.
However, an even easier way is to use the Wooden Bow from the first Anvil Tab and just rain arrows at Biggie Hours until he dies.
The reason why you must use the Wooden Bow and not something stronger, is because it’s the only bow that can be used by a non-archer class.

You can click on the rope to hide if he gets too close, then go back up again to keep shooting.
While this is a slow method and can take a long time (10-30 minutes depending on your damage), it is a fairly easy way to get through it even if you have low level gear.
The other obvious downside of the Bow strategy is that you must be really careful as a single missed click might get you killed or you might accidentally enter a portal, requiring you to craft more Googley Eyes to try again.
But once you finally defeat him, the Elderly Peanut will turn into a Pete the Peanut, which you can then give to the Cactus and become a Maestro!

Fastest way to level up Skills for Maestro
The Maestro class advancement requires you to level up 6 different skills, which is notoriously slow, but you can speed up the process with these tips.
First of all, since you’re already a Journeyman, you should take advantage of the Happy Dude skill from the first Skill Tab.
| Icon | Name | Skill Effect |
|---|---|---|
| Happy Dude | Increases EXP gain for all skills. (+1% per level) |
As for the other base skills, you should level them up based on which skill you are currently working on. For example, when working on your Mining level, level up your STR to 100, then reset your talent points when moving on to the next skill.
The second easy boost to early skilling XP are mini-games, which you can purchase more of from the Gem Shop.
There are also various consumables that can greatly improve skill leveling speed.
| Item | Effect | Source |
|---|---|---|
 EXP Balloon | Gives XP to currently active skill. | Alchemy Shop World 2 Yum Yum Grotto |
Black Pearl | Gives +20% XP to currently active skill. |  Killroy Shop World 2 Yum Yum Grotto |
 Time Candy | Get some hours of gains on currently active skill. |  Gem Shop |
The above items apply for all skills, except Time Candy can’t be used for Smithing or Alchemy.
When it comes to gear, make sure to always equip the highest level tools you can as well as the profession specific pants and shoes, which can be equipped by all classes.
| Pants | Class Level Req. | Effect |
|---|---|---|
Bleached Designer Wode Patch Pants | 25 | +5% Chopping Efficiency |
Dirty Coal Miner Baggy Soot Pants | 25 | +5% Mining Efficiency |
Fishing Overalls | 35 | +12% Fishing Efficiency |
Bandito Pantaloon | 35 | +12% Catching Efficiency |
| Shoes | Class Level Req. | Effect |
|---|---|---|
Cavern Trekkers | 30 | +20% Mining Efficiency |
Angler Boots | 30 | +20% Fishing Efficiency |
Logger Heels | 30 | +20% Chopping Efficiency |
Bandito Boots | 30 | +20% Catching Efficiency |
Alongside gear, make sure to choose appropriate cards which boost the specific skill you are targeting, they’re pretty obvious so we won’t list them here. You can see a few examples in our Mining Build guide.
Finally for Smithing, the best way to level it up is to buy as many Anvil points to upgrade your capacity and speed, then produce Thread and Nails. This will get your level up in no time.
If you’re in a hurry, high level gear and weapons give the most smithing XP.
Keeping Maestro Skills higher than others
As we explained in the first chapter, it is crucial that your Maestros skill levels are higher than other characters, or those characters won’t receive the Skill Efficiency boost from Maestro, making your new hard-earned class nearly useless.
So how can you keep other classes from leveling higher than Maestro?
The most important factor is the Skilled Dimwit prayer from World 3.
| Prayer | Effect | Source |
|---|---|---|
 Skilled Dimwit | Level 1: +30% Skill Efficiency -20% Skill XP Gain Level 50 (Maxed): +177% Skill Efficiency -118% Skill XP Gain |  Goblin Gorefest Wave 25 |
So once you have the highest tools for each class and don’t really need skill levels for your characters anymore, equip the Skilled Dimwit prayer on that character.
It won’t reduce XP below 0 but it will drastically reduce the amount of XP gained, while increasing your Sample Rates for printing. All in all, no downsides.
Also if you equip Skilled Dimwit on your Maestro, you will in fact gain more XP than before due to the combination of Maestro’s Happy Dude talent and the increased Efficiency from the Prayer.
Finally, make sure to reset your class specific Skill Exp Gain Talent to 0 on any class that you don’t wish to gain more skill levels with.
| Talent Icon | Effect |
|---|---|
  | +1% Skilling XP per level |
This skill can be found at the bottom row of the second Talent Tab on every class.

How to unlock Voidwalker
A recent update brought a new subclass following Maestro, called Voidwalker, which doesn’t bring in any new special talents, but instead boosts existing stats and talents for all characters.
Thankfully this class advancement is the easiest one to unlock out of all the prior advancements, requiring only some simple monster kills throughout 3 different quests.
To start the Voidwalker class advancement, you first need to reach World 4 and you need to be at least level 150 with your Maestro.
Then walk to the top right corner of the town to find the Nebulyte NPC peeking from behind the wall.

The first quest is most likely already done, as you simply need 1M kills on each monster from World 1, 2 and 3, which you should have by this point already. That is a total of 40 monsters. You must visit the Death Note in World 3 to get your progress for the quest.
You can read more about the Death Note from our guide.
After that, you must kill a Chaotic Chizoar on your Maestro, meaning the middle difficulty of the World 3 boss.

This might take a while as Maestro damage tends to be a lot lower than other classes, but accuracy will not be a problem so bring enough food in multiple slots and you will be fine.
After the Chizoar, the final quest requires you to kill 12M Green Mushrooms.
The problem is, these kills must be done solely with your Maestro, but the good part is, you can use Time Candy to finish this very fast.
You can see the current amount of Green Mushroom kills you have on your Maestro by opening up your cards and clicking on the Green Mushroom card.

Use as many candies as you need and once you reach 12M kills, you are ready to get your new Voidwalker class from the Nebulyte!