The fourth world in Idleon, Hyperion Nebula, is one of the more interesting worlds bringing Cooking and Lab into the mix, which are some of the biggest sources of bonuses in the entire game.
You also get access to Breeding and The Rift, which both bring nice additional mechanics and bonuses to all aspects of the game.
Quest-wise the biggest difference maker is that there are no more Tokens to be grinded from NPC’s, but instead they give more useful rewards and relatively easier quests, which is a very welcome addition after the first 3 worlds.
Check out our other quest guides for all the other worlds to find out what rewards you should be looking out for, as well as the reason why you should complete as many unique quests as possible explained in the Blunder Hills article.
We will not show class experience or coin rewards in the tables, as they’re not really relevant since quests are not a significant way to gain money or experience (and they would needlessly clutter the tables).

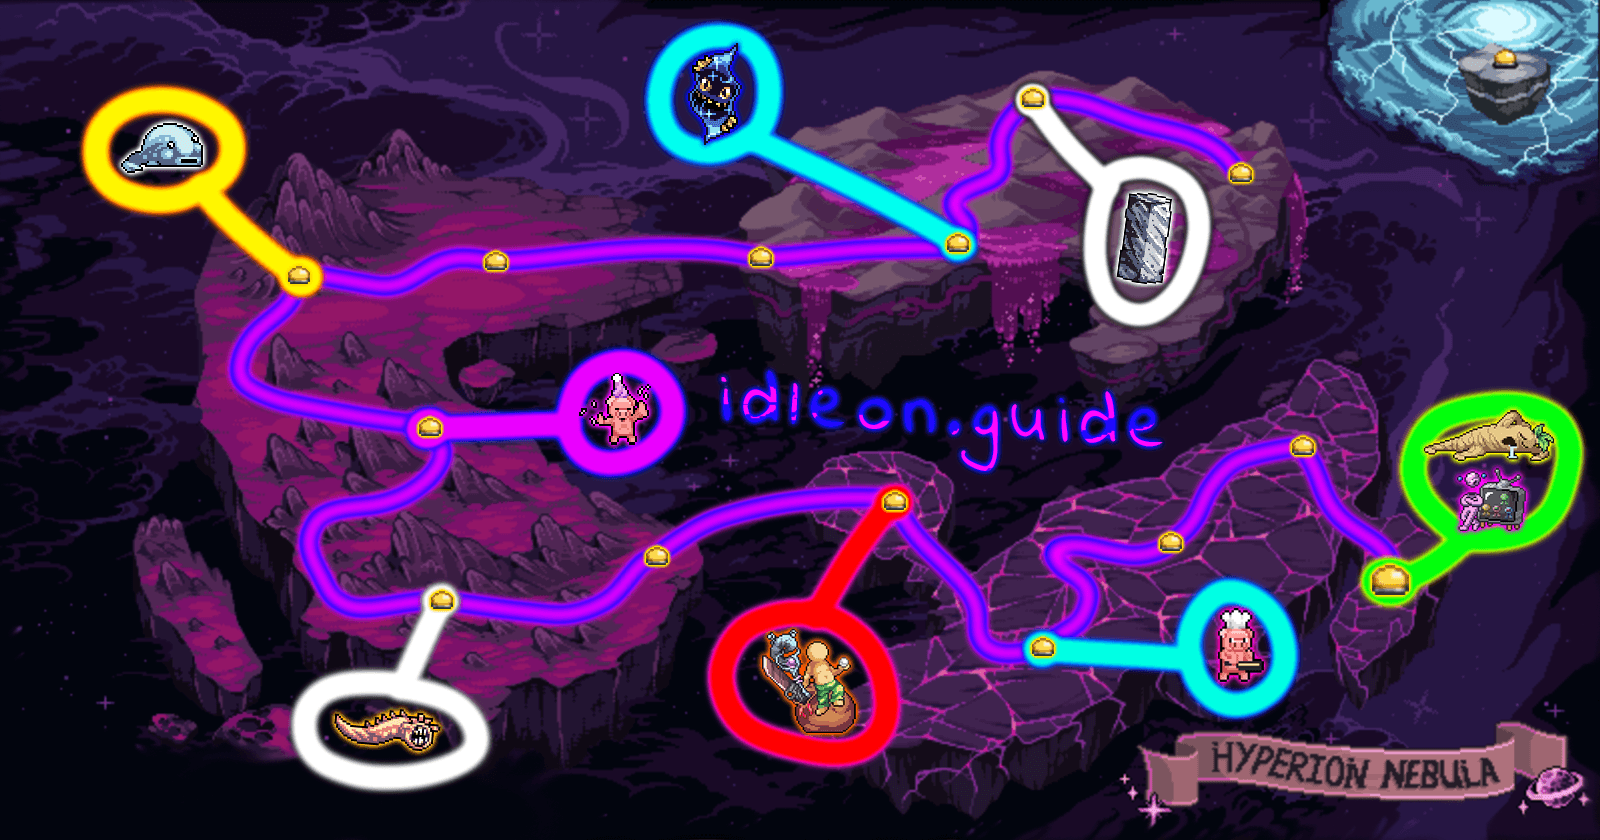
Gobo

Map: Outer World Town (World 4 Town)
Gobo is the introduction to Hyperion Nebula and shows you the basics of Breeding, Cooking and Lab. You only need to complete these few introductory quests with a single character.
Show All 5 Quests
| Quest | Requirements | Rewards |
|---|---|---|
| 1. Breeding in Outer Space | Breed a Green Mushroom at the Breeding Nest | |
| 2. Intense Pet Fighting | Win a Pet Battle at the Breeding Nest | |
| 3. Squirrel Tactics | Breed a Squirrel and Claim Spices once | |
| 4. Spicy Cooking | Finish a Cooking Recipe and AFK in the cooking area for 15 minutes (use the Cooking Ladles you received from the previous quest to speed this up) | |
| 5. Lab Experimentation, Ft. You | Place a character into the Lab and activate a Bonus node |
Nebula Neddy

Map: Outer World Town (World 4 Town)
The World 4 Taskmaster has a single quest which requires you to kill a bunch of mobs for resources, but it shouldn’t be much trouble if you’re geared up.
As a bonus you get some Cooking Ladles and Eggs to give an early boost to your meals and breeding.
Show 1 Important Reward
| Quest Name | Useful Reward |
|---|---|
| Task Requirement Affirmative (#1) | Unlocks World 4 Tasks |
Show 1 Quest
| Quest | Requirements | Rewards |
|---|---|---|
| 1. Task Requirement Affirmative | Unlocks World 4 Tasks |
Oinkin

Map: Donut Drive-In
Oinkin is here to deliver some amazing stamps to boost your Cooking speeds, which are crucial especially early on.
The breeding upgrades in his second quest can take quite a while, but you can get a lot of extra Eggs from the other quests in World 4.
Show 3 Important Rewards
| Quest Name | Useful Reward |
|---|---|
| Filling the Menu (#1) | (+% Meal Cooking Speed) |
| Diner Deliverer (#2) | (+% Breeding Experience Gain) |
| Recipe for Fattening Pastry (#3) | (More Cooking Efficiency) |
Show All 3 Quests
| Quest | Requirements | Rewards |
|---|---|---|
| 1. Filling the Menu | Upgrade three meals to Level 2 | (+% Meal Cooking Speed) |
| 2. Diner Deliverer | Level up the following Breeding upgrades: (you get Gray DNA for these upgrades by trashing pets) | (+% Breeding Experience Gain) |
| 3. Recipe for Fattening Pastry | Unlock the Croissant recipe in cooking Check out our Cooking guide for help | (More Cooking Efficiency) |
Eliteus

Map: Outskirts of Fallstar Isle
Eliteus is your door to the next class advancement, unlocking various classes like the Blood Berserker who can boost your Cooking progress immensely, or the Beast Master that will speed up your Breeding.
Check out our subclass guide for tips on which classes to choose first.
Show All 2 Quests
| Quest | Requirements | Rewards |
|---|---|---|
| 1. The Greenie Gucci Gang | Defeat the 10 Genies that spawn on the map | – |
| 2. Elite Class for the Elites in Class | Select an Elite class | – |
Royal Worm

Map: Wurm Highway
Royal Worm is definitely the hardest NPC to finish up out of all first 4 Worlds with some complicated and demanding quests. Especially his 8th quest which requires you to complete all other World 4 quests.
His quests themselves are pretty fun (except the first one is tedious) and the rewards are not terrible, especially the last quest which gives out a very cool Nebula Royal trophy which boosts Skilling Experience by 50%.
Show 2 Important Rewards
| Quest Name | Useful Reward |
|---|---|
| Let the Tails Hit the Floor (#1) | (Each completed quest gives +% Skill Efficiency) |
| Royal Bidding (#9) | (+10 STR/AGI/WIS/LUK, +50% Skill Exp) |
Show All 9 Quests
| Quest | Requirements | Rewards |
|---|---|---|
| 1. Let the Tails Hit the Floor | Fill all platforms with worm tails. These need to drop from the monsters so you can’t cheese this by dropping them yourself. Dropped coins obviously don’t count. The best way to get most of the spaces filled is by auto-attacking for a while, then turn it off and manually kill worms when they get close to an empty area. The mobs tend to drop their loot towards the direction they’re moving, so you can use this to your advantage to reach corners of platforms. | (Each completed quest gives +% Skill Efficiency) |
| 2. Bothering Mutants | Spawn and kill 5 Mutated Mush mini-bosses. To spawn them, drop a Toxic Sludge on the top platform of the Spaceway Raceway map. (Toxic Sludge is dropped by Purp Mushrooms while actively fighting them. They also drop from normal Slimes in World 1, even while AFK fighting) The amount of small mushrooms on that platform shows how many bosses you can spawn. If there are none, you have to wait a few days for them to re-grow. | (+9 Weapon Power, 5% chance to be consumed on every kill) |
| 3. Royal Score | Get a score of 48.5M in a Colosseum | |
| 4. Downfall of the Hammer Things | Defeat all Stilted Seekers before they respawn with the Big Brain Time prayer equipped. (This is the first prayer you unlock and it increases monster HP) | |
| 5. Kickin’ the Can | Reach Wave 55 in the Clash of Cans Tower Defense and deal 5,000 damage with your own attacks. This Worship Totem is located on the Mountainous Deugh map. If you’re struggling, you can upgrade the Cannoli Meal in cooking for more points, the Wizard Maximizer in the Atom Collider for more damage and tower levels, the Slow Roast Wiz upgrade in Equinox for huge damage boost, and Skill Mastery in the Rift to get all Tower Defense cards as passives. Keep auto-attack on at all times to reach the 5,000 damage requirement. | (Increases Soul Gain by 25% and has 125% chance to be consumed every time you Worship) |
| 6. A Royal Gift | Make sure to craft higher Material Pouches and unlock more inventory slots to carry enough. | |
| 7. Bossin’ the Boss | Defeat the World 4 Boss on Nightmare difficulty 100 times | |
| 8. Normie Bidding | Complete all other World 4 quests | |
| 9. Royal Bidding | Defeat 25,000 Crystal Custards (World 4 Crystal Mobs) |
Capital P

Map: Jelly Cube Bridge
Capital P is here to bring you more stamps, this time to boost Lab experience and DNA splicing, which you need to upgrade Breeding pets.
The quests are quite easy once you understand how they work, but the second one can be annoying if you have a very high mob respawn rate already.
Show 3 Important Rewards
| Quest Name | Useful Reward |
|---|---|
| Right side wrong side! (#1) | (+% Lab Experience Gain) |
| No room on the Dance Floor! (#2) | (+% more DNA from Splicing) |
| Everybody move it move it! (#3) | (+% Total Damage) |
Show All 3 Quests
| Quest | Requirements | Rewards |
|---|---|---|
| 1. Right side wrong side! | Kill monsters only on the right side of the map until you reach 200 points. You get points based on how many monsters are alive on the left side of the map. (Capital P stands at the middle of the map, so only kill monsters to his right) | (+% Lab Experience Gain) |
| 2. No room on the Dance Floor! | Keep the map empty of monsters as much as possible until you reach 1,400 points. (Remove any talents or equipment that increase mob respawn rate) | (+% more DNA from Splicing) |
| 3. Everybody move it move it! | Kill monsters that are moving, until you get 10,000 points. You lose points if they’re not moving. This might be best done without auto-attack so you can try to target more potentially moving mobs. Either way this quest will require some luck. | (+% Total Damage) |
Blobbo

Map: Cocoa Tunnel
Blobbo is a Trapping NPC as completing both of his quests will unlock Blobfish for Trapping. Other than that, he will also reward you with tons of eggs and cooking ladles.
Show 1 Important Reward
| Quest Name | Useful Reward |
|---|---|
| Glitter Critter (#2) | Unlocks Blobfish for Trapping |
Show All 2 Quests
| Quest | Requirements | Rewards |
|---|---|---|
| 1. A Honker Took mah Baby! | (World 3 – Wam Wonderland) | |
| 2. Glitter Critter | (World 2 – The Ring) (World 2 – Bottom left of the Boss map) (World 3 – The Stache Split) | Unlocks Blobfish for Trapping |
Rift Ripper

Map: The Untraveled Octopath
Rift Ripper unlocks the ability to enter The Rift, which provides insane bonuses to all aspects of the game through various Rift Challenges.
Show 1 Important Reward
| Quest Name | Useful Reward |
|---|---|
| Entering The Rift… (#1) | Unlocks The Rift (The other rewards are good too, if you get lucky with them) |
Show 1 Quest
| Quest | Requirements | Rewards |
|---|---|---|
| 1. Entering The Rift… | (Drops from Purp Mushrooms) (1 in 50K chance to drop from TV’s) (Drops from Flying Worms) | (Can drop one of the following: – Gem – Gem Envelope – 1, 2 or 4 Hour Time Candy – Black or Holy Pearl – Summer Weapon, Tool, or Armor Upgrade Stone) (Drops 2 – 10,000 Gems) Unlocks The Rift |
Monolith

Map: Flamboyant Bayou
Monolith will unlock the ability to upgrade your statues to their Onyx counterparts by dropping a stack of 20,000 on the Statue Man in World 1.
Onyx Statues double that statues bonus and give +10% more statues for ALL STATUES dropped in. This stacks the more Onyxes you have!
Also remember to Enhance all your statue-types from the Statue Mans middle tab, so they’re shared across all characters.
Show 2 Important Rewards
| Quest Name | Useful Reward |
|---|---|
| Onyx Statue Crafting (#2) | (Drop this on the Statue Man in World 1 to unlock Onyx Statues!) |
| A Lack of Modesty (#3) | (+% Multikill per unique Onyx Statue you own) |
Show All 3 Quests
| Quest | Requirements | Rewards |
|---|---|---|
| 1. Surface Level Jealousy | Get a total statue level to 250 and bring him 17 different statues in your inventory. (If you fill up your inventory with unique statues after starting the quest, talk to him again to make him check your inventory) | |
| 2. Onyx Statue Crafting | (Drops mainly from Slimes, Baby Boas, Carrotmans and Amarok) | (Drop this on the Statue Man in World 1 to unlock Onyx Statues!) |
| 3. A Lack of Modesty | Loot 100,000 statues. This can be done with Time Candy as long as you pick up the statues from the ground. A fast way to do this is by using Time Candy while mining ores like the Godshard ore at World 1 – Motherlode Pit, which will drop tons of Lumberbob Statues. | (+% Multikill per unique Onyx Statue you own) |
While World 4 has only a few NPC’s, they have some difficult quests scattered in their midst, but the rewards are definitely worthwhile.
Make sure to start working on World 5 before you try to finish up every single quest on this list, as you will want to be grinding out the new mechanics for a long time to come.
If any quests here are unclear, make sure to let us know through the simple form on our About-tab and we will make sure to improve the guide!