
Gold Food gives insane bonuses to all aspects of Idleon and with the addition of the Beanstalk in World 6, you must collect over 100,000 of each Gold Food to get the most out of your bonuses.
The boosts you will receive are absolutely insane, with potential for over +100% boost to things like Drop Rate, AFK gains and even a +1,000% boost to Class EXP gains, so keep reading if you want to find out how to achieve such crazy boosts from your Gold Foods.
This guide goes over how to find each Golden Food as well as what kind of build you should be using to optimize your farming.
Finally we will also showcase all the different ways to boost your Gold Food bonuses through various means, which also impact the bonuses from the Beanstalk!

All Gold Foods & their Farming Locations
There are currently 15 different Golden Foods in Idleon and some of them are a lot easier to get a hold of than others.
The easiest ones are obviously the ones that are dropped by Crystal mobs as they’re very efficient to farm with a Divine Knight Crystal Farm build. The ones that are mainly dropped by Colosseum chests will take ages to collect due to the limited amount of Colosseum Tickets you get per day.
| Gold Food | Effect | Easiest Farming Source |
|---|---|---|
 Golden Jam | +% Max Health | W1, W6 Colosseums |
 Golden Nomwich | More Base Damage | Crystal Carrot (W1 – Any Map) |
 Golden Peanut | +% Mining Efficiency | Recipe from Picnic Stowaway |
 Golden Kebabs | +% Total Damage |  W2, W5, W6 Colosseums |
 Golden Meat Pie | +% Total Defense |  Crystal Crabal (W2 – Any Map) |
 Butter bar | More Base Accuracy |  Butterfly Catching (W2 – Bandit Bob’s Hideout) |
 Golden Ham | +% Skill EXP |  Crystal Cattle (W3 – Any Map) |
 Golden Cheese | More AFK gains for Shrines | Crystal Cattle (W3 – Any Map) |
 Golden Bread | +% More Coins | W3, W5 Colosseums |
 Golden Ribs | +% Fishing Efficiency | Alien Tree Chopping (W4 – Outskirts of Fallstar Isle) |
 Golden Grilled Cheese Nomwich | +% All Stats (STR/AGI/WIS/LUK) | Crystal Capybara (W5 – Any Map) |
 Golden Hampter Gummy Candy | Chance to gain Sailing time from AFK claims | Crystal Capybara (W5 – Any Map) |
 Golden Nigiri | +% Class EXP |  Crystal Candalight (W6 – Any Map) |
 Golden Dumpling | +% All AFK Gains | Crystal Candalight (W6 – Any Map) |
 Golden Cake | +% Drop Rate |  Recipe from Demented Spiritlord (W6 – Troll Broodnest) |
The Golden Cake will also take ages to max out as you first must find the recipe to craft it and each cake requires a Pearler Shell (among other things) which are fairly slow to farm in World 4.
Perfect Gold Food Farming Build
As most Gold Foods are dropped by Crystal Mobs, you will need a build that specializes in spawning as many of them as possible.
For this there are two viable classes, Bubonic Conjuror or Divine Knight, which both clear maps fast and respawn mobs much faster than any other class.


We’ve made a complete build guide for a Crystal Mob build with a maxed out Drop Rate in our Money Farming guide, so make sure to check that out for a more complete outline, but we will also cover the most crucial bits of the build here.
In that guide we also covered why Drop Rate is crucial and why DK becomes better than Bubo at farming because at a higher base Drop Rate, DK’s multiplier increases it so much that it will give you more rare drops like Gold Food.
If you are still fairly early on in the game and don’t have a high drop rate, use Bubo for your farming and use our Cranium Cooking build to spawn as many mobs as possible.
| Talent | Description | Reasoning |
|---|---|---|
 Auspicious Aura | Casts an aura which heals you and damages monsters | This is a crucial damage dealing attack for this build, as it does damage in shorter intervals than gas clouds |
 Flatulent Spirit | Roams around and spawns poison clouds. Damage is based on the Chemical Warfare talent | This is your other crucial attack talent that will cover the whole map in poison and should kill everything in 1 hit (if it doesn’t, you need to focus on getting higher damage) |
 Raise Dead | Respawns all dead monsters within an X pixel radius | Constantly respawns all the enemies, extremely important to be able to get as many kills as fast as possible |
However, if you’re already in World 6 and have a decent Drop Rate, use a Divine Knight, focusing on maxing out these talents:
| Talent | Description | Reasoning |
|---|---|---|
Orb of Remembrance | +1% Active EXP and Drop Rate per kill while Orb is active | This is key for the DK build. It boosts your Drop Rate when actively killing monsters. Will only be significant when your base Drop Rate is high enough. |
Divine Intervention | While active, if all mobs on screen are dead, instantly revive them | Similar to the Bubo Raise Dead talent, but requires a map where you can kill every monster fast enough without running around too much. |
Knightly Disciple | Spawn a knight disciple who generates shockwaves | This will kill all mobs fast if the map has monsters on a single platform, so you can trigger Divine Intervention fast. |
Alongside these talents, there are a few crucial parts to this build, which involves spawning more Crystal Mobs, starting off with the Crystals 4 Dayys Start Talent, the Crystallin Stamp and a Post Office Box.
| Item | Source | Effect |
|---|---|---|
Crystals 4 Dayys Star Talent | Picnic Stowaway (9th quest at World 1 Froggy Fields) | Higher Crystal Monster spawn chance Level 1: +3.41% chance Level 100: +116% chance |
 Crystallin Stamp | Any Crystal Monster | +% Crystal Monster Spawn Chance |
Non Predatory Loot Box |  Postboy Pablob (W2 – Town) | +% Crystal Mob Spawn Chance |
Alongside that talent, there are also two crucial cards you should equip.
| Card | Source | Effect |
|---|---|---|
 | Poop (W1 – Poopy Sewers) | +% Crystal Mob Spawn Chance 1 Star: +20% 4 Star: +50% Ruby: +60% |
 | Demon Genie (W4 – Outskirts of Fallstar Isle) | +% Crystal Mob Spawn Chance 1 Star: +30% 4 Star: +75% Ruby: +90% |
Make sure to equip these cards in the top left and bottom right card slots, so you can double their bonuses through the World 4 Lab chips shown below.
| Chip | Effect |
|---|---|
Chocolatey Chip | 75% chance to spawn a crystal mob when one dies (this is the most important thing for this build!) |
Omega Nanochip | Doubles bonus of card equipped in top left slot |
Omega Motherboard | Doubles bonus of card equipped in bottom right slot |
There are also some lesser bonuses that boost things like stamps, which are covered in the Money Farming guide mentioned in the beginning of this section, so if you want to squeeze everything out of the build, make sure to read it as well.
The Giant Beanstalk Explained
This is the main reason why you must farm so many golden foods to begin with. Normally when equipping a gold food to a food slot, you get a diminishing amount of gains the more food you have, but the Beanstalk in World 6 provides gold food bonuses account-wide for all characters.

On top of that, you can still equip gold foods in your normal food slots to get even more boosts.
In order to get the Beanstalk, you must purchase the 8th upgrade from the World 6 Jade Emporium.

This allows you to drop a stack of 10,000 Gold Food on a beanstalk on the far right side of World 6 town, which will then consume those and provide an equivalent passive bonus to all your characters.
This bonus will take into account all your various Gold Food boosts you receive from various other aspects of the game.
However, once you reach the 22nd upgrade in the Jade Emporium, it allows you to drop an additional stack of 100,000 Gold Food on the beanstalk to make the passive bonus even bigger! The bonus will become equivalent of having 100,000 of that gold food in your food slot, but for all characters!

It should be stated that you can’t cheese it by dropping 100K of a new golden food on the beanstalk immediately, but you must first drop the 10K stack of that food, so you will need 110K of each Gold Food to max them out on the Beanstalk.
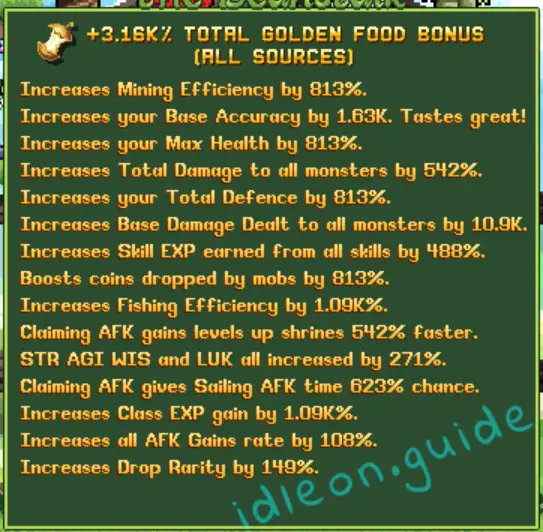
The image above is what you can expect when you have dropped the 100K stack on each food (except the Golden Cake is only a 10K stack in the image, so once you max that out, you will see an even higher Drop Rate bonus at the bottom!)
All Ways to Increase Golden Food Bonuses
There are tons of ways to increase your Gold Food bonuses and alongside boosting the equipped gold foods in your food slots, these bonuses will also boost the ones gained by the Beanstalk, making them some of the most important boosts in the entire game!
Here’s a little teaser for what you can expect from World 4!

Let’s start off with World 1, there is a single stamp that boosts gold foods (you can also double the stamps effect once you unlock Windwalker and Exalted Stamps from their compass). There is also a useful Star Sign that boosts Gold Food.
| Item | Source | Effect |
|---|---|---|
 Golden Apple | Mutton (4th Quest – World 1 – Freefall Caverns) | +% Gold Food Effect |
Beanbie Major (Seraph Constellation) | 6th Star Sign in World 6 | +20% Gold Food Bonus |
Moving on to World 2, there are a few important Alchemy Bubbles as well a Sigil to boost your Gold Food bonuses.
| Item | Source | Effect |
|---|---|---|
 Warriors Rule | Power Cauldron (Bubble #2) | All passive orange bubbles (small bubbles) give higher bonuses |
 Shimmeron | Power Cauldron (Bubble #19) | +% Gold Food Bonuses (Boosted further by the Warriors Rule Bubble above) |
Emoji Veggie | Alchemy Sigils (Sigil #15) | Up to +40% Gold Food Bonuses (when you reach max bonus aka Red Sigil) |
World 3 has nothing significant to add specifically to Gold Foods, so let’s skip straight ahead to World 4, which has arguably the biggest boosts to our Gold Food bonuses through the Lab and especially Cooking Meals.
Let’s start off with the lab items, which don’t directly boost Gold Foods, but they do boost meals which are huge boosters.
| Lab Item | Effect | Reasoning |
|---|---|---|
 Spelunker Obol | 1.5x higher effects from all active Lab Jewels | This boosts the Black Diamond Rhinestone and Pure Opal Navette for higher meal bonuses |
 Black Diamond Rhinestone | All meal bonuses are 1.16x higher | Boosts meals, which is huge once you max them out |
 Pure Opal Navette | +10% higher effects from all active nodes and jewels from the Lab | Boosts Black Diamond Rhinestone (sadly doesn’t boost Spelunker Obol) Must be purchased from W6 Jade Emporium! |
Now let’s check out the juiciest boost, Cooking Meals. While there is simply one meal we care about, the bonus is huge.
| Meal | Effect |
|---|---|
Yumi Peachring (Meal #65) | +% Golden Food Bonuses (This can go up to multiple THOUSAND percent with all boosts and bonuses!) |
One of the biggest boosts to this meal are the new Meal Ribbons, which you can read more about from our Meal Ribbon guide.
There are also two Shiny Pets from Breeding which will boost your Meal Bonuses.
| Shiny Pet | Effect |
|---|---|
Red Mushroom | +% Bonuses from all meals |
Sheepie | +% Bonuses from all meals |
Moving up to World 5, there are two great Sailing Artifacts which give useful boosts (the bonuses below are for the base artifact, which are multiplied many times when you get the rare versions of them).
| Artifact | Base Effect | Reason |
|---|---|---|
Chilled Yarn | All Alchemy Sigils give 2x bonuses | Boosts the Emoji Veggie Sigil for more Gold Food Effects |
The Winz Lantern | All Winner Bonuses from Summoning give 1.25x their bonus | Summoning Winner Bonuses can give more than 2x Meal Bonuses |
Finally, in World 6 the most important upgrade is obviously the Giant Beanstalk itself, but alongside that, the Summoning Winner bonuses can boost Cooking Meal effects, which in turn can be buffed by the Lantern artifact mentioned above.
There are also a couple useful charms in Sneaking called Pristine Charms, which are super rare drops you can get from Sneaking. You can also buy them from the Gem Shop, but they are super expensive, costing 920 gems each.
| Pristine Charm | Effect |
|---|---|
Gumm Stick | +50% Gold Food Bonuses |
Crystal Comb | 1.3x Summoning Winner Bonuses |
The problem with these alongside the massive gem cost, is also that you get a random charm (no duplicates though) and at the time of writing there are a whopping 23 charms.
This means the chance to get when of these two is extremely low, so don’t put these charms high up on your priority list.