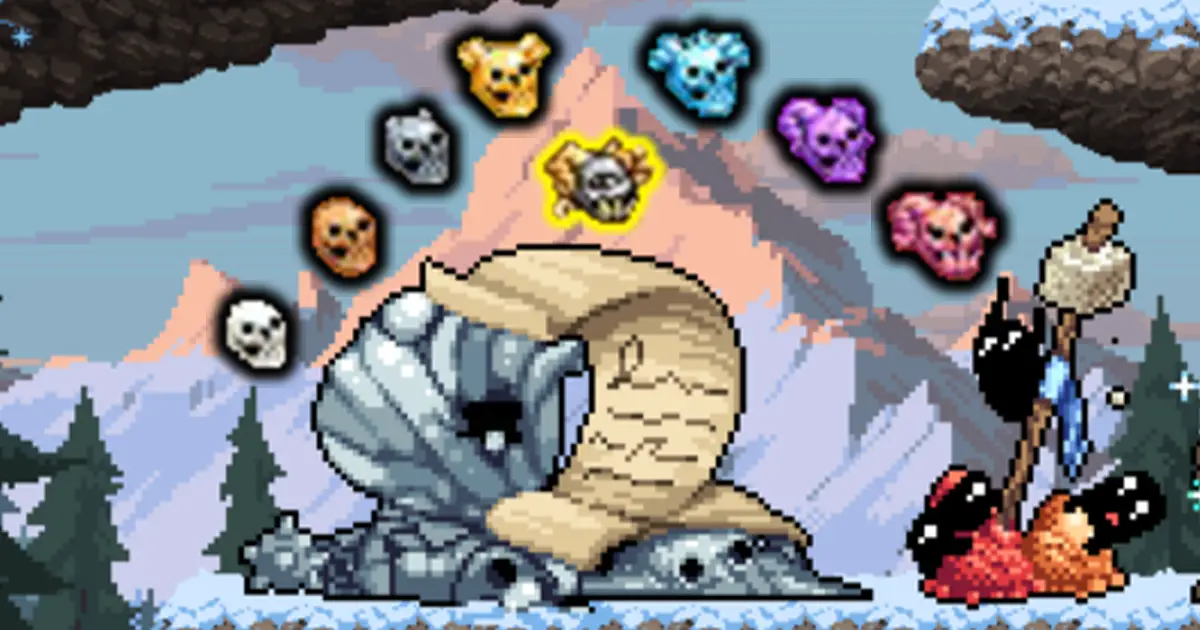
The Death Note is a useful addition that activates once you reach World 3 and it boosts your AFK kills depending on how many monsters you have defeated in each world.
The more you kill, the higher your multikill multiplier becomes, meaning you will get through portals faster and get more XP and more monster drops.
There are also a few achievements that will give higher bonuses, depending on your Death Note progress.
BoneJoePickle Update 
World 6 brought along BoneJoePickle and with it, a whole new page for the Death Note boosting multikill tiers in every world! Scroll to the bottom of the article to find out how it works!

How Multikill and Tiers work
Multikill is directly correlated to your characters damage as well as various multikill bonuses you obtain from the Death Note itself and other sources across Idleon.
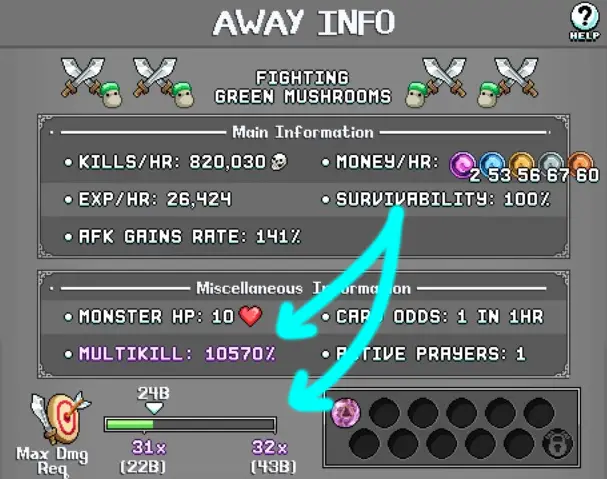
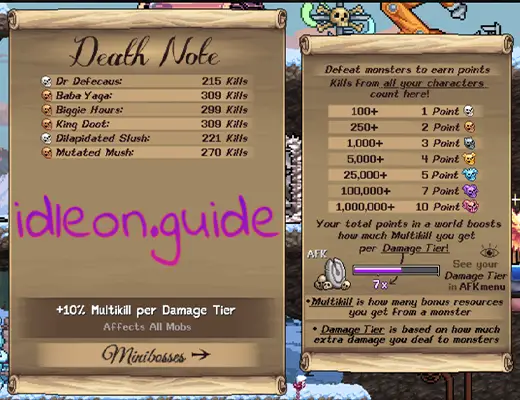
You can see your current multikill tier in any map by checking the bottom of the Away Info window.
The kill multiplier goes up once your damage reaches the required amount, the first Tier being 2 times the current maps monsters HP.
Every tier requires double the damage of the previous tier, meaning the difficulty rises exponentially. So if your current multikill tier requires 10x the monsters HP worth of damage, the next tier requirement will be 20x the monsters HP.
The progress bar at the bottom of the Away Info screen shows your characters maximum damage on top of it, which you can also find from your characters info screen.
Your multikill rate from the Death Note and the other sources that boost multikill percentage is then multiplied by that number.
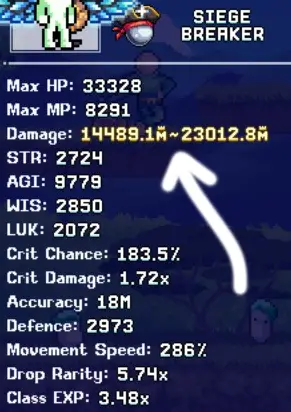
In the images above, the characters damage is over 23 billion which is rounded up to 24B, which can be seen in the Away Info screen, hitting the 31x multiplier.
This multiplier is then multiplied by all possible Multikill multipliers, resulting in a Multikill percentage of 10570%, which is seen above the tier progress in purple text.
All of these multipliers are automatically added to the Kills/Hr count at the top of the AFK Screen so you don’t need to calculate anything yourself.
Remember!
You must have 100% hit rate and your maximum damage must be at least double the enemies health to start getting multikill tiers.
How Death Note Works
The Death Note is unlocked in World 3, which rewards you with additional multikill percentage based on how many of each monster you’ve killed in each world.
It is good to note that these percentages are World dependent, so if you reach +150% additional multikill percentage from World 1 mobs, that will only affect your kill count when fighting in World 1.
Below you can see how many times you need to kill a monster to reach the next bonus.
| Tier | Total Kill Requirement | Multikill Percent |
|---|---|---|
| 25K | +1% | |
| 100K | +2% | |
| 250K | +3% | |
| 500K | +4% | |
| 1M | +5% | |
| 5M | +7% | |
| 100M | +10% | |
| 1,000M | +20% +5% Total Damage |
While the tier bonuses are separated by Worlds, the kill counts and bonuses are shared between all your characters.
Obviously you can also use Time Candy to boost your kill counts in Death Note.
Eclipse Skull
The final black and gold skull or Eclipse Skull is unlocked in World 4, in the Rift, and it requires 1B kills, but also gives additional damage to all characters. Click the link above the see the requirements of unlocking the reward in the Rift.
Other ways to increase Multikill
As with every stat in Idleon, you can also increase your multikill percentage through many other means aside from the Death Note.
Obviously the main way to increase it is by simply increasing your damage, but since there are countless ways to boost damage, we will only cover the ways to directly increase the Multikill Count.
Starting off with achievements, there are 3 that will boost your multikill percentage.
| Achievement | Description | Bonus | World |
|---|---|---|---|
Just Passing By | Pass 30 rooms in the World 2 Party Dungeon. | +2% Multikill for all Worlds | World 2 |
Wazzzzam! | Get ‘Wazam‘ 125 times in the World 2 Party Dungeon. | +6% Multikill for all Worlds | World 2 |
Too Cute To Live | Kill all Sheepies within 20 sec of entering the map. | +5% Total Multikill | World 3 |
Once you reach World 4 and get your hands on Breeding, there are 4 different Shiny Pets that will give you a boost to multikill percentage.
| Shiny Pet Name | Unlock Order |
|---|---|
Baby Boa | World 1 Pet #8 |
Rat | World 1 Pet #17 |
 Bloque | World 3 Pet #6 |
 Dedotated Ram | World 3 Pet #16 |
All of the pets above add +1% to multikill per level, so together they will add up a significant amount once leveled up to 6. Leveling a pet higher than that takes a lot longer in comparison to the early levels.
When it comes to gear, there are a few multikill boosters, but they’re not easy to acquire and in general other bonuses are simply much more useful.
| Equipment | Stats | Source |
|---|---|---|
Hallowed Tail Pendant | +30% Multikill +1 STR/AGI/WIS +3 LUK 2 Upgrade Slots | Party Dungeon Flurbo Shop |
Nuget Cake Fedora | +15% Multikill +1 Weapon Power +10 LUK 6 Upgrade Slots | Smithing (Anvil Tab 2) |
Pincer Hand Chain | First stat: +5%, +7% OR +12% Multikill Second Stat: Random Tier 2 keychain stat (can also be more Multikill %) | Party Dungeon Keychain (Tier 2) |
Crown of the Gods | +22% Multikill per Tier +18 Weapon Power +65 STR/AGI/WIS/LUK +15% Drop Chance +210 Defence 11 Upgrade Slots (Level Requirement: 510) | Smithing (Anvil Tab 6) (World 6 item, extremely late game) |
The Recipe for the Nuget Cake Fedora is received by completing the World 2 achievement called Nuget Nightmare which requires you to get a Nuget Cake (1 in 20K chance) from a Crabbycake monster without using auto attack, which can take ages.

As you might notice, the Pincer Hand Chain can be acquired by buying chains from the Party Dungeon shop or as a Dice Drop from a Party Dungeon. Only a Tier 2 chain can drop this specific multikill chain, but you can have 2 of the same chain on one character.
The rest of the possible multikill bonuses are spread out the game, so we added them into a single convenient table below.
| Item | Effect | Source |
|---|---|---|
 Multikill Stamp | +% Base Multikill rate | Many World 3 Monsters (1 in 1.23M) |
Clammie Card | 0 Star: +1.5% Multikill per Tier 4 Star: +7.5% Multikill per Tier Ruby Star: +9% Multikill per Tier | Clammie (World 4) |
Suggma Card | 0 Star: +2% Multikill per Tier 4 Star: +10% Multikill per Tier Ruby Star: +12% Multikill per Tier | Suggma (World 5) |
Woodlin Spirit Card | 0 Star: +3% Multikill per Tier 4 Star: +15% Multikill per Tier Ruby Star: +18% Multikill per Tier |  Woodlin Spirit (World 6) |
Sovereign Emperor Card | 0 Star: +20% Multikill per Tier 4 Star: +100% Multikill per Tier Ruby Star: +120% Multikill per Tier | Sovereign Emperor (World 6) (Not released, so only W6 Card Pack) |
Cullingo Star Sign | +15% Total Multikill (2nd Constellation, Star #14) | Star Sign (World 1) |
Killian Maximus Star Sign | +3% Multikill per Tier (3rd Constellation, Star F) | Star Sign (World 1) |
Arcade Bonus | When maxed out, gives +5% Multikill per tier (+10% when upgraded after level 100) | Arcade Shop (World 2) |
Mr Massacre Alchemy Bubble | +% Multikill per tier (Level 100 bubble gives +60% multikill) |  Alchemy (World 2) |
Slowergy Drink Alchemy Vial | +1% Multikill per tier per Vial level | Alchemy (World 2) |
 Utilitarian Capsule | +9.78% Multikill per tier at max level 400 |  Post Office (World 2) |
Multikill Obols | Bronze Obol: +1% Multikill Silver Obol: +2% Multikill Gold Obol: +3% Multikill Platinum Obol: +5% Multikill Dementia Obol: +10% Multikill |  Obols |
Death Note Building | +2% Multikill per Building Level |  Construction (World 3) |
Balance of Pain Prayer | Level 1: +8% Multikill per Tier Level 30: +31.2% Multikill per Tier |  Wave 21 at Clash of Cans TD (World 4) |
Purple Salt | Level 1: +3% Multikill Level 10: +30% Multikill |  Salt Lick (World 3) |
Wood Chip | +15% Multikill per tier | Lab (World 4) |
 Mana Is Life | Level 100: +20% Multikill per Tier Level 200: +27% Multikill per Tier | Wizard Talent |
Trilobite Rock Artifact | Normal: +25% Multikill per Tier Ancient: +50% Eldritch: +75% (from The Rift) Sovereign: +100% | Sailing (World 5) |
 Master of the System | Level 100: +6.67% Multikill per Tier Level 200: +10% Multikill per Tier (Applies to all characters) | Voidwalker Talent |
 Monolithialism | Level 100: +15% Multikill per unique Onyx Statue Level 150: +18% Multikill per unique Onyx Statue | Star Talent |
As you might notice there are tons of ways to buff your multikill in each world, many stronger than others. Boosting these is very important as the Tiers you can gain by simply boosting your damage increase exponentially and you will hit a wall fast.
World 6 Jade Emporium & BoneJoePickle
Once you reach World 6, the first thing you do is go to the new Vendor and check what he has for sale. The first item is the spooky BoneJoePickle.
| Item | Description | Source |
|---|---|---|
BoneJoePickle | Multiplies miniboss HP by 1.1x and stacks with other BoneJoePickles. Must hold in character inventory while fighting boss to have any effect. |  Spirit Village Shop World 6 Spirit Village |
Sadly you can only buy 1 per day, but make sure to buy one every day.
Now you might be wondering why you should care about this when it comes to multikills, but that comes to play when you check the Jade Emporium shop where you can buy bonuses with Jade earned from Sneaking.
| Jade Emporium Upgrade | Description | Jade Cost |
|---|---|---|
 Revenge of the Pickle (16th upgrade) | Adds a new miniboss page to the left of World 1 in the Death Note. Each BoneJoePickle in your inventory counts as +1 boss kill in Death Note. |
So once you manage to buy the upgrade, you get a whole new page in your Death Note and the best part about it is, that it gives multikill bonuses to every world, unlike the other pages which only affect that specific world.
On the right you can see how many kills you need per point and each point grants you +1% Multikill per Tier for every World!
You might also notice that stacking the pickles increase the miniboss health, so when you have tons of pickles, your damage needs to be ready for the HP scaling.
Remember to keep the pickles in the inventory of the character you fight the boss with or you get no progress!

At the time of writing this, there are 6 different minibosses that count for this Death Note.
| Boss | Locations | Information |
|---|---|---|
 Dr Defecaus | World 1 The Office | This boss respawns every day. |
 Baba Yaga | World 1 Birch Enclave Dewdrop Colosseum | Check out our Baba Yaga guide |
 Biggie Hours | World 2 The Mimic Hole Sandstone Colosseum | To spawn this boss in the first map, you must drop Googley Eyes on the broken hourglass. (The crafting recipe drops from Crabcakes) As for Sandstone Colosseum, Biggie Hours is the final boss. |
 King Doot | World 2 Sands of Time Portal | Check out our Doot guide |
 Dilapidated Slush | World 3 Refrigeration Station Chillsnap Colosseum | To spawn this boss in the first map, drop a Bucket of Slush on the snow pile. (The crafting recipe for the bucket drops from most W3 mobs like Bloques) As for Chillsnap Colosseum, Dilapidated Slush is the final boss. |
 Mutated Mush | World 4 Spaceway Raceway Astro Colosseum | To spawn this boss in the first map, drop a Toxic Sludge on the top platform of the map. (Get as drop from Slime in World 1) As for Astro Colosseum, Mutated Mush is the final boss. |
If more minibosses are added in later updates, we will make sure to add them to this list.