Idleon is packed with various quests with varying degrees of rewards. Some give out game changing talents or stamps, others simply shill out a few coins. However aside from rewards there are other reasons why you would want to finish as many quests as possible, including a few Star Talents that get stronger based on the amount of quests you have finished.
This article lists all the quests that can be found in World 1, also known as Blunder Hills, along with tips and tricks on how to complete some of the trickier ones. There are currently nearly 80 quests found in this world and doing them with all characters will take half a lifetime.
Under each NPC we will show two expanders, the first will show any especially useful rewards that you can obtain from some of the quests and the second will show each quest, their requirements and rewards.
Make sure to check out the quests from World 2 as well, so you don’t miss out on amazing rewards:
We will not show class experience or coin rewards in the tables, as they’re not really relevant since quests are not a significant way to gain money or experience (and they would needlessly clutter the tables).

Why you should do all the quests
The obvious reason is that most NPC’s have at least one noteworthy reward, but there are a few other reasons as well, most notably the following Special Talents:
| Talent | Description | Effect |
|---|---|---|
 Quest Kapow! | Each completed unique quest across all characters gives +1% Damage | Level 100: +1% DMG per quest up to +500% DMG Level 200: +1% DMG per quest up to +1,000% DMG |
 Studious Quester | Each completed unique quest across all characters gives +0.10% All Skill Efficiency | Level 100: +0.10% Skill Eff. per quest up to +40% Skill Eff. Level 150: +0.10% Skill Eff. per quest up to +60% Skill Eff. |
Quest Chungus | Each completed unique quest across all characters gives +1 LUK | Level 50: +1 LUK per quest up to +200 LUK Level 100: +1 LUK per quest up to +400 LUK |
(Unique quests mean that if you do that same quest on multiple characters, it only counts as 1 quest for these counters)
Another small bonus is that The Tome in World 4 also gives you more points according to your unique quests completed across all characters. While this single bonus won’t be the biggest difference maker, The Tome itself gives fantastic bonuses overall.
Scripticus

Map: Blunder Hills (World 1 Town)
Scripticus is the first NPC in World 1 and shows you the basics of how to play Idleon and provides you with some nice inventory space and potentially your first decent Trophy eventually.
Show 5 Important Rewards
| Quest Name | Useful Reward |
|---|---|
| Mr. Worldwide (#3) | |
| Warrior, Archer or Mage? (#5) | |
| What Lies at the Heart of the Forest (#6) | |
| The Bigger they are, the Bigger they Fall! (#7) | |
| Champion of the Grasslands (#8) | (+2 Weapon Power, +15 DEF, +5 STR/AGI/WIS/LUK, +3% Skill AFK Gains) |
Show All 8 Quests
| Quest | Requirements | Rewards |
|---|---|---|
| 1. Hardcore Gamer Status, Here I Come! | Defeat 5 Green Mushrooms | |
| 2. Gear Up, Gamer! | Craft Boxing Gloves with: | – |
| 3. Mr. Worldwide | Equip the boxing gloves you just crafted and use the portals to go to the next map after Green Mushrooms (Froggy Fields) Then use the Map to teleport anywhere. | |
| 4. The Choice is Yours! | Spend 5 talent points | |
| 5. Warrior, Archer or Mage? | Select a class advancement from Promotheus (Valley of the Beans map) and buy 25 upgrades from the Upgrade Vault. | |
| 6. What Lies at the Heart of the Forest | Unlock the Encroaching Forest Villas map (Map #8) | |
| 7. The Bigger they are, the Bigger they Fall! | Complete Dog Bone’s first quest to get some Forest Villa Keys, then defeat the Amarok boss (through the big door in the same map) | |
| 8. Champion of the Grasslands | Craft all the World 1 completion tokens. | (+2 Weapon Power, +15 DEF, +5 STR/AGI/WIS/LUK, +3% Skill AFK Gains) |
Mr Pigibank

Map: Blunder Hills (World 1 Town)
Mr Pigibank is the banker hoarding all of your Stamps and Bribes, which boost all aspects of Idleon. Quest-wise he only has one, which unlocks the Stamp view upon completion.
Show 1 Quest
| Quest | What to do? | Rewards |
|---|---|---|
| 1. A Pig and his Stamps | Buy any 1 of the 3 stamps from the World 1 shop | Unlocks the use of stamps |
Town Marble

Map: Blunder Hills (World 1 Town)
Similar to Mr Pigibank, this NPC only has one purpose and this time it’s holding all of your statues to provide various bonuses to base stats all across the various stats and professions found in the game. This piece of marble also just has a single easy quest that unlocks the use of statues.
Show 1 Quest
| Quest | Requirements | Rewards |
|---|---|---|
| 1. Visualizing the Sculpture Within… | Buy Sculpting Tools from the World 1 shop |
Builder Bird

Map: Blunder Hills (World 1 Town)
The Builder Bird unlocks the portal to World 2 once you finish most of Scipticus’ quests and kill Amarok. World portals unlock for all characters when the quest is completed!
Show 1 Quest
| Quest | Requirements | Rewards |
|---|---|---|
| 1. Restoring Power to the Portal | Give the bird the Desert Topaz that is dropped by Amarok |
Glumlee
Map: Tunnels Entrance
Glumlee introduces you to the amazing world of mining, which is a cornerstone of Idleon, as almost all equipment require some sort of ore to be smelted into bars. Sadly his quest rewards are not particularly useful.
Show 2 Important Rewards
| Quest Name | Useful Reward |
|---|---|
| The Impossible Task (#4) | |
| He’s Havin’ a Bad Day (#5) | (Used for crafting the “Easy Blunderhills NPC Token” which is needed for Scripticus’ final quest) |
Show All 5 Quests
| Quest | Requirements | Rewards |
|---|---|---|
| 1. Learning to Swing | Mine 2 Copper Ore | |
| 2. Learning to Smelt | Smelt a Copper Bar at the Forge. You can use the oil from the previous quest to speed it up. | |
| 3. Literally Burning your Money | Buy 2 upgrades from the Forge | |
| 4. The Impossible Task | Pick up the microphone he drops on the ground. | |
| 5. He’s Havin’ a Bad Day | Pick up the microphone he drops on the ground again. |
Mutton

Map: Freefall Caverns
Mutton is the next NPC you encounter after Glumlee and he provides a few stamps as rewards, one of which is the Golden Apple Stamp which is a big boost for Gold Food bonuses!
Important!
Muttons last quest requires you to collect tons of Corporatube Subs, Instablab Followers and Cloudsound Followers. However these items will only drop from monsters while you have this quest active (not completed). You can complete the quest earlier on one character to get the Golden Apple Stamp.
This also means that if you don’t finish this quest, you will get tons of these 3 items while you play normally, allowing you to Green Stack them in your Storage Box (over 10 million of each becomes a Green Stack).
You want to get as many Green Stacks in your storage as possible, because in World 4 Lab the Unadulterated Banking Fury bonus gives +2% Total Damage per Green Stack.
Also the Equinox in World 3 has a requirement of 200 different Green Stacks for one of the upgrades.
Show 4 Important Rewards
| Quest Name | Useful Reward |
|---|---|
| Beatboxing Starterpack (#1) | |
| Clout Chasin’ (#2) | |
| Cross Platform Promotion (#3) | |
| 7 Figure Followers (#4) |
Show All 4 Quests
| Quest | Requirements | Rewards |
|---|---|---|
| 1. Beatboxing Starterpack | Find the Headband and Pants by killing monsters: (Both of the above items are dropped by Green Mushrooms, Frogs, Bored Beans, Red Mushrooms, and Amarok) | |
| 2. Clout Chasin’ | (Easiest monsters that drop these are Poops. Click the sewer in World 1 town to find them!) | |
| 3. Cross Platform Promotion | (Easiest monsters that drop Instablabs are Rats. They’re found in the next map after Poops) | |
| 4. 7 Figure Followers | (Cloudsound Followers are dropped by nearly every monster in all worlds once this quest is active!) |
Krunk

Map: Freefall Caverns
Krunk has some pretty underwhelming quests, the best reward being a new bridge that unlocks at the top of the map which allows you to run to Gold Ores a little faster. Thankfully the quests are pretty easy to finish up.
Show 1 Important Reward
| Quest Name | Useful Reward |
|---|---|
| The Scientific Method, According to a Rock (#2) |
Show All 3 Quests
| Quest | Requirements | Rewards |
|---|---|---|
| 1. A Plot to be Perfect | (You can buy Small Mana Potions from the World 1 Shop) | |
| 2. The Scientific Method, According to a Rock | (Easiest to farm from Slimes, Baby Boas or Carrotmans) | |
| 3. King of the Cavern | Also unlocks a bridge at the top of the map, allowing faster access from the portal to Gold Ore. |
Woodsman

Map: Spore Meadows
The Woodsman is your introduction to the Chopping skill, but sadly gives no worthwhile rewards from his quests, other than the token which is needed for one of Scripticus’ quests.
Show 1 Important Reward
| Quest Name | Useful Reward |
|---|---|
| Exotic Pranks… I mean Logs! (#4) | (Used for crafting the “Easy Blunderhills NPC Token” which is needed for Scripticus’ final quest) |
Show All 4 Quests
| Quest | Requirements | Rewards |
|---|---|---|
| 1. A noob’s first swing | ||
| 2. A noob’s 2nd first swing | ||
| 3. It’s Just a Plank, Bro! | AGI +3, LUK +4, DEF +2, Chop Efficiency +5%) | |
| 4. Exotic Pranks… I mean Logs! | (This tree can be found in the last map of World 1) |
Typhoon

Map: Froggy Fields
Typhoon is the Colosseum guardian for World 1 and is your source for Colosseum Tickets for this world. You simply need to complete his one easy quest to start gaining tickets and start Colosseum runs.
Show 1 Important Reward
| Quest Name | Useful Reward |
|---|---|
| Surprise Attack! (#1) | Ability to collect a Colosseum Ticket every day (stacks up to 3 if you forget to collect for 3 days) |
Show 1 Quest
| Quest | Requirements | Rewards |
|---|---|---|
| 1. Surprise Attack! | Kill the 7 Frogs that spawned. | Unlocks the ability to collect a Colosseum Ticket every day by clicking on him. |
Picnic Stowaway

Map: Froggy Fields
Picnic Stowaway is an NPC where you can repeat most of his quests once per day, in this case in order to get the King of Food Trophy (one of the best ones early on).
You can also get the important Crystals 4 Dayys Star Talent which increases Crystal Monster spawn chance by A LOT which is important for grinding statues.
Show 4 Important Rewards
| Quest Name | Useful Reward |
|---|---|
| Brunchin’ with the Blobs (#5) | |
| The Last Supper, at Least for Today! (#9) | |
| A Midnight Snack (#11) | |
| King of Food (#12) | (+3 Weapon Power, +10 STR/WIS/AGI/LUK, +25 DEF, +20% Food Effect) |
Show All 12 Quests
| Quest | Requirements | Rewards |
|---|---|---|
| 1. The Hungry Stowaway | (Craft it from the Anvil) | |
| 2. Beating Up Frogs for some Sauce | (These drop from Frogs while the quest is active) | |
| 3. Live-Action Entertainment | Defeat 10 Green Mushrooms that spawn on the map. (If you fail for any reason, you can forfeit the quest from the quest window and start it again) | |
| 4. The Most Important Meal of the Day | ||
| 5. Brunchin’ with the Blobs | (You get the Peanut recipe when you start the quest, it’s also needed for Journeyman) | |
| 6. Luncheon with the Inlaws | ||
| 7. Afternoon Tea in a Jiffy | Run to the Vegetable Patch map and kill the Sandy Pot in the map, pick up the teacup dropped by it and run back. Don’t use the map to teleport or the quest will fail! | |
| 8. Early Evening Eating Endeavor | (You can buy Kebab Sticks from the World 2 Town Shop) | |
| 9. The Last Supper, at Least for Today! | (Dropped by Amarok, the World 1 Boss) | |
| 10. Don’t Desert the Dessert | (1 in 20K chance to drop from Crabcakes in World 2 Dessert Dunes map) | |
| 11. A Midnight Snack | (Rare drop from later World 2 mobs, like Tyson, Moonmoon, Sand Giant, Snelbie and Efaunt) | |
| 12. King of Food | (+3 Weapon Power, +10 STR/WIS/AGI/LUK, +25 DEF, +20% Food Effect) |
Hamish

Map: Froggy Fields
Hamish is found at the bottom right of Froggy Fields and all of his quests provide some nice rewards including 2 stamps as well as some more storage space.
Show 3 Important Rewards
| Quest Name | Useful Reward |
|---|---|
| The Hamazing Plot Twist (#1) | |
| Should we tell him? (#2) | |
| Slime for Storage (#3) |
Show All 3 Quests
| Quest | Requirements | Rewards |
|---|---|---|
| 1. The Hamazing Plot Twist | ||
| 2. Should we tell him? | Craft Purple Tupacband from the recipe he drops: | |
| 3. Slime for Storage |
Toadstall

Map: Grandfrog’s Backyard
Toadstall is just here to introduce you to the Party Dungeons and give you a few Dice to get your first Dungeon Credits. None of the rewards are fantastic and you will get infinitely more by simply grinding the dungeons.
Show All 3 Quests
| Quest | Requirements | Rewards |
|---|---|---|
| 1. Creating a Party! | Create a party from the party-button in your inventory. | |
| 2. Bigger Party Better Party! | Be in a party of 3, including yourself. You can join someone else’s party as well. | |
| 3. Bother the Frogger! | Defeat Grandfrogger (the main boss of the Party Dungeon) |
Promotheus

Map: Valley Of The Beans
Promotheus is a well-known NPC as you must talk to him with all of your characters in order to choose a class (except Journeyman, but you can still complete his quests after you have acquired Journeyman).
Also his last quest gives 2 inventory slots which is always great!
Show 1 Important Reward
| Quest Name | Useful Reward |
|---|---|
| The Witcher, but not Really (#4) |
Show All 4 Quests
| Quest | Requirements | Rewards |
|---|---|---|
| 1. I’m Ready, Promotion! | Reach level 10 | |
| 2. Three Right Answers | Select a class | |
| 3. Slovakian Scare | See Baba Yaga (enter the Birch Enclave map) | (+3 AGI, +11 WIS, +4 DEF, +10% Mana Regen) |
| 4. The Witcher, but not Really | Kill Baba Yaga |
Stiltzcho

Map: Jungle Perimeter
Stiltzcho is an NPC hiding among the Slimes and gives you a Scouting Report that unlocks an achievement (only when playing on Steam), which gives you 20 gems. The rest of his rewards just give you some time candy and a token.
Show 2 Important Rewards
| Quest Name | Useful Reward |
|---|---|
| Time Crime Season Finale (#6) | (Used for crafting the “Easy Blunderhills NPC Token” which is needed for Scripticus’ final quest) |
Show All 6 Quests
| Quest | Requirements | Rewards |
|---|---|---|
| 1. Outta the Way Slimes | Kill 10 Slimes before the timer runs out. | |
| 2. No Stone Unturned | Gather 4 Strange Rocks from Boas (They only drop when this quest is active) | |
| 3. Investigator by Day, Prankster by Night | ||
| 4. Time Crime Episode 1 | AFK at Green Mushrooms for 4 hours (You can use Time Candies for this to speed it up) | |
| 5. Time Crime Episode 2 | AFK at Frogs for 8 hours (You can use Time Candies for this to speed it up) | |
| 6. Time Crime Season Finale | AFK at Slimes for 16 hours (You can use Time Candies for this to speed it up) |
Funguy

Map: Winding Willows
Funguy has some fun quests, with decent rewards. Mainly a good early game ring which increases your fighting AFK gains, as well as the Funguy Token which is needed for Scripticus’ final quest.
Show 2 Important Rewards
| Quest Name | Useful Reward |
|---|---|
| Partycrastination (#3) | (STR/AGI/WIS/LUK +1, +2% Fighting AFK Gains) |
| Wicked Party Cleanup (#5) | (Used for crafting the “Easy Blunderhills NPC Token” which is needed for Scripticus’ final quest) |
Show All 5 Quests
| Quest | Requirements | Rewards |
|---|---|---|
| 1. Mushroom Munchies | ||
| 2. Videogame Highscores are COOL! | Get 20 points in the Chopping minigame | (+5 STR, +9 AGI, +13 DEF) |
| 3. Partycrastination | (These drop only while the quest is active, from: Slimes, Baby Boas, Carrotmans, Baba Yaga and Amarok) | |
| 4. Party Crashin’ | Kill the 35 mobs that spawn on the map (If you accidentally leave the map, forfeit the quest and start again) | |
| 5. Wicked Party Cleanup | (Drops from the Toilet Tree found in the Poopy Sewers map) | (50% chance for +4 Random Stat, +3 Weapon Power) |
Dog Bone

Map: Encroaching Forest Villas
Dog Bone is your path to Amarok and most importantly he starts handing out more keys every day after you complete his first quest.
Other than that, he also provides a Token like most other NPC’s, so you can finish up crafting those Blunderhills NPC Tokens.
Show 2 Important Rewards
| Quest Name | Useful Reward |
|---|---|
| Why he Die??? (#1) | Unlocks ability to collect Forest Villa Keys from him every day. (You get more keys per day when you complete this quest on more characters) |
| Bow Wow going Dow..n! (#2) | (Used for crafting the “Med Blunderhills NPC Token” which is needed for Scripticus’ final quest) |
Show All 2 Quests
| Quest | Requirements | Rewards |
|---|---|---|
| 1. Why he Die??? | Collect 3 Dog Bones dropped by Planks | Unlocks ability to collect Forest Villa Keys from him every day. |
| 2. Bow Wow going Dow..n! |
Tiki Chief

Map: Encroaching Forest Villas
Tiki Chief requires you to be level 60 to start his questline, which is surprisingly high, but at least he gives you a stamp for your collection and 50 Kachow statues (+% Crit DMG) which is a nice bonus. Also you’re going to want the Token from his final quest to complete Scripticus’ final quest.
Show 2 Important Rewards
| Quest Name | Useful Reward |
|---|---|
| Three Strikes, you’re Out! (#2) | This is a pretty useless stamp, but it’s nice to collect all the stamps. |
| Hotel? Tikivago. Sorry, couldn’t Help It! (#4) | (Used for crafting the “Med Blunderhills NPC Token” which is needed for Scripticus’ final quest) |
Show All 4 Quests
| Quest | Requirements | Rewards |
|---|---|---|
| 1. Brochure Building | ||
| 2. Three Strikes, you’re Out! | Drop the flier on Krunk, Funguy and Mr Pigibank (Pick it back up after dropping) | (+% Quest XP) |
| 3. Blame it on the Glublins | Defeat 5,000 Glublins (You can use Time Candy to speed this up) | |
| 4. Hotel? Tikivago. Sorry, couldn’t Help It! | Kill Amarok 5 times and one of them should be in under 30 seconds |
Papua Piggea

Map: Tucked Away
Papua Piggea provides you with some amazing stamps, especially the Crystallin Stamp which increases Crystal Monster spawn chance.
The quests do take a while to complete though, as one of them needs a few stamps you have to buy from shops and you can only buy 1 of each per day, so make sure to stock up when you can, so all your characters can eventually complete this quest.
Show 5 Important Rewards
| Quest Name | Useful Reward |
|---|---|
| Oinko Boinko (#1) | (+% Critical DMG) |
| Crystal Crime Stopper (#2) | (+% Crystal Monster spawn chance) |
| Stamp Collecting (#3) | (+% Boost from Food) |
| This Little Piggy Felt Remorse (#4) | (+% Total Damage) (Used for crafting the “Med Blunderhills NPC Token” which is needed for Scripticus’ final quest) |
Show All 4 Quests
| Quest | Requirements | Rewards |
|---|---|---|
| 1. Oinko Boinko | (Drops from Gigafrogs only while this quest is active) | (+% Critical DMG) |
| 2. Crystal Crime Stopper | (Drops from all Crystal Monsters only while this quest is active) | (+% Crystal Monster spawn chance) |
| 3. Stamp Collecting | (Buy from World 1 Town Shop) (Buy from World 1 Town Shop) (Buy from Encroaching Forest Villas Shop) | (+% Boost from Food) |
| 4. This Little Piggy Felt Remorse | Upgrade Stamps until you reach a total stamp level of 500 | (+% Total Damage) |
Sprout

Map: The Base Of The Bark
This happy little flower pot is known for the infamous Frisbee collection quest which used to be a lot harder than it is now. Sadly none of the quest rewards are great, but the Frisbee Ring reward can help out in the early game with potential accuracy problems.
Show 1 Important Reward
| Quest Name | Useful Reward |
|---|---|
| Frisbee Fanatic (#4) | (+12 STR, +35 Accuracy) Great ring for early game if you are missing Accuracy for some mobs. |
Show All 4 Quests
| Quest | Requirements | Rewards |
|---|---|---|
| 1. Sticks and Stone Something Something Bones… | ||
| 2. Justice Wears No Clothes | Defeat 30 Walking Sticks without any equipment other than a weapon | (+4 STR, +13 WIS, +2 DEF) |
| 3. Shoe Shopping with Sprout | (Goo Galoshes crafting recipe has a 1 in 33.3K chance to drop from Slimes) | (+2 Weapon Power, +8 AGI, +1 DEF) |
| 4. Frisbee Fanatic | (1 in 100k chance to drop from Wood Mushrooms at the top of the tree) | (+12 STR, +35 Accuracy) |
Dazey

Map: Hollowed Trunk
Dazey is another lackluster NPC in terms of rewards with nothing noteworthy to talk about other than the Token which is needed to craft the Hard Blunderhills NPC Token.
Show 1 Important Reward
| Quest Name | Useful Reward |
|---|---|
| Literally Physics (#2) | (Used for crafting the “Hard Blunderhills NPC Token” which is needed for Scripticus’ final quest) |
Show All 2 Quests
| Quest | Requirements | Rewards |
|---|---|---|
| 1. Dressing like a Dork | (Flowies have 100% chance to drop from Baba Yaga) | |
| 2. Literally Physics | (Rare drop from Wood Mushrooms and Walking Sticks) |
Telescope

Map: Where the Branches End
The Telescope is the way to view and assign your collected Star Signs and constellations, which provide decent bonuses especially after you unlock The Rift and get Infinite Star Signs.
Check out our Star Sign guide to see the locations of all the Star Signs!
Show 1 Important Reward
| Quest Name | Useful Reward |
|---|---|
| I’m Seeing Stars! (#1) | Unlocks the ability to collect Star Signs and assign them to your characters. |
Show 1 Quest
| Quest | Requirements | Rewards |
|---|---|---|
| 1. I’m Seeing Stars! | Go AFK for 1 hour on the map, then click on the star constellation at the bottom right branch. | Unlocks the ability to collect Star Signs and assign them to your characters. |
TP Pete

Map: Rats Nest
TP Pete is another NPC with no noteworthy quest rewards. You can get a new pickaxe from his last quest but it’s so slow that it’s just not worth using.
BUT, if you type “More like Poopy Pete” while standing next to him, you get a free Star Talent:
| Talent | Description | Effect |
|---|---|---|
Toilet Paper Postage | Stamps that give Skill Efficiency give higher bonuses | Level 100: 1.35x bonuses Level 200: 1.47x bonuses Level 1000: 1.64x bonuses |
Sadly as you might notice, the scaling really drops off fast so it’s not worth investing a lot of points into (if at all), depending on how many extra points you have left after leveling the more important Star Talents first. Check our Start Talent guide for talent priorities.
Show All 3 Quests
| Quest | Requirements | Rewards |
|---|---|---|
| 1. Roll of Anger | Defeat 40 Poops in 200 seconds | |
| 2. The Rats are to Blame! | (These drop from Rats when the quest is active) | (80% chance to get+2 Skill Power, +2 Random Stat) |
| 3. Fired for BS Reasons! | (Drops from Dr Defecaus at The Office map) | (Mining Power: 18, Speed: 2 (Very slow), +2% Mining Efficiency, +3 DEF) |
Meel

Map: Entrance is at The Office map
Meel is a spooky skeleton hidden inside the sewers and has two quests that give you some gems and a mediocre Death Wish ring. These quests can only be completed once and apply to all characters when completed.
In order to access this hidden area you first need some Bolt Cutters, which is a rare drop from Green Mushrooms.
| Item | Source | Drop Chance |
|---|---|---|
Bolt Cutters | Green Mushroom (W1 – Spore Meadows) | 1 in 100,000 |
Then go to the end of the sewers, The Office, where Dr Defecaus resides. Click on the top right corner of the map where the sewer grate is and your character will walk there along an invisible platform.
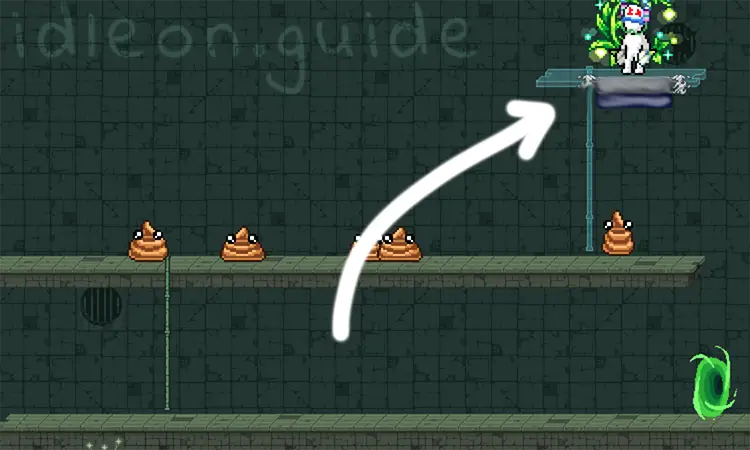
Then simply click on the sewer grate to enter the hidden map and find Meel. This will remain open for all your characters.
Show All 2 Quests
| Quest | Requirements | Rewards |
|---|---|---|
| 1. Spooky Scary Skelepoops | (15 Boops spawn on this map every day, so this quest will require you to come back tomorrow to kill the rest) | |
| 2. Waitin’ for the Cards to Drop | (Only Boops drop these so it will take many days to complete. But if you manage to spawn a Giant Monster on this map, it drops tons of Bonemeals. So you can try to enter this map just when a week resets, so you will have a higher chance to spawn a giant mob) | (+4 Weapon Power, +6 DEF, +5% Boss Damage) (60% chance for +1 Weapon Power, +3 Random Stat) These upgrade stones are also used in crafting the Efaunt Helmet. |
That’s it for all the quests in World 1! If you made it this far, congratulations. Now it’s time to rinse and repeat the quests with all your other characters for even more rewards, then move on to the next World.