Accuracy is one of the most important concepts to understand in Idleon early on, as you will struggle to hit enemies even if your damage would be high enough to progress to the next map.
Thankfully it is a very simple stat to understand and just as easy to boost through various means.
This guide will go through how to increase accuracy as well as how much of it you will need in each World to be able to hit all the enemies at 100% accuracy.

How Accuracy works in Idleon
At its core, accuracy decides how likely you are to hit a certain monster.
If your accuracy is 50%, you will miss half of your hits and only gain half of any AFK gains from that map.
Each class has a specific stat that improves their accuracy, which you can see from the chart below, taken from our class selection guide.
| Image | Class | Path | Damage Stat | Accuracy Stat | Profession |
|---|---|---|---|---|---|
 | Warrior | STR | WIS | Mining | |
 | Archer | AGI | STR | Smithing | |
 | Mage | WIS | AGI | Chopping | |
 | Journeyman | LUK | LUK | All Professions |
As you can see, each class has different stats for damage and accuracy (except Journeyman), but the damage stat also affects that classes profession efficiency, meaning it is a much more important stat to boost.
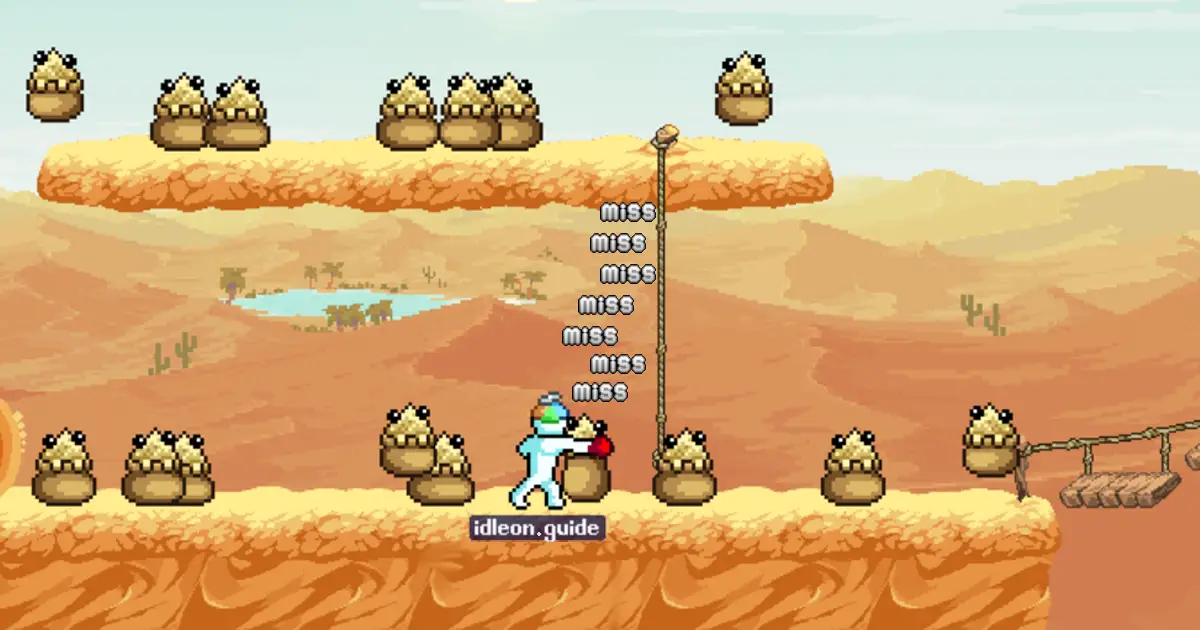
You can find the current accuracy requirement in a specific map from it’s AFK Info screen and it will show you your current accuracy above the progress bar.
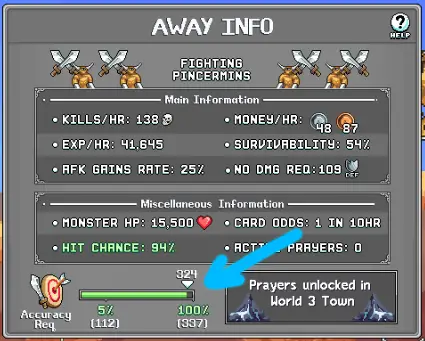
In the image above, the World 2 Pincermins map requires 337 accuracy for a 100% hit chance, and the current character has 324 accuracy, meaning he will only have a 94% chance to hit an enemy.
You can see your current accuracy on top of the green accuracy bar or by opening your bag and finding the stat from the Character Info.

Putting points into your classes accuracy related stat will give many points into actual accuracy, as it is multiplied by many aspects of the game.
We will discuss all the possible ways to increase this multiplier after the next section.
Accuracy requirements in each World
In general you want to have 100% accuracy in any map that you are idling on as to maximize your gains, but anything over that is generally redundant.
This is why you should have an idea of when your accuracy is high enough to finish your current World and focus on increasing your damage stats instead.
World 1 Accuracy Requirements
| Monster | Accuracy Requirement (for 100%) | |
|---|---|---|
| First Enemy |  Green Mushroom | 2 |
| Last Enemy |  Gigafrog | 90 |
| World Boss |  Amarok | 158 |
World 2 Accuracy Requirements
| Monster | Accuracy Requirement (for 100%) | |
|---|---|---|
| First Enemy | Sandy Pot | 90 |
| Last Enemy |  Snelbie | 600 |
| World Boss |  Efaunt | 825 |
World 3 Accuracy Requirements
| Monster | Accuracy Requirement (for 100%) | |
|---|---|---|
| First Enemy |  Sheepie | 825 |
| Last Enemy |  Neyeptune | 3,600 |
| World Boss |  Chizoar | 3,375 |
World 4 Accuracy Requirements
| Monster | Accuracy Requirement (for 100%) | |
|---|---|---|
| First Enemy |  Purp Mushroom | 4,200 |
| Last Enemy |  Stilted Seeker | 16,500 |
| World Boss |  Massive Troll | 3,750 |
World 5 Accuracy Requirements
| Monster | Accuracy Requirement (for 100%) | |
|---|---|---|
| First Enemy | Suggma | 18,000 |
| Last Enemy |  Tremor Wurm | 75,000 |
| World Boss | Kattlecruk | 3,750 |
World 6 Accuracy Requirements
| Monster | Accuracy Requirement (for 100%) | |
|---|---|---|
| First Enemy |  Sprout Spirit | 75,000 |
| Last Enemy |  Samurai Guardian | 3,8M |
| World Boss | Not out yet | Not out yet |
Notice
It is good to note that once you reach World 4, you will be getting so many buffs and bonuses from the new Professions that you will never have to think about having enough Accuracy again.
Best Gear for high accuracy
You should now be aware of how much accuracy you need to finish your current world, so let’s go through all the methods and tools that increase your accuracy in Idleon.
Obviously the most important factor is by increasing your class-specific accuracy stat, but other than throwing in more skill points, gear is the biggest difference maker early on.
Keeping your gear up-to-date when you reach a new world will usually give you enough accuracy to finish that world.
Here are the optimal gear sets for each world that should give you most of the accuracy boost you will need.
NOTE: The armors below are ordered from decent (will work) to good (will work better)! All anvil tabs have better equipment but they’re not worth it for all characters due to high material costs.
| Item Type | World 1 (Blunder Hills) | World 2 (Yum Yum Desert) |
|---|---|---|
| Weapon | ||
| Helmet | ||
| Body | ||
| Legs | ||
| Boots | ||
| Pendant | ||
| Rings |
Weapon choice is not important early on as they don’t boost stats or accuracy significantly, but in World 2 it’s already worth it to craft some of the class specific weapons.
Copper armor will last you just fine through the entire first world, but Amarok equipment are cheap and good enough for the second world (Amarok helmet is not worth the materials).
As for the amulets, the orange Carrot Horror pendant is decent and you get it for free from Stiltzcho’s early quests.

However, once you reach Amarok, you can buy the Tarantulight pendant from the Encroaching Forest Villas shop which has one more upgrade slot.
When it comes to rings, the Steel Band is fairly cheap and has 3 upgrade slots in comparison to the other rings 2 slots, so it’s the best option early on.

The Frisbee Ring is a quest reward from Sprout from the top of the tree in World 1, where you need to kill some Wood Mushrooms. It gives +35 Accuracy and has 4 upgrade slots, but it’s quite difficult to get many of, so it’s debatable if it’s worth the trouble.
| Item Type | World 3 (Frostbite Tundra) | World 4 (Hyperion Nebula) |
|---|---|---|
| Weapon | ||
| Helmet | ||
| Body | ||
| Legs | ||
| Boots | ||
| Pendant | ||
| Rings |
The weapons are self explanatory and helmets are pretty simple and cheap as well.
When it comes to armor, you can get far with the Efaunt gear, then upgrading them to Dementia as you go. Finally Chizoar gear will get you through World 4 and started with World 5.
The Deathly Cluster pendant can be obtained from the Party Dungeon Flurbo shop and it’s one of the best pendants currently in the game, only bested by Chizoars Caustic Scarf.

When it comes to rings, the Silver Stopwatch is fairly easy to get from Funguy’s quests, but the Bejeweled Ring is a nice step up once you get enough Flurbos in Party Dungeon to buy a few. In World 4, the Neutron Ice ring is great and super easy to get from Rams, so you can just add them to all your characters.
Remember to use up the upgrade slots on your equipment! If you want to add your accuracy statistic to them, you must upgrade them on a character where it is their main stat. For example, if you want more WIS on your gear for your Warrior to boost his accuracy, use upgrade stones on his gear on your Mage character!
Your accuracy will be high and you won’t need to worry about complicated gear sets as these work perfectly for all classes.
Note
The gear above is not the best possible end-game gear, but cheapest ones that will provide you with enough accuracy to progress through the worlds.
Big Accuracy Boost Early From The Upgrade Vault
With the addition of the Upgrade Vault from the beginning of World 1, it is the easiest early boost to your accuracy, especially since those upgrades are fairly cheap in comparison to most of the others.
We made a guide covering the Upgrade Vault which might be a useful read, as well as a Money Farming guide to max out all those pesky expensive upgrades.
These are all the upgrades from the vault that boost your Accuracy (the total cost in the table expects you to have maxed out the Major Discount upgrade):
| Upgrade | Description | Effect | Total Cost |
|---|---|---|---|
 Bullseye | More Accuracy | Level 1: +1 Accuracy Level 200: +200 Accuracy | |
 Stamp Bonanza | Higher bonuses from the Sword, Heart, Target, and Shield stamps (the Target Stamp gives more accuracy!) | Level 1: +1.02x Bonuses Level 100: +3.00x Bonuses | |
 Vial Overtune | All Vials give higher bonuses (meaning the Fly In My Drink gives more base Accuracy!) | Level 1: +1.10x Bonuses Level 3: +1.30x Bonuses | |
  Vault Mastery I & II | Higher bonuses from all Vault Upgrades | Level 1: +1.01x Bonuses Level 50: +1.50x Bonuses |
While there is only one main accuracy booster, Bullseye, the others will add on top of that and they will definitely help out a lot early on if you’re struggling with reaching those Accuracy tresholds.
Alchemy for Accuracy
If your gear is not quite there yet, the second biggest boost to accuracy in Idleon is the famous Shaquracy alchemy bubble.
It is the 7th bubble in the green cauldron and can be increased with Bloach fish.
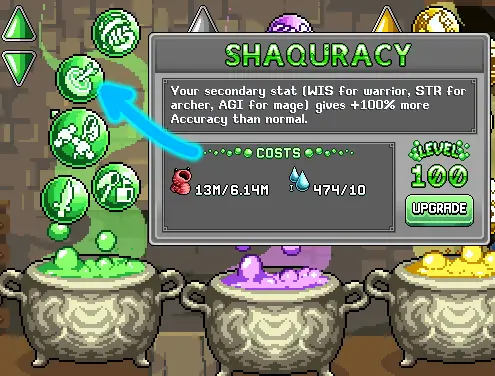
It has a huge buff of +1% Accuracy gained from your classes accuracy stat per level, which makes a massive difference fast. At level 100, it will double your accuracy, which in turn is increased even more by other buffs.
If you checked our Alchemy Vial guide, you might notice there is also a Fly-vial which boosts base accuracy.

However, the boost is very insignificant in comparison to the amount of materials it costs, so you shouldn’t focus on it too much. The Shaquracy bubble is much more important.
Massive Accuracy Boost from Poppy the Kangaroo Mouse
Poppy The Kangaroo Mouse’s Fish Pond is a relatively new addition to World 2 and you can find him by purchasing the map from the World 2 Town Shop and following its directions.
Poppy requires you to catch fish in order to buy upgrades and once you reach enough fish, you can buy the “Bonuses From Poppy” upgrade from the top right corner.

In addition, you can reset everything in order to get a Megafish, which in turn boosts all the bonuses from the other bonus mentioned above, including a percentage boost to Accuracy.
This can end up being absolutely massive, as you will get around a +100% accuracy boost at 8 Megafish caught.
Sure, this will take a long time to grind through, but it’s worth it especially since you also get other great bonuses like more AFK Cains, more Total DMG and a huge boost to Coin gains.
Boosting Accuracy with Cards, Statues & Stamps
There are 5 different cards in Idleon that boost accuracy by a lot, but since cards also can provide huge bonuses to damage and other aspects, you don’t want to waste them on accuracy if not necessary.
The cards are listed below in descending order of their position in the in-game card gallery.
| Card | Source | Min. Effect (0 Stars) | Max. Effect (4 Stars) |
|---|---|---|---|
 | Wood Mushroom World 1 Where the Branches End | +5% Total Accuracy | +25% Total Accuracy |
 |  Sand Castle World 2 Shifty Sandbox | +4% Total Accuracy | +20% Total Accuracy |
 | Copper Vein World 1 Tunnels Entrance | +4 Base Accuracy | +20 Base Accuracy |
 | Stump Tree World 1 Hollowed Trunk | +3% Total Accuracy | +15% Total Accuracy |
 | Neyeptune World 3 Crystal Basecamp | +5% Total Accuracy | +25% Total Accuracy |
It is good to note that alongside the cards, the World 3 card set, or Frostbite Tundra set, has a set bonus of increased defense and accuracy from 5% all the way up to 25% for the 4-star complete set bonus, so you can use this in addition if you need even more accuracy.
Alongside cards, there are also 3 stamps and one statue that can be used to level up your accuracy stats a little, but these boosts are not too significant in comparison to other boosts.
| Stamp | Effect | Main Source | Upgrade Material |
|---|---|---|---|
 Target Stamp | +1 Base Accuracy (per level) |  Blunder Hills Shop (World 1 Town) | Thread (Anvil) |
 Bullseye Stamp | +2 Base Accuracy (per level) | Snelbie World 2 Djonnuttown | Sentient Cereal World 2 Pincer Plateau |
 Tripleshot Stamp | +3 Base Accuracy (per level) | Purp Mushroom World 4 Spaceway Raceway | Tangled Cords (Anvil) |
| Statue | Effect | Main Source | Levels |
|---|---|---|---|
 Bullseye Statue | +% Accuracy |  Walking Stick World 1 The Base of the Bark | Level 10: +8% Accuracy (21 statues) Level 50: +40% Accuracy (437 statues) |
The stamps cost a lot of money to upgrade, so they will not help much early on, but the Statues are fairly easy to collect to decent levels. The statue requirements scale fast after the first 50 levels, so don’t focus on it later on.
Talents and Star-Signs to elevate Accuracy
Now we’ve covered the best early game accuracy boosters, but don’t fret, there are plenty more if you are still struggling to reach 100% hit chance or want to boost the Overaccurate Crit talent.
Bowman and Squire have their own talents to boost accuracy, but there are also some Star talents that benefit from high accuracy, which are all listed below.
| Talent | Type | Effect | Source |
|---|---|---|---|
 Extendo Rangeo | Bowman Talent | Level 100: Attack range +70 pixels & Accuracy +25% for few minutes Level 200: Attack range +120 pixels & Accuracy +31% for few minutes | Class Specific |
Balanced Spirit | Squire Talent | Level 100: Accuracy & Def +17% but Damage -28% Level 200: Accuracy & Def +20% but Damage -33% | Class Specific |
Precision Power | Squire Talent | Level 100: +6% Damage per Refinery Rank if Accuracy is at least 150% of map limit Level 200: +8% Damage per Refinery Rank if Accuracy is at least 150% of map limit | Class Specific |
Tiptoe Quickness | Star Talent | Level 100: If under 200% speed: +13% Speed Else: +15% Accuracy Level 200: If under 200% speed: +17% Speed Else: +20% Accuracy | Party Dungeon Flurbo Shop |
Overaccurate Crit | Star Talent | Level 100: +5% Crit Chance for every POW 10 accuracy over 100% Level 200: +6% Crit Chance for every POW 10 accuracy over 100% | Party Dungeon Flurbo Shop |
Alongside Star Talents, there are also 2 Star Signs which increase accuracy, although again they are very tiny buffs, but better than nothing.

You can find the Robinhood Star Sign in the right edge of the first tab, which gives +4% accuracy, while the other sign is the second star sign in the second constellation tab, which has a higher buff of +10% accuracy.
Check our Constellation Guide on how to unlock these Star Signs easily.
Other End-Game accuracy buffs
There are still many other accuracy sources to utilize and in order to keep this guide fairly compact, we added the rest of the useful boosts here in a tidy list.
| Item | Effect | Location | Source |
|---|---|---|---|
Arcade Accuracy Upgrade | +30% Total Accuracy (30% when maxed out, can also double it to +60% with the Super Upgrade) | World 2 Arcade | Can show up in the Arcade Shop depending on the current rotation |
Grounded Software | +10% Total Accuracy | World 4 Lab Chip | Pile of Chips |
Cheesy Bread | +1% Total Accuracy (per level) | World 4 Cooking | Meal #25 |
Balance of Precision | Level 1: +30% Accuracy -15% Total Damage Level 50 (Max): +177% Accuracy -89% Total Damage |  World 3 Prayer |  World 2 Up Up Down Down (Reach Wave 31) |
Box of Unwanted Stats | +0.25 Base Accuracy (per level) |  World 2 Post Office | Unlocked Automatically |
 Butter Bar | Boosts Base Accuracy (1,000 bars = +22 accuracy) This can be further boosted by the Giant Beanstalk in World 6 by collecting 20k and 100k bars and dropping them on it! |  World 2 Bandit Bob’s Hideout | Catching Butterflys |
Flurbo Shop | +1% Accuracy (per level) |  Party Dungeon | Buy from Non-Dungeon Stats |
 Snehebatu | Minor Link Bonus: Up to +70% Accuracy Up to +70% Defence | World 5 Divinity | Unlocked Automatically (1st God) |
From the list above, everything should be fairly self explanatory other than the World 5 Divinity God. A minor link bonus means you will get that bonus only on a character that is currently linked to that specific God.
The stats also increase depending on your current Divinity level. So for example at Divinity level 50, you would get about +30% accuracy from Snehebatu if you linked to it.
But as mentioned many times, once you reach World 5, you will not have any trouble with Accuracy unless you’re under-geared or under-levelled, so there are many better Gods to use instead. You can check some examples from our Sailing Guide which are much better.