You’ve surely stumbled upon a few outdated reddit posts about how to make the best possible mining build or how to increase your mining efficiency to the max, but so many things affect skilling, that there’s no short way to explain it.
That’s why this guide was made, to showcase all the equipment, skills, cards, alchemy bubbles and whatever else you might need to get the highest mining sample rates for your printer and bars for crafting.
The one good thing about mining is that most of the best mining related gear have fairly low level requirements, so you can get started quick! However, the biggest gains in efficiency come in later worlds, so you priority should always be to get the the latest World before trying to perfect your builds.

Mining efficiency, power and speed explained
Before you can get on your way to building the best miner Idleon has ever seen, you must understand how mining works and what factors increase mining efficiency.
In its basic form mining efficiency means how good you are at mining. The higher your mining efficiency is, the better ores you can mine and the more ores you get.
Mining efficiency increases through mining related stats and talents, including your STR points, mining power and mining skill level.
Mining speed increases your active mining speed as well as AFK ore and XP gains.
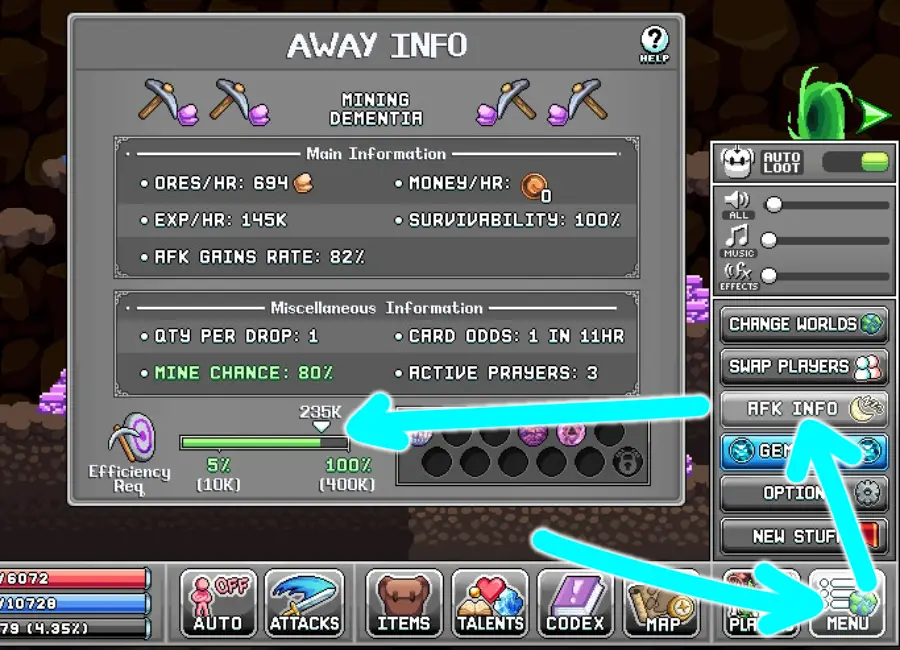
When you’re first starting out, when you mine a new rock and go to check your AFK Information at the bottom right, you might see a percentage from 0% to 100% and your progress bar somewhere in between.
For example in the image above, the characters mining efficiency is 235K, but a Dementia ore requires 400K for a 100% hit chance. This means the character will have an 80% chance to gain ores per hit, as shown by the ‘Mine Chance‘ text.
It is recommended that you only mine ores that you have 100% or higher efficiency on, as that way you will get more ores and more exp per hour.
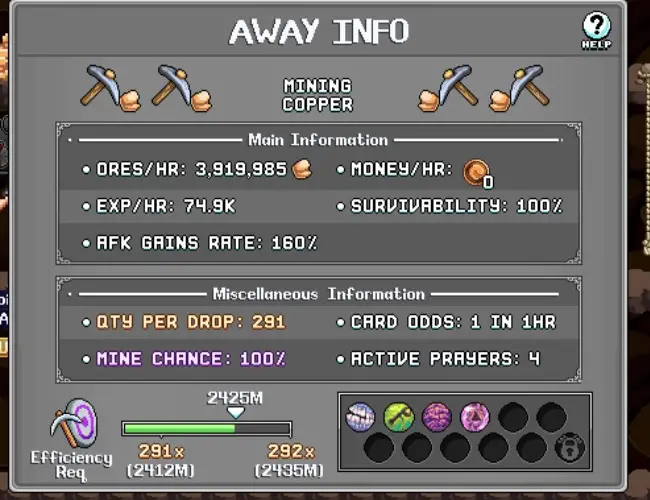
Once you gain more efficiency, you will gain more multipliers and eventually reach numbers multipliers like this:
As you might notice, the mine chance will not go over 100%, but you will start to gain efficiency multipliers, meaning all your gains will be multiplied by the shown number.
Note!
Summarized, your end goal is to get as much Mining Efficiency as possible by getting as much strength, mining power and mining speed as possible.

Class and talents for Mining in Idleon
Starting off with the obvious, which class should you pick? The obvious choice here is a Warrior, as it is the only class that has all the necessary mining related talents as well as the only class that can equip proper mining gear.

The second subclass doesn’t really matter too much, as all warrior sub-classes will get the needed mining statue boost and skill efficiency talents.
However, a squire also gets the Super Samples -talent, which will give a slight boost in your future samplings, so just for that, a Squire will be the best choice.
When it comes to talents, there are a few important ones that you should max out to boost your mining efficiency as much as possible.
 First Talent Tab (Beginner Skills)
Starting off with the first talent tab, the table below shows you what you need to level up and why. Put points in higher priority talents first and fill out the rest as you level up.
| Icon | Name | What? | Why? | Priority |
|---|---|---|---|---|
| Health Booster | Increases Max HP | The Hearty Diggy alchemy bubble gives more mining efficiency based on your HP. |  | |
| Star Player | Gives more Star Talent points | If you maxed out everything else, there are useful star talents to max out. |  | |
| Fist of Rage | Increases STR | More STR = Better mining power = Better mining???? |  | |
| Brute Efficiency | Increases Skill Efficiency | Self explanatory, huge boost to mining efficiency. |  | |
| Idle Skilling | Higher Skilling AFK gains | Get more ores and mining XP while you sleep. Higher sampling too. |  |
 Second Talent Tab (Warrior Talents)
Next up comes the second talent tab with Warrior specific skills, which are the main source of your mining efficiency. Some give more boosts than others, but together they make the biggest impact alongside alchemy bubbles.
| Icon | Name | What? | Why? | Priority |
|---|---|---|---|---|
| Health Overdrive | Boosts max HP by A LOT. | The Hearty Diggy alchemy bubble gives more mining efficiency based on your HP. |  | |
| Strength in Numbers | Boosts max HP based on STR. | Same as above, but this one gives less HP. |  | |
| ‘STR’ess Tested Garb | Equipment gives more STR. | STR gives more mining power. Better with late game gear. |  | |
| Absolute Unit | Straight up more STR ???? | Same as above. |  | |
| Haungry for Gold | Boosts golden food bonuses. | Golden peanuts give more mining efficiency and this boosts them. |  | |
| Big Pick | Boosts mining gains when equipped. | Gives massive bonuses once you have the Attacks on Simmer star talent and a few alchemy bubbles! |  | |
| Copper Collector | Boosts mining efficiency based on your Copper Ores in storage. | The biggest, best and most important talent for Mining Efficiency! MAX OUT FIRST! |  | |
| Motherlode Miner | Boosts mining gains when equipped. | Similar to Big Pick, sounds good but only slight increase to AFK mining gains. |  | |
| Tool Proeficiency | More mining power per mining level. | Increases mining power which increases mining efficiency. |  | |
| Tempestuous Emotions | Gives more Skill EXP. | Useful when starting out and need levels for new pickaxes. |  |
Here it is important to note that the usefulness of the max HP boosting talents depend completely on your Hearty Diggy alchemy bubble level, so if you haven’t levelled it up yet, you should prioritize other talents first.
The golden food bonus boost from Haungry for Gold bears a similar issue, as Golden Peanuts are very difficult to make and the talent gives a fairly low boost, so unless you have tons of peanuts, don’t prioritize it first.
As for the skill experience increase, while it’s prioritized the lowest, if you need quick mining levels, you can always reset your talent points later once you have enough levels.

 Third Talent Tab (Barbarian / Squire)
Next up is the third talent tab, so either Barbarian or Squire depending on your choice. The important talents are pretty much the same for both classes aside from the printer talent of Squire that we mentioned in the beginning.
| Icon | Name | What? | Why? | Priority |
|---|---|---|---|---|
| Fistful of Obol | Obols give more STR. | If you don’t have pure mining obols yet, these will give more STR from STR obols. |  | |
| Shieldiest Statues or Strongest Statues | Mining statue gives a higher bonus. | Get more mining efficiency from your Mining statues. |  | |
| STR Summore | Higher max level for Fist of Rage in 1st talent tab. (Gives more STR) | Get summore STR ???? |  | |
| Super Samples | Gives higher sample size for 3D Printer. (Squire only) | If you reached World 3, samples are important and this helps with ore samples. |  | |
| Back to Basics | Transfer talent points from third to second tab. | This tab doesn’t have that much use in skilling, so might as well use the points to fill up the crucial second tab! |  |
The third tab is the least important one when it comes to a beastly mining build, but getting more STR helps and the small boost from the statues in mining efficiency is decent once you get collect statues.
The obols boost is only useful if you use many STR obols, as they are easy to come by.

 Fourth Talent Tab (Blood Berserker / Divine Knight)
Finally the newest addition to the table, the third sub-classes. They came with one extremely important talent to boost skill efficiency, but there are a few that can be useful overall.
| Icon | Name | What? | Why? | Priority |
|---|---|---|---|---|
| Skill Strengthen | STR has higher impact on Mining Efficiency. Also adds some STR. | Fantastic skill, one of the best boosts to Mining Efficiency. |  | |
| Overblown Testosterone | Gives more total STR and higher max level for Fist of Rage. | Huge increase to STR ???? |  | |
| The Family Guy | Boosts Family Bonuses | Gives decent increase to all family bonuses which include HP, Skill Efficiency, STR and more. Needs high level characters. |  | |
| Symbols of Beyond | Every 20 levels of this boosts all other skills by 1 level. | Needs tons of points for very little boost, so not great but not useless like most others in this tab. |  |
There are two obvious winners in this tab, but The Family Guy talent has great potential. When you reach end game, you can gain huge bonuses from your family stats, so once you reach those numbers, this talent will have a huge impact. Below you can see some useful family boosts on an end game account.
 Best Star Talents for Skill Efficiency
Most of the useful star talents will already be familiar to you as they are the same for every class. However a few of them are very important for increasing your Mining Efficiency as well.
| Icon | Name | What? | Why? | Priority |
|---|---|---|---|---|
| Will of the Eldest | +1 to all stats per 10 levels of your highest character level. | Gives more STR. |  | |
| Tick Tock | Boosts AFK Gains rates. | Boosts AFK gains directly, very important! |  | |
| Attacks on Simmer | Boosts AFK Gains from Big Pick Talent | Big impact on AFK gains, once Big Pick is equipped in attack bar. |  | |
| Toilet Paper Postage | Skill Efficiency stamps give higher bonuses. | Good if you have high level stamps, otherwise unnoticeable. |  | |
| Frothy Malk | Foods give higher bonuses. | Boosts foods like Golden Peanuts and health potions, giving more Efficiency and HP. |  | |
| Printer Sampling | Higher sample rates. | Doesn’t affect mining efficiency or gains, but higher printing rates are always good. |  | |
| Supersource | Higher base Efficiency to all skills. | Base efficiency is great as all % based boosts are calculated from it. |  | |
| Action Frenzy | Higher speed for all skills. | Better mining speed = better gains! |  | |
| Ubercharged Health | Increase base HP. | Base HP is great, but this talent gives very little of it. |  |
Supersource and Action Frenzy affect your Mining Efficiency and speed directly, making them fantastic additions. You can buy both of the talents from the Party Dungeon Flurbo shop.
Frothy Malk is the third major buff which gives bigger bonuses when you have more Golden Peanuts and equip all the different HP potions in separate slots, which will all be boosted by this talent. This talent is dropped by Baba Yaga or Dr Defecaus minibosses, once you have at least one point in the 7th merit in the Blunder Hills (World 1) Merit Shop.

Best Mining Gear in Legends of Idleon
Once you’ve read through the talent explanations, you should start to understand what stats you are looking for and why they are useful when it comes to mining efficiency.
When it comes to equipment, there are tons of things you need to craft, but thankfully must of the important mining gear is quite easy to make and the rest can be made on the way while you get stronger.
Let’s first check out the first equipment tab with the basic gear from your helmet to the shoes, as well as the rings and pendant.
| Icon | Name | Important Stats | Source |
|---|---|---|---|
| Viking Cap (Helmet) | STR: +13 Mining Efficiency: +10% | Anvil Tab 2 | |
| Dirty Coal Miner Baggy Soot Pants (Pants) | STR: +7 Mining Efficiency: +5% | Anvil Tab 1 | |
| Cavern Trekkers (Shoes) | STR: +5 Mining Efficiency: +20% | Anvil Tab 2 | |
| Rough Rockers (Better Shoes at Level 110) | STR: +13 Mining Efficiency: +35% | Anvil Tab 4 | |
| Persephones Bouquet (Pendant) | STR: +1 Skill AFK Gain: +15% | Flurbo Shop (Party Dungeon) | |
| Serrated Rex Ring (Ring) | STR: +5 Skill Efficiency: +8% | Anvil Tab 1 (Recipe from Baba Yaga) |
There are is no mining specific chest armor or weapon, so for those just get the highest level equipment you can wear that gives the most STR for optimal efficiency.
There are two different shoes purely so you have something to wear until you reach level 110 and can start using the Rough Rockers instead.
Now let’s check out the second equipment tab by clicking the left arrow at the bottom of the current equipment tab, to see your special chains, trophy and wings.
| Icon | Name | Important Stats | Source |
|---|---|---|---|
 | Any premium hat with STR stones | STR: +25 (with 5 stones) | Gem Shop |
| Blunder Hero (Trophy) | STR: +5 Skill AFK Gain: +3% | Last Scripticus quest in World 1 | |
| King of Food (Better Trophy) | STR: +10 Food Effect: +20% | Picninc Stowaway Quest (30 times) | |
 | Gilded Efaunt Dislodged Tusks (Cape) | STR: +15 Skill Efficiency: +10% | Nightmare Efaunt |
 | Angel Wings (Better Cape) | All AFK Gain: +11% | Gem Shop ($20 USD Pack) |
| Time Candy Chain (Tier 3 Keychain) | All AFK Gain: +2-5% | Dungeon Loot or Flurbo Shop | |
  | Any premium ring with STR stones | STR: +15 (with 3 stones) | Gem Shop |
As you can see, the second equipment tab relies a lot on the Gem Shop and rare drops. Especially the capes, you will most likely not have any for a long time as the Efaunt Cape is an extremely rare drop.
As for the trophies, the King of Food trophy is very slow to get as you need to do the Picnic Stowaway quest to completion 30 times, which can only be done once a day. However the trophy is great as it boosts your Golden Peanuts as well as any health potions.
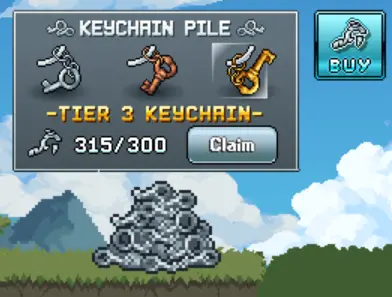
The Time Candy Chain can be obtained just by playing Party Dungeons, or bought from the Keychain Pile. Just remember you must buy a tier 3 chain to have a chance at the Time Candy keychain.
The reason why these chains are so great, is because you will boost their bonus even higher from the Lab chips in World 4.

Best Cards for a Mining Build in Idleon
Cards will give the most significant boost to your mining efficiency, especially with added lab boosts from chips.
Thankfully it is easy to get good base cards to start out with, then you can keep improving them as you go.
We split the cards to two section, the best and optimal cards first, then good replacements for any cards you don’t have in the second table.
World 4 Rift!
This means you should focus on cards that don’t give direct mining bonuses, like Skill Efficiency or HP bonuses.
Read more about it in our Rift guide!
Best Cards for a Mining Build
| Card | Name | Maxed Card Stats |
|---|---|---|
 | Amarok (Bosses & Nightmares) | +12% Skill AFK Gain Rate |
 | Chaotic Troll (Bosses & Nightmares) | +50% All Skill Efficiency |
 | Lustre (Hard Resources) | +25% Mining Speed |
 | Dementia (Medium Resources) | +20% Mining Speed |
 | Plat (Medium Resources) | +10% Mining AFK Gains |
 | Chocco Box (Events) | +20% Boost Food Effects |
You can clearly see why these cards are amazing for Mining Efficiency and why they’re better than the cards below.
Some of them are very hard to level up without paying for card bundles, like the Chaotic Troll Card, which is why you can pick any of the cards below to fill in.
Good alternatives
| Card | Name | Maxed Card Stats |
|---|---|---|
 | Void (Medium Resources) | +30% Total Mining Efficiency |
 | Iron (Easy Resources) | +25% Total Mining Efficiency |
 | Bunny (Hard Resources) | +5% Skill AFK Gain Rate |
 | Octodar (Hyperion Nebula) | +60 Base STR |
 | Loveulyte (Events) | +25% Total HP |
 | Frost Flake (Frostbite Tundra) | +35 Base STR |
Also remember to activate the Skill Efficiency card set bonus for a huge boost in mining efficiency.
Alternatively you can use the Food Effect bonus if you gain a bigger bonus from that.

Alchemy Bubbles and Vials for Mining
Alongside cards and skills, Alchemy Bubbles are the biggest difference maker in your mining efficiency and they are also the hardest ones to upgrade, requiring tons of materials and liquids to upgrade.
In fact many late game upgrades from Lab, Atom Collider and Sailing will make upgrading bubbles a lot easier, but even then they will be an endless grind as there are no max levels for alchemy bubbles.
The crucial bubbles that are optimal for you mining efficiency are as follows:
| Bubble Name | Cauldron Location | Effect | Upgrade Material | Priority |
|---|---|---|---|---|
Prowesessary |  Bubble #5 | Lowers Efficiency needed for skilling drop multipliers. This means more skill AFK gains! | Potty Rolls |  |
All for Kill |  Bubble #10 | Attack talents give more AFK gains than normal. Same as Attacks on Simmer. | Veiny Logs |  |
Roid Ragin |  Bubble #1 | More Total STR, so % bonuses don’t affect this. Cost also rises quickly so focus on this later. | Oak Logs |  |
Warriors Rule |  Bubble #2 | Orange passive bubbles (ones you don’t equip) give higher bonuses. | Spore Cap |  |
Hearty Diggy |  Bubble #3 | More mining efficiency per max HP. | Jungle Logs |  |
Wyoming Blood |  Bubble #4 | Multi-ore chance is increased. Huge bonus with with All for Kill bubble and Attacks on Shimmer talent. Remember to equip this one! | Fly |  |
Stronk Tools |  Bubble #8 | Pickaxes give more Skilling Power, aka more Mining Efficiency. | Platinum Ore |  |
Multorange |  Bubble #17 | Increases bonuses from bubbles #1 and #3. Level this after Warriors Rule bubble is high. | Half Eaten Donut |  |
Dream of Ironfish |  Bubble #18 | Higher mining AFK gains. Very hard to level up without tons of smithing points to make Tangled Cords fast. | Tangled Cords |  |
Shimmeron |  Bubble #19 | Higher Gold Food bonuses. Also very hard to level up but gives high % bonuses. | PVC Pipe |  |
Slabi Orefish |  Bubble #22 | More Mining Power per 100 items found in W5 slab. | Oozie Soul |  |
Slabi Strength |  Bubble #24 | More Base STR per 100 items found in W5 slab. Very hard to level up as OJ Juice is a rare drop. | OJ Juice |  |
As you might have noticed, some bonuses are A LOT better than others, but they all end up stacking up and every single one of these bubbles will end up improving your mining efficiency.
Start with the easy materials and once the costs get too high, focus on progression first as you will end up getting millions of materials a lot easier later in the game.
As for the vials there are only two important ones you really should focus on. You can check the effects of the other vials from our complete Vial guide.
| Vial | Effect |
|---|---|
Void Ore | Increase Mining Efficiency (1% per level) |
Pearler Shell | Increase all stats (0.5% per level) |
You can more than double these effects through Lab chips, which makes these vials worth maxing out once you start getting enough excess materials.

Optimal Obols for a Mining Build
Obols are probably the most painstaking way to increase mining efficiency, due to the fact that mining obols can only be obtained by luck from the alchemy store, from the shop items below:


However they’re crucial in squeezing the juices out of all the alchemy bubbles you spent ages leveling up, so here’s how you should set up your obols for your miner.
 |  |  | ||
 |  | |||
 |  | |||
 |  | |||
 |  |  | ||
 |  | |||
 |  | |||
 |  | |||
 |  |  |
It will take a long time before you can get this many mining obols from alchemy, so replace the ones you don’t have with STR or Dice (drop rate) obols.


You should also add the same obols to the Family Obols at least right before you take a printer sample to get the maximum boost.

Mining Efficiency from Cooking & Lab
When you reach World 4, you should be sitting most of your characters in the lab to get the massive bonuses from it, but once you get to World 5, you will be able to take them out thanks to the new Divinity skill.
Cooking certain meals will also give you grand skilling efficiency bonuses, but they will take a while to reach at first. Below are all the meals that will improve your Mining Efficiency:
| Meal | Effect | Spices Needed |
|---|---|---|
Corn (#7) | More skill efficiency. (+2% per level) |    |
Riceball (#28) | More skill efficiency. (+3% per level) |  |
Leek (#34) | More skilling prowess, same as Prowesessary alchemy bubble. This means less efficiency needed for skilling AFK gain multipliers. (+2% per level) |  |
Whipped Cocoa (#42) | More skill efficiency. (+4% per level) |  |
As you might notice the meal bonuses end up being huge, but the Corn meal will be the first one you can level up for quite a while, being the seventh meal you unlock.
The lab bonuses and gems on the other hand are a lot easier to unlock, but the Jewels can take a long time without spending gems in the gem shop.
Below are the main Lab Jewels and Lab Mainframe Bonuses that will help you the most with your Mining Build:
| Bonus / Jewel | Effect |
|---|---|
 Sapphire Navette | +3% All Stats |
 Certified Stamp Book | Doubles all stamp bonuses. |
 Spelunker Obol | 1.5x higher effects from all active Jewels. |
 Emerald Navette | +200 base mining efficiency and +10% skill speed. This bonus doubles if all 5 green jewels are active! |
 My 1st Chemistry Set | Doubles all Vials from alchemy. |
 Black Diamond Rhinestone | All meals give 1.16x higher bonuses. |
While the lab bonuses and jewels give out nice boosts to your mining efficiency and overall skilling, the chips are where the big difference is made.
Chips boost you cards, afk gains, skilling efficiency and much more, so it is crucial to get the most optimal chips as soon as possible.
| Chip Name | Effect |
|---|---|
Conductive Processor | +15% Skilling AFK Gain rate |
Galvanic Motherboard | +20% Total Skilling Efficiency |
Galvanic Processor | +250 Base Skilling Efficiency |
Silkrode Nanochip | Doubles bonuses of active Star Signs |
Silkrode Software | Doubles Misc bonuses of upper Keychain slot |
Silkrode Processor | Doubles Misc bonuses of Pendant |
Omega Nanochip | Doubles card bonus in top left slot |
Omega Motherboard | Doubles card bonus in bottom right slot |
The most important Lab Chips are the last two omega chips, as they double two of you cards, giving massive boosts in Mining Efficiency.


Galvanic Motherboards and Galvanic Processors are great replacements for any of the above chips and you can equip more than 1 of those on one character.

Stamps and Post Office for Mining Stats
While there are tons of stamps, you should focus on the mining efficiency related ones the most, as they will be the biggest difference makers for your mining build, while the STR bonuses are a nice buff but won’t have a huge difference early on.
| Stamp | Bonus | Cost |
|---|---|---|
 Heart Stamp (Combat Tab) | More base HP | Oak Logs |
 Vitality Stamp (Combat Tab) | More base HP | Snake Skin |
 Blackheart Stamp (Combat Tab) | More base HP | Purple Screw |
 Fist Stamp (Combat Tab) | More STR | Bleach Logs |
 Violence Stamp (Combat Tab) | More STR | Dementia Ore |
 Maxo Slappo Stamp (Combat Tab) | More STR | Maple Logs |
 Stat Graph Stamp (Combat Tab) | More all stats (so also more STR ????) | Mystery Upgrade Stone I |
 Pickaxe Stamp (Skills Tab) | More base Mining Efficiency | Oak Logs |
 Twin Ores Stamp (Skills Tab) | Higher Multi-Ore Chance | Thief Hood |
 Cool Diggy Tool Stamp (Skills Tab) | More base Mining Efficiency | Iron Hatchet |
 Multitool Stamp (Skills Tab) | More efficiency for all skills. | Dust Mote |
 Potion Stamp (Misc Tab) | More bonuses from normal foods. (Eg. health potions) | Icing Ironbite |
 Golden Apple Stamp (Misc Tab) | More bonuses from Gold foods. | Golden Nomwich |
Alongside stamps, the Post Office in World 2 will give nice bonuses once you have 400 points to put into a few boxes that will increase your mining efficiency, HP, food effects and other important stats.
Below are the Post Office boxes that you should focus on maxing out.
| Box | Max Bonuses (at level 400) | Priority |
|---|---|---|
 Dwarven Supplies | +33% Mining Efficiency +29% Prowess Effect +9.47% Mining AFK Gains |  |
 Locally Sourced Organs | +201 Base Max HP +37.5% Max HP +18% Faster Respawns |  |
 Carepack From Mum | +15.3% No consume food chance +19.6% Health Food Effect +18% Power Food Effect |  |
 Myriad Crate | This crate has max level of 100,000! At level 400 you get: +7.84 Base All Stats +14.78 Base All Efficiency +0.5% All Skills EXP At level 100,000 you get: +333.33 Base All Stats +833.10 Base All Efficiency +83.29% All Skills EXP |  |
 Gaming Lootcrate | +7 % afk counts for gaming +60 STR +5 % Total Damage |  |
It is good to note that you only unlock the Gaming Lootcrate from the Cloud Urn Sailing artifact, meaning it is an extremely late game unlockable.
On top of that it only gives quite a limited amount of extra STR, so it shouldn’t be a first priority.

Prayers, Shrines and Statues
There are a two important things that unlock when you reach World 3, including prayers and shrines. You shouldn’t confuse shrines with statues which are fairly similar to be fair.
First off there are two prayers that can be unlocked by reaching high waves in the Goblin Gorefest tower-defese mode.
Those prayers have a huge impact on skilling efficiency, but only one of them is easy to unlock, the other is extremely difficult to reach.
| Prayer | Effect | Source |
|---|---|---|
 Skilled Dimwit | Level 1: +30% Skill Efficiency -20% Skill XP Gain Level 50 (Maxed): +177% Skill Efficiency -118% Skill XP Gain |  Goblin Gorefest Wave 25 |
 Zerg Rushogen | Level 1: +5% AFK Gain Rate -12% Carry Capacity Level 20 (Maxed): +14.5 AFK Gain Rate -34.8% Carry Capacity |  Goblin Gorefest Wave 121 |
As you can see, reaching wave 25 is very easy, but reaching wave 121 requires almost maxed out towers and various other bonuses.
Thankfully the Skilled Dimwit prayer is the important one, but leveling it up to reasonable levels is going to require a lot of Forest Souls.
Alongside Prayers, you should definitely equip two of your shrines as well. You can build all the shrines from the World 3 construction table.
| Shrine | Bonus |
|---|---|
 Isaccian Shrine | Base: +12% Max HP and Total Defence Level up: +3% per level |
 Primordial Shrine | Base: +1% AFK Gain Rate Level up: +0.1% per level |
Once you reach World 5, the first Sailing artifact you gain allows you to place shrines on any World or map and still gain all the benefits with every character.
Finally, statues, one of the first bonuses you get in World 1, also end up being important for the rest of the game and the same goes for Mining Efficiency.
There are 3 obvious favorites when it comes to mining:
| Statue | Bonus | Bonus Levels | Best farming sources |
|---|---|---|---|
 Mining Statue | More Mining Power | Level 1: 0.3 Mining Power Level 50: 15 Mining Power | World 1 Trees |
 Health Statue | More base HP | Level 1: +3 HP Level 50: +150 HP | Some World 1 monsters (Amarok, Baba Yaga, Gigafrog, Wode Board, Walking Stick, Poop) |
 Feasty Statue | Higher bonuses from food | Level 1: +1% Food Effect Level 50: +50% Food Effect | Some World 3 monsters (Dedotated Ram, Neyeptune) |
Health and Feasty statues can be acquired from some other monsters as well, but the ones mentioned above are the most common farming locations.
It is good to note that a statue level 50 requires you to collect 437 statues and the bonuses aren’t massive, so you shouldn’t focus on farming statues too much.
There is no max level to statues and 50 was just a reasonable example, as the level up requirements increase exponentially. In fact, a level 100 statue needs a whopping 4400 statues collected.

Golden Foods and Potions for Mining
As you might have guessed from the amount of various food bonus increases and golden food mentions in the previous sections, there are a few foods you should consider equipping on your miner.
| Food | Bonus | Source |
|---|---|---|
 Golden Peanut | Increases Mining Efficiency | Smithing |
 Golden Jam | Increases Max Health | World 1 Colosseum, Picnic Stowaway Quest |
 Icing Ironbite | Increases Mining Speed by 15% | Smithing |
 Small Life Potion | Increases base HP by 30 | Blunder Hills Vendor (World 1) |
 Average Life Potion | Increases base HP by 120 | YumYum Grotto Vendor (World 2) |
 Decent Life Potion | Increases base HP by 250 | Frostbite Towndra Vendor (World 3) |
 Potent Life Potion | Increases base HP by 700 | Outer World Town Vendor (World 4) |
 Giftybread Man | Increases Mining Speed by 25% | Christmas Events (Giftmas Box) |
The reason why you need so many, even lesser potions is because you can only equip a single type of potion in one slot simultaneously.
If you have all slots filled, start by taking out the smallest life potions as they give the least bonuses.

Sailing Bonuses and Sigils
When you reach World 5, you will be shocked at how powerful the Sailing artifacts are, as they will give insane bonuses to all aspects of the game, skilling included.
We made a complete Sailing Guide which explains everything you need to know about unlocking these Artifacts!
| Artifact | Main Bonus | Ancient Bonus | Island Number |
|---|---|---|---|
Frost Relic | +30% Skill Efficiency | Double main bonus | #6 |
Chilled Yarn | Double Sigil bonuses | Double main bonus | #6 |
Fury Relic | +25 Max Talent Book Level | Double main bonus | #9 |
Cloud Urn | Unlocks the gaming box which gives +60 STR at max level. | Chance for double PO box | #10 |
Socrates | +10% All Stats | Double main bonus | #14 |
Thankfully you will have the easiest time unlocking Frost Relic which has the biggest increase in Mining Efficiency out of all of the artifacts.
Chilled Yarn doubles sigil bonuses which is also a great deal if you have progressed far enough with Alchemy Sigils.
When it comes to World 2 Sigils, they’re extremely slow to progress through, but there are two significant ones especially once quadrupled by Chilled Yarn.
| Sigil | Base Bonus | Boosted Bonus | Ancient Chilled Yarn |
|---|---|---|---|
Big Muscle | +10 Base STR | +20 | Normal: +40 STR Ancient: +60 STR |
Emoji Veggie | +10% Golden Food Bonus | +25% | Normal: +50% Ancient: +75% |
Dream Catcher | +1% Skill AFK Gain Rate | +2% | Normal: +4% Ancient: +6% |

Rift Bonus to Skilling
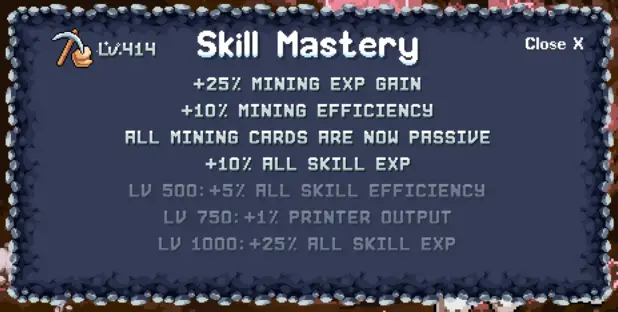
Rifts give various bonuses to all aspects of the game and the on that has a massive effect on all skills, including Mining, can be unlocked by reaching Rift 11.
This will unlock the Skill Mastery bonus, from which you will receive massive boosts to all skill efficiency as well as XP and other buffs.
Your characters combined Mining Level will boost the Mining Mastery and as you can see from the image below, the bonuses are great.
The biggest booster is making all the Mining Cards passive, which means you don’t need to worry about equipping them, just focus on leveling the cards up.
Remember lab!

Maestro is the icing on the cake!
Finally, after everything you’ve read through, one of the most important factors to take into consideration is the second Journeyman advancement, Maestro.
If you don’t have one yet, we made a complete guide on how to unlock Maestro!
Maestro comes equipped with one extremely crucial talent, the Right Hand of Action, more commonly known as the right claw.
| Talent | Bonus | Bonus Amount |
|---|---|---|
 The Right Hand of Action | Higher skill efficiency for all other characters, if their skill level is lower than Maestro’s. | Talent Level 100: +75% Skilling Efficiency Talent Level 200: +100% Skilling Efficiency |
As you might notice from the skills description, it is in your best interest to always keep every characters skill levels below your Maestro’s, as otherwise they won’t be receiving this massive efficiency boost.
In general, once you have the highest possible skill specific gear, refrain from leveling up your skills on other characters and only take printer samples with them.
If you must do a lot of skilling before unlocking the 3D Printer, make sure to always use the Skilled Dimwit prayer to minimize XP gains at later levels.

